
It's that time of year again- time for the the Self Challenge. This year they're calling it the Self Drop 10 Challenge, and they have all the tools you need to lose 10 pounds in 5 weeks. This program is free, and anyone can sign up. They offer a variety of meal plans and workouts to help you lose weight, but still feel satisfied. This interval workout is intense, and challenges me in new ways. Normally I do 3 sets of 16 reps when doing strength training exercises, but with this workout you do 20 seconds of the exercise, then rest 10 seconds, and repeat 8 times. So you end up doing more, yet those short intervals seem manageable. After I complete the interval workout I do another hour or so on the elliptical, or add some other type of cardio exercise to increase the calorie burn. I alternate the interval workout with less challenging workouts six days a week, with one day off to rest.
I've joined the Challenge for the last 10 years or so, and every year I've managed to lose any extra weight I've gained over the winter and tone up in time to slip back into my bikini. And every year Self manages to challenge me in new ways. Follow the plan and you WILL lose weight!
-Michelle of CreativeCritters
Thursday, March 31, 2011
Wednesday, March 23, 2011
Sharing a collection of Beautiful Handmade Flowers
I guess it was a good thing I enjoyed the nice weather while it was here, because it's cold and rainy today. To cheer myself up I put together a collection of beautiful and colorful handmade flowers from some of the very talented artists on ArtFire. I hope these brighten your day as well!
Whatever your weather, have a wonderful day! =)
-Michelle of CreativeCritters
Whatever your weather, have a wonderful day! =)


-Michelle of CreativeCritters
Tuesday, March 22, 2011
Spring means flowers, in the garden and in my jewelry and sculptures
I've been planting flowers ever since I was a little girl, and sculpting them nearly as long. When I was little I would help Grampa plant annual flowers for Gramma each spring. She always had Marigolds, Irises, Lily of the Valley, Roses, Tulips, and many others. Flowers and Gramma have always gone together in my mind. While she never grew Orchids, she did love them. Whenever she had to stay in the hospital they would give her an Orchid with Sunday breakfast. I always loved that they did that, because that pretty little flower brightened her whole day. She always made sure to show me her Orchid, then had me take it home so I could enjoy it too. It wasn't until these earrings were actually complete that I realized I was sculpting one of Gramma's hospital Orchids.

And then there are Gramma's roses. These roses have survived drought, neglect, and being dug up by the plumbers. I couldn't believe it when I saw the plant pushing through the hard clay soil last week. Like Gramma, these flowers are survivors! After all the plumbing work was done a few years ago I found a little sprout and transplanted it to a better location. Gramma was so happy to hear that at least one plant had been spared and might have a chance to grow again. But when I saw that rose coming up in the area that had been destroyed (not the piece I transplanted, but the original rose plant), it brought tears to my eyes. Gramma's been gone for almost a year now, and that rose just reminded me of how strong she had been for 93 years. I feel Gramma's spirit in those flowers, which is just one of the reasons I tend them so lovingly. This sculpture was inspired by Gramma's roses, as well as the yellow roses I had in my own garden.
With Spring coming I've been thinking more and more of Gramma, and missing her very much. She always loved Spring, and for her birthday in April I would always pick her a bouquet of Daffodils and Tulips, some of the first flowers to bloom in her yard. She'd have me put the vase right where she could see it while she sat in her chair, and sometimes those flowers lasted so much longer than they should have. Maybe they knew how happy they made Gramma. While I was living with her I always showed her my sculptures after they were done. She really liked this one
.
Her only complaint about Tulips was that they didn't last long enough. She said with this sculpture they'd never drop their petals ;-) I still miss her every day, but little reminders of her are sprouting all over as the days grow warmer. And she'll continue to inspire my work, just as she's done since I was little. Thanks for sharing some very special memories of Gramma with me.
-Michelle of CreativeCritters
Friday, March 18, 2011
How to turn an old drawer into a raised bed for plants
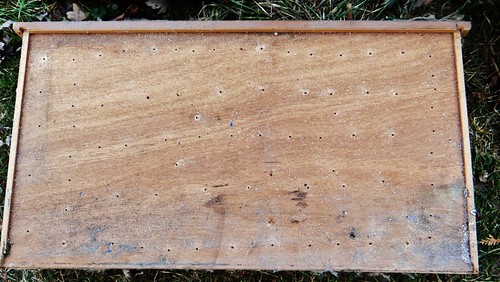
I'm very good at recycling and finding new uses for old things- it just comes natural to me. While I was cleaning the basement I came across an old drawer (the dresser it came from is long gone). The lettuce I started from seed under florescent lights was just about ready to be planted outside, so I thought the drawer would make a very nice raised bed. One problem I often have with my early spring crops is that it's usually too wet to get out to the garden and get them planted at the right time. Usually I end up waiting until the garden dries up, and that shortens the time I have to harvest the lettuce before it goes to seed. This year, by using the drawer as a planter, I can have the lettuce close to the house, and even move the planter around as needed. This is what I started with.

Then I drilled holes in the bottom for drainage (otherwise the water would just sit in the bottom and the roots would end up rotting).
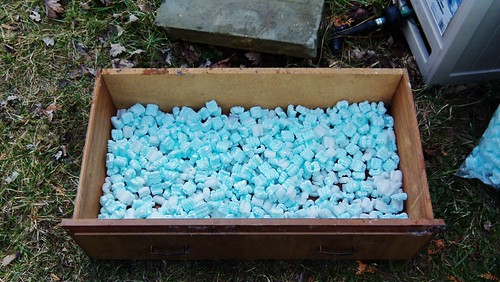
Then, to improve drainage further and make sure the potting soil won't block the holes, I added a layer of styrofoam packing peanuts. I've used this method before in a variety of other planters and it's worked quite well for me.
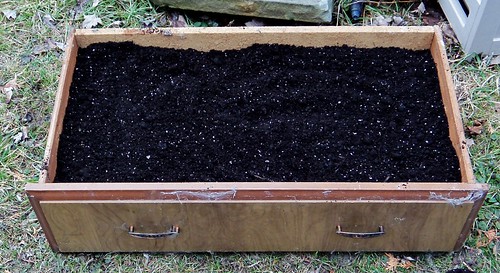
Then I filled the drawer almost to the top with good quality potting soil. Add the soil slowly or you'll have packing peanuts flying all over the place! And a windy day isn't the best time to work with packing peanuts outdoors either ;-)
Then I added the lettuce- a variety of loose leaf and semi head lettuce (Buttercrunch is my favorite!). I added potting soil around the plants as needed and gently firmed the soil around them. I made sure the plants would have enough room to grow too.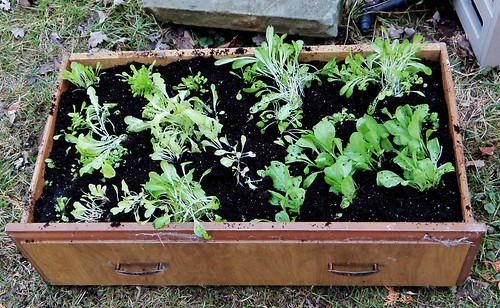
After I gently watered the plants I used two row cover supports and covered the whole thing with a lightweight row cover, attaching it to the drawer with clothespins and plastic spring clamps. The row cover serves a few purposes: it keeps animal from eating or digging up the lettuce (and I've got all sorts of critters in my yard who would love a nice fresh salad!), and it protects the plants if the temperature drops below freezing.
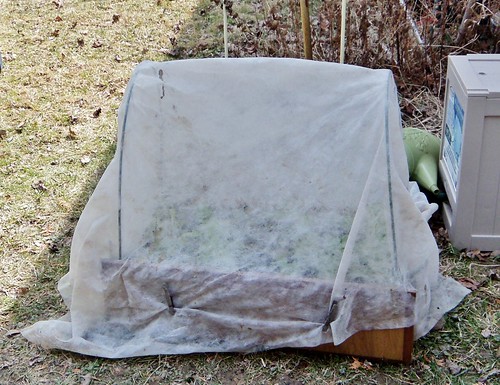
Lettuce does quite well in cool temperatures, and so long as it's protected from actually freezing, it can handle pretty low temperatures. I used the same row covers one year when the temps were down to about 27 one spring, and not a single plant was damaged. Within a few weeks I should be eating nice fresh salad from a drawer- LOL! Happy gardening! =)
-Michelle of CreativeCritters
Then I drilled holes in the bottom for drainage (otherwise the water would just sit in the bottom and the roots would end up rotting).
Then, to improve drainage further and make sure the potting soil won't block the holes, I added a layer of styrofoam packing peanuts. I've used this method before in a variety of other planters and it's worked quite well for me.
Then I filled the drawer almost to the top with good quality potting soil. Add the soil slowly or you'll have packing peanuts flying all over the place! And a windy day isn't the best time to work with packing peanuts outdoors either ;-)
Then I added the lettuce- a variety of loose leaf and semi head lettuce (Buttercrunch is my favorite!). I added potting soil around the plants as needed and gently firmed the soil around them. I made sure the plants would have enough room to grow too.
After I gently watered the plants I used two row cover supports and covered the whole thing with a lightweight row cover, attaching it to the drawer with clothespins and plastic spring clamps. The row cover serves a few purposes: it keeps animal from eating or digging up the lettuce (and I've got all sorts of critters in my yard who would love a nice fresh salad!), and it protects the plants if the temperature drops below freezing.
Lettuce does quite well in cool temperatures, and so long as it's protected from actually freezing, it can handle pretty low temperatures. I used the same row covers one year when the temps were down to about 27 one spring, and not a single plant was damaged. Within a few weeks I should be eating nice fresh salad from a drawer- LOL! Happy gardening! =)
-Michelle of CreativeCritters
Wednesday, March 16, 2011
A treasure box guarded by dragons
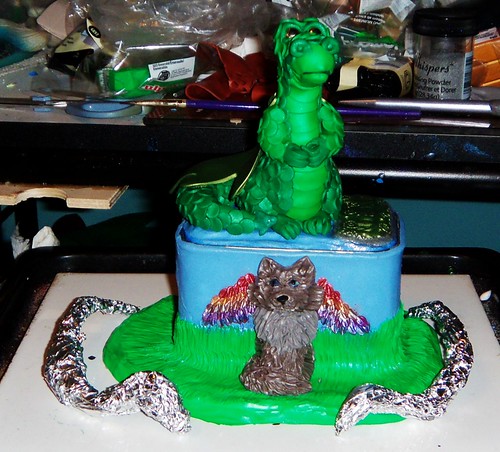
I managed to finish the Dragon trinket box I've been creating for my best friend's son. It's now ready to be shipped for his birthday. This piece took MANY hours to complete (all those scales were cut out one by one and carefully attached to each dragon), but it was totally worth the effort. After I finished sculpting Mother and Father dragon, I went to work on Baby Dragon. His scales are blue and green, a combination of his mother and father, of course! Each dragon is a unique individual though, with their own personality ;-) 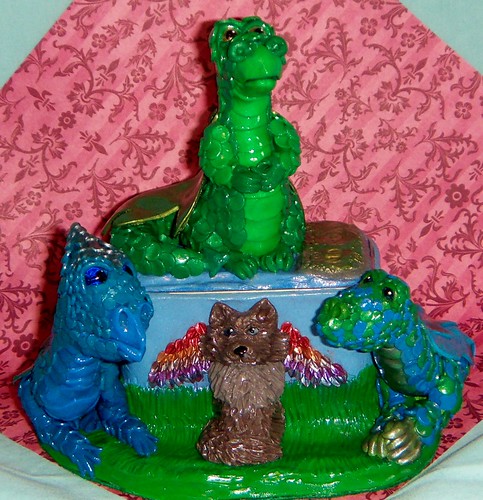
I used blue glass beads for his eyes and rubbed silver Pearl Ex powder on his belly scales, wings, and claws. The dragons are just hanging out with their friend the Dragon Kitty, and guarding all the treasures that might be in the box.
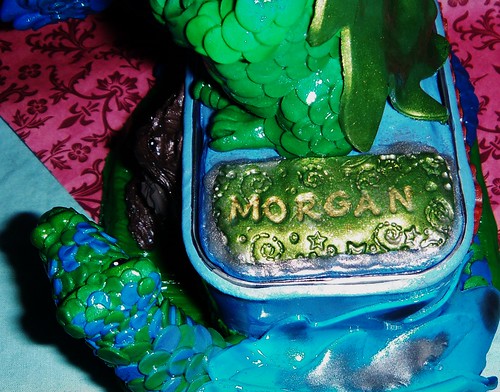
I stamped Morgan's name on the lid to make it even more personalized and special.
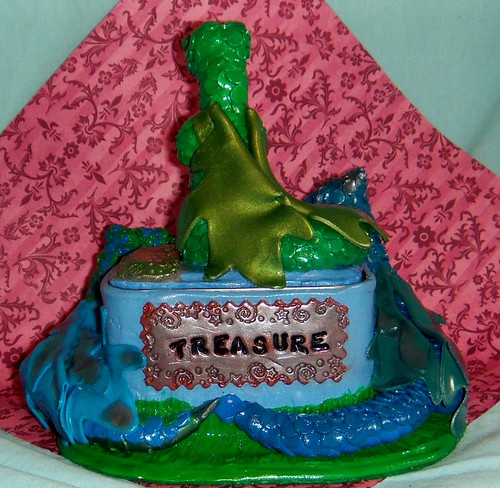
On the back I added a plaque with the word "treasure" stamped on it. All of Morgan's extra special treasures will be well protected by this family of dragons! I only wish I could be with him when he opened it up. Unfortunately Monica and her family live out of state, and I don't get to see them nearly as often as I'd like. Special gifts like these bring them a little closer though, and they'll always be able to look the gifts I've made them and think of me. I hope all the love I put into this comes through every time Morgan looks at this special treasure box! Thanks for coming along on another creative journey!
-Michelle of CreativeCritters
I used blue glass beads for his eyes and rubbed silver Pearl Ex powder on his belly scales, wings, and claws. The dragons are just hanging out with their friend the Dragon Kitty, and guarding all the treasures that might be in the box.
I stamped Morgan's name on the lid to make it even more personalized and special.
On the back I added a plaque with the word "treasure" stamped on it. All of Morgan's extra special treasures will be well protected by this family of dragons! I only wish I could be with him when he opened it up. Unfortunately Monica and her family live out of state, and I don't get to see them nearly as often as I'd like. Special gifts like these bring them a little closer though, and they'll always be able to look the gifts I've made them and think of me. I hope all the love I put into this comes through every time Morgan looks at this special treasure box! Thanks for coming along on another creative journey!
-Michelle of CreativeCritters
Tuesday, March 15, 2011
The Aerobarre Workout- add weights to ballet and boxing moves for total toning
This workout video comes from Self.com and adds intensity to traditional ballet and boxing moves for a killer total body toning and cardio workout. This workout requires a 9- to 12-pound body bar for the ballet moves and 1- to 2-pound dumbbells for the boxing sequences. Do two sets of the indicated reps per move, followed by two-minute rounds of jabs and uppercuts, three times a week on nonconsecutive days. I don't have a body bar, so I substituted a pair of 5 pound hand weights and a broomstick for the moves that used the bar for balance. This workout is not only effective, but tons of fun! I love boxing for releasing the stress of the day, and if I'm mad at anybody, I just imagine their my target- LOL!
Listen to your favorite high energy music during this workout and not only will you tone and tighten every muscle in your body, you'll burn tons of calories and have a blast doing it!
-Michelle of CreativeCritters
Listen to your favorite high energy music during this workout and not only will you tone and tighten every muscle in your body, you'll burn tons of calories and have a blast doing it!
-Michelle of CreativeCritters
Sunday, March 13, 2011
Work on Morgan's Dragon Trinket Box continues
Morgan is my best friend's son, and he has a birthday coming up this month. I've been sculpting a very special polymer clay Dragon Trinket Box for him since he loves dragons. Father dragon is complete, and I decided to add a Dragon Kitty to the box next. That's what Morgan calls Calcifer: "Aunt Michelle's Dragon Kitty". So I thought the Dragon Family should be visiting with their friend and neighbor, Dragon Kitty. I gave him iridescent wings and fluffy gray fur. I think Calcifer would approve of these wings ;-)
Next I started sculpting the Mother Dragon. I chose to make her in shades of blue. I covered the foil armature with scrap clay, then began adding the underbody plates, which I cut out with a diamond shaped clay cutter.
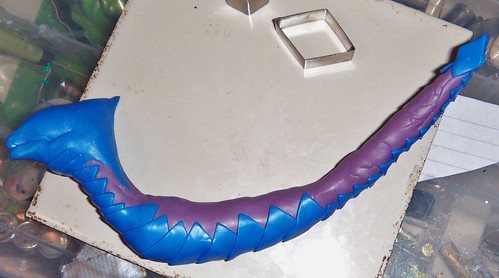
Then I started adding blue scales. I sculpted the legs, covered them with scales, then attached them to the body, adding more scales to help secure them. I didn't use any wire armatures for the legs because they'll be firmly attached to the base, and have little chance of breaking.
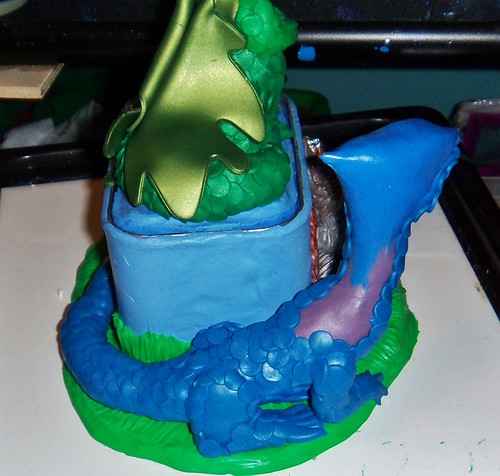
Once I covered her body and head in scales I added wings, which I made sure to press close to the body and box. This lessens the chance of them breaking. I also used blue glass beads for her eyes and highlighted her wings and head with silver Pearl Ex powder.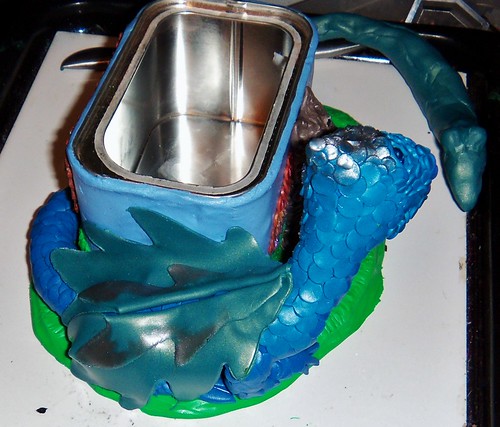

You can see that I've started covering the baby dragon's armature in clay. But we'll save his construction for another day. So far I'm very happy with the progress of this piece. I think Morgan will really like it too. Stay tuned to see how this project turns out!
-Michelle of CreativeCritters
Next I started sculpting the Mother Dragon. I chose to make her in shades of blue. I covered the foil armature with scrap clay, then began adding the underbody plates, which I cut out with a diamond shaped clay cutter.
Then I started adding blue scales. I sculpted the legs, covered them with scales, then attached them to the body, adding more scales to help secure them. I didn't use any wire armatures for the legs because they'll be firmly attached to the base, and have little chance of breaking.
Once I covered her body and head in scales I added wings, which I made sure to press close to the body and box. This lessens the chance of them breaking. I also used blue glass beads for her eyes and highlighted her wings and head with silver Pearl Ex powder.
You can see that I've started covering the baby dragon's armature in clay. But we'll save his construction for another day. So far I'm very happy with the progress of this piece. I think Morgan will really like it too. Stay tuned to see how this project turns out!
-Michelle of CreativeCritters
Saturday, March 12, 2011
RMdesigns- beautiful and unique jewelry
Becky, of RMdesigns on ArtFire.com is a self taught artist and a member of the Tippecanoe Art Association. She says "As an artist I dare to be different, use my creativity and believe in myself. I think these feeling show in my creative design". Making jewelry has been a passion of hers for over 10 years. She says "I love when the piece that I am working on starts to take on a life of it's own. Semi-precious stones and wireworking just seem to go hand-in-hand. As does soldering and vintage pieces." Become a fan of RMdesigns on Facebook, and keep up with her latest work! Below are a few of my favorite jewelry pieces from her shop.


Her shop is just full of beautiful and unique jewelry, so be sure to stop in and find a few favorites of your own!
-Michelle of CreativeCritters
Her shop is just full of beautiful and unique jewelry, so be sure to stop in and find a few favorites of your own!
-Michelle of CreativeCritters
Friday, March 11, 2011
My cat ate my headset!
Calcifer has always been a chewer, but I think all the upheaval with cleaning the basement and moving things around has stressed him out lately. I've noticed him chewing on more things the last few days- everything from my exercise bands to the edge of the carpet. I didn't see him jump up next to the computer, but I did catch him with the cord of my headset between his teeth! And he KNEW he was doing something very bad, because the second he realized he'd been caught he raced downstairs and hid for half an hour. Hopefully I can fix the cord with some electrical tape, but I'm definitely going to have to break him of the habit of chewing on cords. I do not want my kitty electrocuted! As soon as I can I'll get some Bitter Apple spray and spray all the cords around the house, as well as anything else I don't want him gnawing on. It worked to break my dog from chewing on the furniture years ago, so hopefully it will work on Calcifer as well. His attempts to apologize were pretty funny though. He was all sweet and cuddly, and sat on my lap for more than an hour. I think I've got the house pretty much back to normal, so maybe he won't be as naughty now that things are the way they should be (in his eyes at least). I swear he's just like a kid: he acts out to get attention, but doesn't like getting yelled at. He's very intelligent though, so I think I can train him out of chewing on the wrong things. I "donated" one of my exercise bands as a chew toy and gave him lots of praise when he chewed on that. I've been able to teach him to sit and stay, along with a few other things. I'll spend a little extra time playing with him too, so he'll burn off some of that excess energy. There's usually a reason why our pets do the things they do. It's up to us to figure out what the issue is and try to fix it. Usually Calcifer's pretty well behaved though.
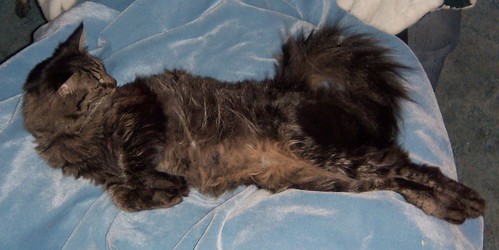
Looks innocent, doesn't he? Even when he's a bad boy, I still love him!
-Michelle of CreativeCritters
Looks innocent, doesn't he? Even when he's a bad boy, I still love him!
-Michelle of CreativeCritters
Monday, March 7, 2011
Work in progress- a Dragon trinket box for Morgan
My best friend's son, Morgan, has a birthday coming up in a few weeks and I've started making him his own dragon trinket box. The last time they were here he saw the one I have for sale in my shop and just loved it.

This one's a bit delicate for a child, but I think Morgan will like the one I'm making him. Like most of my trinket boxes, this one started out with a metal coffee tin, which I covered in Tacky glue (that helps the polymer clay adhere to the metal box). For this one I added a cardboard base, also covered in glue.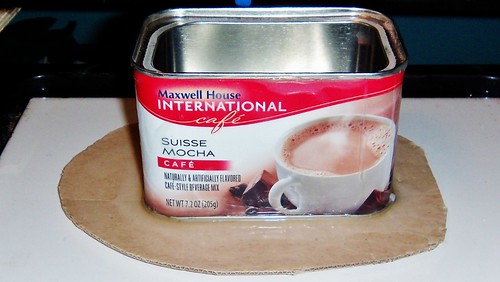
Then I covered the tin in blue clay and the base in green clay, which I textured to look like grass.

Next I made foil armatures for each of the three dragons. By using a foil armature I can create a stronger sculpture and use less clay.
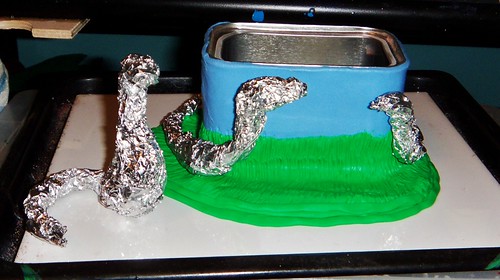
The one on the left will be the father dragon, and he'll be on the lid. The middle one will be the mother, and the one on the right will be the baby. For the lid I cut 2 rectangles from sheets of clay, sandwiching a wire between the layers and leaving about 2" of wire sticking up in the middle of the lid. I pierced the dragon armature and used liquid polymer clay on the wire and in the hole to secure him to the lid.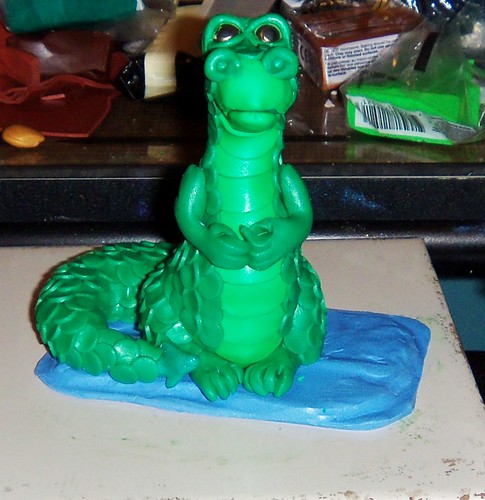
Here's Daddy Dragon after being attached to the lid. I cut out each of his scales individually. Here you can see how he looks before he has all his scales on.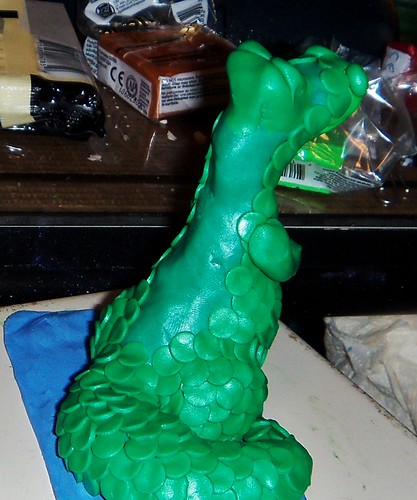
I'm giving these dragons more of a cute look, since they're for a child. And I'm making them in shades of blue and green, because Morgan said that good dragons are blue and green, and mean dragons are red (wouldn't want to give him a trinket box with mean dragons on it!). Stay tuned to see how this one turns out!
-Michelle of CreativeCritters
This one's a bit delicate for a child, but I think Morgan will like the one I'm making him. Like most of my trinket boxes, this one started out with a metal coffee tin, which I covered in Tacky glue (that helps the polymer clay adhere to the metal box). For this one I added a cardboard base, also covered in glue.
Then I covered the tin in blue clay and the base in green clay, which I textured to look like grass.
Next I made foil armatures for each of the three dragons. By using a foil armature I can create a stronger sculpture and use less clay.
The one on the left will be the father dragon, and he'll be on the lid. The middle one will be the mother, and the one on the right will be the baby. For the lid I cut 2 rectangles from sheets of clay, sandwiching a wire between the layers and leaving about 2" of wire sticking up in the middle of the lid. I pierced the dragon armature and used liquid polymer clay on the wire and in the hole to secure him to the lid.
Here's Daddy Dragon after being attached to the lid. I cut out each of his scales individually. Here you can see how he looks before he has all his scales on.
I'm giving these dragons more of a cute look, since they're for a child. And I'm making them in shades of blue and green, because Morgan said that good dragons are blue and green, and mean dragons are red (wouldn't want to give him a trinket box with mean dragons on it!). Stay tuned to see how this one turns out!
-Michelle of CreativeCritters
Saturday, March 5, 2011
My Entries for the Polymer Clay Smooshers Nature Challenge
The theme for the latest Polymer Clay Smooshers Challenge was Nature, which is a perfect theme for me! A lot of my polymer clay pieces have some element of nature in them. You'll find plenty of polymer clay plants, flowers, and animals in CreativeCritters! I wanted to create something a bit different for this challenge, and that's where Christi Friesen's new book Woodland Creatures comes into play. I had just gotten the book and couldn't wait to start in on the projects. In the book Christi has a project for creating Oak leaves and acorns, and another for sculpting a really cute squirrel. I ended up combining my version of the squirrel with a few Oak leaves, acorns, and some beads and came up with this unique and adorable necklace.

I've had so much fun playing with Pearl Ex powders lately! That's how I achieved the coloring and shine on the Oak Leaves. So my first entry in the Nature Challenge was my Squirrel Necklace, which was really fun to create. My next entry is a sculpture of St. Francis of Assisi, sometimes known as the patron saint of animals. Many years ago I sculpted a version of St. Francis (which unfortunately got broken), but this one turned out much better. Naturally St. Francis is surrounded by some of his animal friends, including two birds, a squirrel, and a wolf.

I can't think of a more perfect piece for me to enter in a Nature Challenge than this one!
There were many wonderful entries in this challenge, and all the amazing pieces can be viewed on the Smooshers blog. And while you're there be sure to vote for the theme for our next challenge (the poll is in the upper left corner of the page). Personally, I'm hoping Sci Fi will win (I've already got some cool ideas for Sci Fi entries!). Thanks for stopping by and voting for Sci Fi for our next challenge. ;-)
-Michelle of CreativeCritters
I've had so much fun playing with Pearl Ex powders lately! That's how I achieved the coloring and shine on the Oak Leaves. So my first entry in the Nature Challenge was my Squirrel Necklace, which was really fun to create. My next entry is a sculpture of St. Francis of Assisi, sometimes known as the patron saint of animals. Many years ago I sculpted a version of St. Francis (which unfortunately got broken), but this one turned out much better. Naturally St. Francis is surrounded by some of his animal friends, including two birds, a squirrel, and a wolf.
I can't think of a more perfect piece for me to enter in a Nature Challenge than this one!
There were many wonderful entries in this challenge, and all the amazing pieces can be viewed on the Smooshers blog. And while you're there be sure to vote for the theme for our next challenge (the poll is in the upper left corner of the page). Personally, I'm hoping Sci Fi will win (I've already got some cool ideas for Sci Fi entries!). Thanks for stopping by and voting for Sci Fi for our next challenge. ;-)
-Michelle of CreativeCritters
Friday, March 4, 2011
Free gifts can equal future sales
Sometimes people wonder if it's worth it to give free gifts with their orders. I now have definite proof that it is indeed worth it to give customers free gifts with their orders! Several months ago I got an order from Alisun's on ArtFire. Her shop banner and avatar have a sun in them, so I figured she would like a polymer clay sun magnet as a free gift. Whenever I can I like to suit my free gifts to the person receiving them. Alisun remembered that free gift and recently asked if I could make a bulk order of those suns, without the magnet.

Of course I was more than happy to fill this order! With all the rain and snow we've had lately, I needed a bit of sunshine- LOL! This is my first bulk order, but hopefully not my last. Something like these suns would make a great promotional gift for any business. They can be made into magnets or pins, and will make customers remember your shop. So if anyone else is interested in a few (or many) polymer clay shapes like this, just use the Contact Artisan button at CreativeCritters to send me a request. Thanks for stopping by!
-Michelle of CreativeCritters
Tuesday, March 1, 2011
The flooded Metroparks
I took a short break from cleaning the wet basement to check out the flood damage down in the Metroparks and get some pictures. All I can say is Wow! I've never seen the water from the river so high, and it had even gone down quite a bit since yesterday.
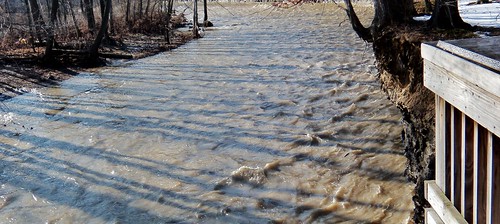

Normally you can walk across to the other side of the river here. You can see some of the trees and debris that have been washed down from farther up the river. I've never seen it flowing this fast and violently.
You can see that the walking path ends abruptly in water. The flood waters had covered the road as well. And the picnic area was still flooded. Now I know why the picnic tables have cables attaching them to the ground. I can see that they were still tossed around quite a bit.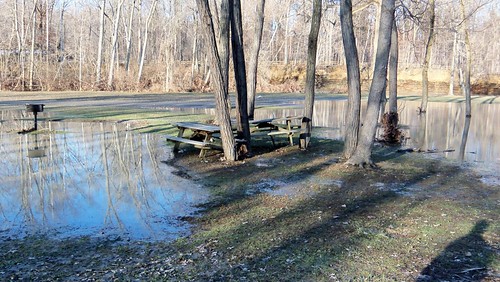
And there was a big log jam against a small bridge. This road is closed for obvious reasons!

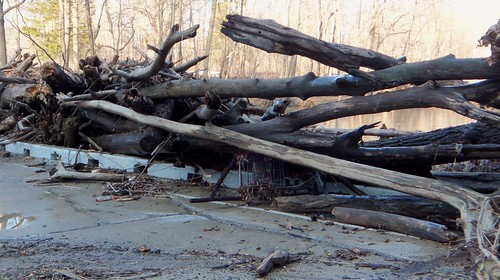
These are some big trees! The bridge was cracked from the force of all that water and debris. It will be really interesting to see how much the landscape has been changed once the water recedes back to normal levels. And now it's back to the basement, which is drying up slowly but surely. ;-)
-Michelle of CreativeCritters
Normally you can walk across to the other side of the river here. You can see some of the trees and debris that have been washed down from farther up the river. I've never seen it flowing this fast and violently.
You can see that the walking path ends abruptly in water. The flood waters had covered the road as well. And the picnic area was still flooded. Now I know why the picnic tables have cables attaching them to the ground. I can see that they were still tossed around quite a bit.
And there was a big log jam against a small bridge. This road is closed for obvious reasons!
These are some big trees! The bridge was cracked from the force of all that water and debris. It will be really interesting to see how much the landscape has been changed once the water recedes back to normal levels. And now it's back to the basement, which is drying up slowly but surely. ;-)
-Michelle of CreativeCritters
Subscribe to:
Posts (Atom)


