Sunday, October 20, 2013

Miniature Halloween Haunted House sculpture from CreativeCritters

Well, it's that time of year again- the time when I (along with so many others) am inspired to make some spooky Halloween creations.  I'd been tossing around the idea of a miniature haunted house sculpture for some time, and recently my ideas came together and I got to sculpting.
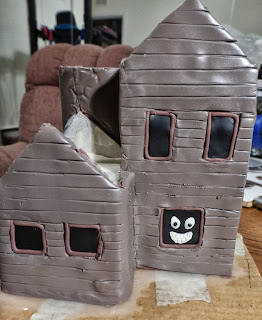
I used heavy cardboard for the base and to cut out the shapes of the house.  For the tower I used the tube from a roll of paper towels.  Everything was securely taped and glued together and then I wrapped the whole thing in black clay to make one solid piece and to make the windows look dark when I cut them out.  After I baked that it was easier to apply the walls of the house.  I cut out windows and the door and framed them with thin strips of clay.

Then I started having fun with the glow in the dark clay!  I made glow in the dark candle flames for the upper windows and made them resemble eyes and teeth.  I started the front porch and sculpted a door as well.  The ghost was sculpted from glow in the dark clay and is letting out a black cat with glow in the dark eyes.  For as tiny as he is (no more than 1/2" long) that cat took a long time to make!  It's not easy sculpting in such a small scale!
And this is what it looks like in the dark at this point.  Pretty cool, huh?
And this fun face in the back window was a suggestion from my boyfriend.  It's reminiscent of the Cheshire Cat from Alice in Wonderland, albeit slightly more spooky and evil looking, especially when it's glowing in the dark!
Then I started really getting into the details, adding a roof to the front porch, more spooky effects in the windows, and of course the resident skeleton.
All of the effects in the windows were sculpted from glow in the dark clay, as was the skeleton.
At this point I put the roof on, shingled the roof, and then added the large Oak tree at the back of the house.  The tree has a wire and foil armature ansd is securely attached to the base of the sculpture.  It looks somewhat delicate, but is really fairy strong and sturdy.
Spooky Glow in the Dark Miniature Halloween Haunted House Sculpture
I added a large glow in the dark full moon to the branches of the tree as well. Then  I added ivy climbing up the sides of the house along with red, yellow, and orange Maple and Oak leaves in the yard.
 Spooky Glow in the Dark Miniature Halloween Haunted House Sculpture
I also made three Jack O Lanterns with glow in the dark faces to decorate the front yard.  The whole thing looks pretty impressive during the day or at night!
You can click on any of the pictures to be taken to the listing and read more about this unique Halloween haunted house sculpture.  This took about three weeks to complete but I really enjoyed the process.  I wasn't just sure how it would come out until it was finished.  I must say, I'm really pleased with the results!  As with most of my work, this is another one of a kind creation. 

Thanks for joining me for yet another creative adventure!  Stayed tuned for more creativity- I've got plenty of new projects planned for the holiday season!
 ~Michelle of CreativeCritters

Wednesday, October 16, 2013

New Colorful Knit Dragon Joins the Menagerie at CreativeCritters

This colorful knit dragon is the latest addition to the menagerie of critters available from CreativeCritters.
I challenged myself to create a knitting pattern from scratch for a cute and brightly colored dragon.  I made it up as I went along, writing down what worked, and trying again when something didn't turn out quite as I wanted.  I learned how to follow a sewing pattern many years ago, and using that knowledge (and a lot of trial and error) I figured out how to make my own original patterns.  That's essentially how I made this guy.  I thought of the shapes I would need if I were to create a sewing pattern for a creature like this, then I figured out how to knit those shapes and sew them together.  It wasn't easy- that's for sure!  But I do enjoy a challenge, and I like testing and improving my artistic skills, so although it took a lot of time, I really had fun bringing this fantasy dragon to life,  I used bright purple (my favorite color) for his body, which I knit in a garter stitch.  I used a stockinette stitch and bright yellow yarn for the dragon's belly and the underside of his tail.
I gave him triangular spikes that were knit in bright red yarn.  I sewed all the various parts onto the dragon very securely and stuffed him with polyester fiberfill.  The wings were a bit of a challenge.  I considered creating knit wings, but really wanted them to be more lightweight.  I didn't want to have to use wires to help them hold their shape, as I've done with plush dragons in the past.  I wanted this to be a toy that kids could hugs and cuddle, without any sharp or hard parts.  So I decided to use red and purple felt (I just happened to have exactly the right colors in my fabric stash).  I drew out a wing pattern on paper and used that as my guide.  Then I sewed veins into the wings to give them more stability.
This cute stuffed animal measures about 15 inches long and 15 inches tall.  This guy's pretty special, and I hope when he sells he goes to a loving home.  Until then he can hang out here and make me smile =)  If you want to purchase this dragon, or read more details about him, just click on any of the pictures to be taken to the listing in my shop.
Thanks so much for stopping by!
~Michelle of CreativeCritters

Wednesday, September 25, 2013

The garden

Well Fall is here, and it seems like it showed up overnight.  The temps have fallen to "absolutely perfect", the monsoon rains have ended, and the humidity is approximately 0%.  The summer certainly was eventful, especially in the garden.

  Some plants had a rough start in the spring because the winds were just nonstop.  The cukes never really did get going too well, but I still managed to make 3 jars of pickles, and two plants look like they might revive a bit for Fall.  At first I thought the beans wouldn't be able to recover from the wind damage, but by late spring and early summer they were going strong and I've harvested more beans than ever before.

  We blanched a whole bunch of them last month, and will probably be able to do a second batch in a few weeks.  I only got a few beets, and the onions (planted nearby) didn't fare so well either- many of them have been rotten.  The monsoons were absolutely intense this year and one half of the garden (where the beets, cukes, and onions are planted) got flooded more than once even though the garden is higher than the surrounding area and has great drainage.  Then there was the hail with the one storm which tore up most of the leaves on the Butternut squash, zucchini, and yellow squash.

  It looks like we'll still have a pretty good harvest of Butternut squash though since the hail came after most of the veggies were big enough to handle it.

  We got a good crop of the zucchini and summer squash earlier in the season and were able to blanch and freeze enough of those to take us through winter.

 By the middle to end of the season though, the plants had just gotten too much water and the roots were rotting.  And of course the squash bugs took advantage of the weakened plants and further damaged them.  A few weeks ago I pulled up the ones that were too far gone, leaving just a few that may recover enough to give us at least a few more veggies.  Luckily tomatoes like rain and can handle some pretty tough conditions.  All the varieties we planted (yellow, pink, and 2 varieties of cherry) have done well, although they are ripening more slowly as the nights turn colder.

 The Bell peppers and mini Bell peppers are doing really well, as are the carrots, so I should be able to make at least one more big batch of my garden fresh pasta sauce (I basically throw in all the fresh veggies and herbs I can harvest and cook it low and slow all day long).

 The Japanese eggplants have just recently started producing, but they seem to be doing well.  I made a mouthwatering eggplant Parmesan the other night ;) 


The herbs and salad garden have fared quite well and I've had fresh salad every night for months now, along with plenty of fresh basil (made tons of pesto!), parsley, chives, scallions, oregano, and rosemary.

 Oh, and for the first time I got several REALLY good cantaloupe.

  Although the season is coming to a close we should have another couple of months before the first frost, so I imagine I'll be harvesting tomatoes, peppers, eggplant, salad, Swiss chard, carrots, and herbs at least until Thanksgiving.  This was my first year gardening in Arizona (I'm originally from Ohio) and while it has it's own unique challenges, I love this place and this was the most successful garden I've had.  Of course I've been saving seeds from everything I can (flowers included), so I won't even have to buy seeds next year.  Right now I'm planning on what to plant in the greenhouse.  I put the garlic in last week and some of it has already sprouted.  It takes hard work, dedication, and lots of sweat (especially when it's 115 degrees!), but nothing beats fresh herbs and veggies, grown organically and nurtured by your own hand. =)

~Michelle of CreativeCritters


Tuesday, September 3, 2013

Knit Blue Kangaroo now available at CreativeCritters

Over the last few years I've knit several different blue kangaroos for a variety of customers, but haven't had one listed in my shop as a regular item.  Most customers learned about my blue kangaroos from my Gallery of past work.  The last knit kangaroo I created was headed all the way to Australia!  I developed my own knitting pattern for these kangaroos and have adapted it several times over as I found new ways to improve the design.  I just listed this cute kangaroo in CreativeCritters today.  I'm not sure how long she'll last- they seem to sell pretty quickly!
I used soft and silky Homespun yarn in Montana Sky Blue for the body and Waterfall for the belly.  I really love Homespun yarn because it's so soft and has such a nice texture when you knit with it.  Anyone who does a lot of knitting or crocheting knows that it's a real pleasure to work with a good quality yarn, and of course it creates a very soft and cuddly stuffed animal.

For this particular kangaroo I completely revamped my old pattern and got pretty creative as I knit.  This is one of the reasons most of the items in my shop are one of a kind creations- I always seem to end up changing how I make them, even if I start out following a pattern.  I guess it's just the artist in me- LOL. 
This particular kangaroo ended up with a lot of personality!  Sometimes these things just sort of seem to happen on their own.  I had a general idea of how I wanted her to look, but really didn't know how she would turn out until I had most of the parts sewn on.  And as always, the true personality really came out once I added her eyes, nose, and ears. 
I used gray fleece fabric for the nose, which is lightly stuffed and securely sewn on.  I used the same fleece behind the eyes, which are black plastic safety eyes, making this safe for children.  I stuffed the kangaroo softly with polyester fiberfill, with the goal of keeping her very soft and cuddly.  Adults and children will both love giving this cute stuffed animal a big hug!  I may be all grown up myself, but I still love to cuddle up with a soft stuffed animal.  I think there are some things we just never grow out of!
If you're interested in purchasing this blue kangaroo just click on any of the pictures to be taken to the listing in my shop.  And if you're looking for something in a different size or color combination, just email me at macreativecritters@gmail.com with your request.  I can also create a variety of other stuffed animals.  If fact, I'm currently working on a knit dragon right now (and this is definitely a challenging project!).
Thanks for sharing the creative cuteness once again!
~Michelle of CreativeCritters

Friday, August 16, 2013

Completing the World of Warcraft Pandaren Wedding Cake topper

To see how this all started check out post one, two, three, and four in this series.  Here's the final installment of my work in progress posts for the World of Warcraft Pandaren wedding cake topper.  In the last post I showed you how I finished sculpting the pretty Pandaren bride.  The poor groom was still headless at that point, but here you can see what he looks like with a good head on his shoulders ;)
And here's a shot of what he looks like from behind.  I textured the eyebrows,  hair, and beard and gave him a topknot as well.
After a final smoothing the wedding cake topper was ready to be baked.  I baked this one all in one shot, rather than doing several short bakes before the final longer bake.  When I'm working with white clay I try to just do one bake since the clay can sometimes darken with multiple bakes.  And since I used foil armatures to fill the larger parts, rather than solid clay, baking the piece for an hour and letting it cool in the oven was completely sufficient.  After the sculpture was cooled I mixed pearlizing medium with high gloss glaze to add a pretty shimmer to the bride's dress.
I used acrylic paint to add the gray stripes under her eyes and painted her nose and both their mouths with black acrylic paint.  I also added shine to their eyes and noses with a coat of high gloss glaze.  The final touch was to seal the entire piece with several layers of matte glaze.  This helps protect the sculpture and makes it easier to clean.

This wedding cake topper measures about 4 1/2 inches wide and 6 inches tall and is actually quite lightweight, especially considering that Pandaren are very solid, thick creatures.


I'm very happy with the way this piece turned out and I hope to get the chance to sculpt more Pandaren, as well as other World of Warcraft characters, in the future.  I really enjoy creating wedding cake toppers because a wedding is such a special event, and the cake topper is a lasting reminder of that very important day in a couple's life.  And don't forget, I'll sculpt just about any character you've got pictures of, so just contact me at macreativecritters@gmail.com if you'd like me to create a customized cake topper for your wedding, anniversary, birthday, or other celebration.
Thanks for following another creative adventure with me!
~Michelle of CreativeCritters

Monday, August 5, 2013

World of Warcraft Pandaren Wedding Cake Topper Work in progress- the groom gets arms and the bride is completed


 Progress on the World of Warcraft wedding cake topper is moving forward and the sculpture is nearing completion.  To see how this all started check out posts one, two, and three in this series.  In the last post I showed you how I dressed the bride and groom , but neither had their arms or heads yet.  Now you can see how the Pandaren groom's hands and arms started out.  I used a wire armature bent into the proper shape and sculpted the gray and black polymer clay fingers and hands onto the wire.  They're still a little rough in this picture, but you get the idea.
Next I sculpted the arms and added cuffs to the black tuxedo jacket.  The cuffs also help secure the hands even more firmly to the arms.  I left enough wire sticking out of the shoulders to insert into the groom's body. 
I did the same thing with the bride's arms and managed to to arrange their arms so they were holding hands.  It took several tries to get this right, but I managed to achieve the look I wanted.  This is a very sturdy sculpture as well.  Not only do the arms have wire armatures but I also pressed them against the bodies wherever possible, forming one solid piece.
The next step was to sculpt the bride's head.  Although I've never sculpted a Pandaren before, my years of experience sculpting a variety of animals came into play and I was able to create a female Pandaren in polymer clay without too much difficulty.  I also had several good pictures to go by, which always helps.
Here you can see that I've added her hair, put a purple (polymer clay) bow in it, and inserted a pair of hair sticks.  I also added gray piping to her bodice and gray details to the shoulders of the dress.  The piping helps distinguish the white dress from her white flesh and the shoulder details not only add a bit of color but also help attach the arms even more firmly to her body.
And here you can see what she looks like from the back.  I used thin strands of clay to create her hair and styled it into a bun encircled with a gold band.  Making hair in this manner does take quite a bit of time, but I just love the way it looks- so much more natural than a sheet of textured clay.  At this point the sculpting phase is finished for the bride.  Once I'm finished sculpting the groom I'll bake the entire piece then do some detail painting. 
In the next post I'll finish sculpting my Pandaren groom and I'll be able to share the final cake topper with you.  Thanks for joining me in this creative World of Warcraft wedding cake topper adventure! ;)
~Michelle of CreativeCritters


Tuesday, July 30, 2013

Progress on the Pandaren Wedding Cake Topper: the Bride and Groom Get Dressed

To see how this all started be sure to check out the first two posts on this project at Making a Custom Order World of Warcraft Pandaren Wedding Cake Topper and Work in Progress (Pandaren Pants)

Work on the custom World of Warcraft Pandaren wedding cake topper has been coming along nicely and the Pandaren couple are now getting dressed in their sharp looking tuxedo and pretty white wedding dress.
Now that the groom's pants are complete I've started to add his jacket and belt.  This is the view from the rear.
And this is the view from the front.  As you can see, I've added lots of little details, including the white shirt under the tuxedo jacket, a black bow tie, and silver buttons down the center of the jacket.  I made the belt to resemble the picture that bride sent me as closely as possible.  All of this is done by hand using Premo polymer clay.
Once I completed the main part of the groom's tuxedo I attached the bride to the base, sculpted her feet in the same manner as I did the groom's, and used a thin sheet of white polymer clay to create the skirt of her wedding gown.  As with the groom, the bride has a foil and wire armature with the wire going through her feet and into the base.  All of my pieces are created with durability in mind.  I want my work to be around for years to come!
I used my fingers and a soft paint brush to create the folds I wanted and position the skirt exactly the way I wanted it to lay.  I smoothed the waist of the skirt onto her body in preparation for adding the bodice.  One reason I love Premo polymer clay is that you can roll it out very thin and it still remains strong and flexible.  When I make clothing like this I usually run the clay through my pasta machine on #4 or #5, which makes it very thin and easy to drape.  Of course it also takes a very light touch to avoid stretching or ripping the clay!
And here you can see I've added not only the bodice of the dress, but also sculpted a layer of white clay over the brown to create the Pandaren bride's skin.  I added a purple sash with a little bow at the waist as well.  In the next post you'll see how I add details to the bodice to make it stand out against her white skin.
And here's a slightly different angle.  You can see my laptop with the pictures I'm using in the background.  The bride sent me several good shots of the Pandaren couple, which made it much easier to include all these little details and reproduce the characters in clay.  I've also bent the wire for the arms of the bride and groom.  This next part is going to be a bit complicated because I want the couple to be holding hands.  It may sound easy enough, but it can be difficult to get each arm and hand positioned just right.  So be sure to check back and see if I can do it!
Thanks so much for sharing another creative adventure with me!

~Michelle of CreativeCritters