Showing posts with label tutorial. Show all posts

Wednesday, June 13, 2012

How to replace a missing crock pot lid handle

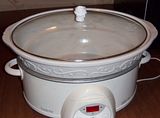
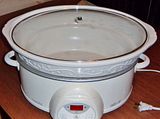
This weekend I got a really nice crock pot for just .50 from a garage sale.  The only thing wrong with it was that the handle for the lid had broken off.  This is pretty easy to fix, so I figured I'd do a little tutorial and show you one way to replace a missing or broken handle.  This would work on most types of lids.  Since I used polymer clay you wouldn't want to use this method for anything that goes into the oven or reaches temperatures above 275 degrees.
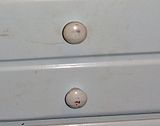
In preparation for my move I emptied out my old craft dresser, since I won't be taking it with me.  It has lots of nice wooden drawer handles that would make a good replacement for the lid handle.

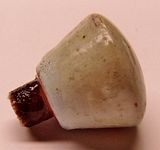
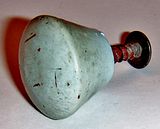
 I just removed one of the handles and covered it in Tacky glue.  This helps the clay stick to the wood better and reduces the chance of air bubbles under the clay. Since the screw was a little long I added a cardboard collar.  I used superglue to attach it to the drawer handle, then covered it in Tacky glue as well.
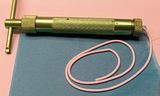
Then I covered the entire thing in a layer of white clay.  Once the clay was nice and smooth I used my clay extruder to make a long thin rope so I could add some swirls to the handle. 
 I added a flat disk of clay to the bottom along with some small dots, then baked the handle for an hour.  Once it was cool I applied three coats of high gloss glaze and attached the handle to the glass lid.  I figure it will have to stand up to a lot of handling, so the glaze should help protect it, and make it easy to clean. 
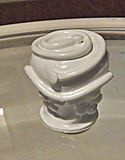
I cooked some chicken in the crock pot today and the handle stayed nice
and cool and is very secure (better than many I have bought from the store!).
So there's a fairly easy way to replace missing or broken lid handles.  You
can make them in colors and designs to match the pot, and if you don't
want to play with clay, you could just simply paint and seal a well fitting
drawer handle.  Not bad for a .50 cent garage sale find, huh? And this one
is WAY nicer than my old crock pot- it's bigger and you can set the time and
temperature, as well as switch from high to low at any point during cooking.                                                                                                                 

Friday, March 9, 2012

How to sculpt a cat pendant from polymer clay part 3 video tutorial

And here's the final video in my How To A Sculpt a Cat Pendant series.  You can find part 1 here http://www.youtube.com/watch?v=N2JXmTdGlig and part 2 here http://www.youtube.com/watch?v=vHZKTzuLAeg.  And of course you can always subscribe to my YouTube channel to keep up with all my newest tutorials and other videos.
Thanks so much for watching!  I hope you enjoyed this series, and if there's something you'd like to see me do a tutorial about, just leave me a comment! =)
~Michelle of CreativeCritters

Thursday, March 8, 2012

How to sculpt a cat pendant from polymer clay part 2 video tutorial

Here's part 2 of my 3 part video tutorial on  how to sculpt a cat pendant in polymer clay.  There's a link to part 1 in the video description, and you can also subscribe to my channel to keep up with all my tutorials.
Thanks for watching, and be sure to stop by for the final installment of this series!
~Michelle of CreativeCritters

Wednesday, March 7, 2012

How to sculpt a cat pendant from polymer clay part 1 video tutorial

I just finished uploading part 1 of my how to sculpt a cat pendant to YouTube and wanted to share it here as well.  I'll be uploading parts 2 and 3 in the next few days, so be sure to check back or subscribe to my YouTube channel so you don't miss any new tutorials.  Since I was sculpting a cat Calcifer figured he'd better supervise this project very closely.  Plus he just loves being on camera- LOL ;-)
 Thanks for watching!
~Michelle of CreativeCritters

Saturday, December 17, 2011

How To Make a Teddy Bear Christmas Ornament in Polymer Clay

Just in time for Christmas, I finished my first full length video tutorial on sculpting a cute teddy bear ornament wearing a scarf and Santa hat.  This is a fairly easy sculpture to make and only requires a small amount of polymer clay and a few basic tools.
2011
 
This bear is also available in my shop, just click the picture to be taken to his listing.
Thanks for watching!  Have a Merry Christmas and Happy Holidays!

~Michelle of CreativeCritters
Get CreativeCritters e-books from Smashwords and Amazon

Sunday, July 31, 2011

How To Knit Using a Round Loom

Loom knitting is fun and easy.  All sorts of things can be created using looms, including hats, sweaters, doll clothes, and stuffed animals.  I made this How To video to show beginners how to use these looms.  Different sized looms make different sized tubes.  Many of the knit stuffed animals found in CreativeCritters were made using various sized knitting looms.
When I first got my looms I had a hard time finding a good tutorial on exactly how to use them, which is why I made this video.  I hope it can help others learn this fun variation on knitting!
-Michelle of CreativeCritters

Thursday, April 14, 2011

Video Tutorial on How To Sculpt Roses in Polymer Clay

This three part video series will show you how to sculpt detailed realistic roses from polymer clay.  You can subscribe to CreativeCritters on YouTube to keep up with all my latest tutorials.
And when I finished these roses I created this pretty necklace and earring set.  I had Mother's Day in mind when I started sculpting these roses.  I knew I wanted to create pretty and feminine jewelry, and I really love the pastel pink mixed with the white beads.
Pink and White Polymer Clay Rose Memory Wire Necklace and Earring Set 
Of course you can do anything you like with your roses, and if you want them to have stems just use floral wire instead of the toothpick.  Bend a small loop at the end of the wire, coat it with Tacky glue, and form the rose bud around that.  Happy crafting! =)
-Michelle of CreativeCritters