Wednesday, July 25, 2012

New Beginnings

It's been a month since I last posted on here and in that time I left my emotionally abusive husband, cleaned out Gramma's house (it's still up for sale), packed up all my belongings, and moved myself and my two cats across the country to Arizona.  Hey, no baby steps for me- when I go to change something I do it BIG! LOL  Of course in all seriousness none of this has been easy, and none of this would have been possible without all the help and support I received from my family and friends.  So here I am in Prescott Arizona, starting all over again, which isn't a bad thing- I get one gigantic do over.  Marrying my husband was a mistake in the first place, and I was never truly happy in the marriage, although I desperately tried to convince myself otherwise.  He was a cruel and controlling man who did his very best to isolate me from my family and any friends I might have.  I may blog more about that part of life at another time.  Right now I'm still sorting through the last 16 years and wading through that emotional minefield.
I will tell you about the trip from Ohio to Arizona though.  Things worked out rather perfectly- my mom just rented the house in Prescott (she actually signed the lease before she even knew what was going on in my marriage).  All it really took was her offer of a place to stay, and I ended up finally telling her the truth about my life.  Up to that point no one knew the hell that I lived in.  So she and my brothers began planning a way to get me out of there and out to Arizona.  My youngest brother's fiance flew in from CA so she could fly back to Arizona with me.  I needed someone along for the flight for a few reasons.  For one thing I was flying with my cats, Calcifer and Ginko, and I needed someone to carry one of their pet carriers.  For another thing I had never flown before and Sarah happens to have traveled quite a bit during her life, so she knew the ropes ;-)  She also really helped to keep me calm and keep me laughing.  This was the first time I had meet my future sister-in-law, and I must say, I love her already ;-)  She was wonderful with the cats too- very kind and gentle, which was just what they needed.  I sprayed the towels in their carriers with Feliway (calming cat pheromones) before we left, and I was really amazed at how well they did.  They were scared, of course, but there was no yowling or total freak outs.  Once we were on the plane they actually managed to fall asleep for a while.  It was about a 6 hour flight and then at least a 2 hour drive from Phoenix to Prescott.  And did I mention that I was doing all this after not sleeping for about a week?  By the time we got to our new home the cats and I were all exhausted!
It took a few days, but once I was finally able to get some sleep and get over a bit of altitude sickness I was able to really appreciate the beauty of Arizona.  Mother and I made a few trips back to Phoenix to move the rest of her stuff from her apartment, and I got to experience Phoenix in mid-summer.  They say it's dry heat, but 108 degrees is just incredibly hot no matter how you look at it!  Prescott, on the other hand is at least 20 degrees cooler and more of a mountain environment than a desert environment.  It also gets more rain, which I didn't expect.  We've actually had a good bit of rain each afternoon for the last 3 days.  I really love it here.  I'll have been here one week tomorrow, and already this feels like home.  The West just feels so different from where I came from.  The sky is clearer and bigger somehow, the landscape just takes my breath away, and the people are so open and friendly.
And I have everything I could ever ask for right in one place.  In one direction I have a national forest within easy walking distance, and in the other direction I have the cool town of Prescott with all it's shops and neat places to check out.  I don't believe I have ever felt so happy, calm, and relaxed.  And it doesn't hurt to have most of the country between me and my ex.  I think I'm going to split this into several posts, because I have so much to talk about.  I'll let you know how the cats are adjusting and tell you about some of the awesome things I've seen.  To end this post I want to share the view that I wake up to every morning when I look out my window.  Seeing this every morning just makes me happy to be alive! :-)

Monday, June 25, 2012

My entry for the Smooshers In The Ocean Challenge

The theme for the Polymer Clay Smoosher's Challenge this month is In The Ocean.  Once again I had lots of ideas swimming through my head (and not enough time to sculpt them all)!  Eventually I settled on a mermaid.  I always enjoy adding an element of fantasy to projects whenever possible ;-)  Not too long ago I made several beaded pendants using some of my mismatched glass beads.  The beads were all very pretty, but none of them matched.  When I make jewelry I generally like to use matching, or at least similar beads, so this was a good way to display the beads.  I decided that a miniature mermaid wrapped around a pendant made of blue and green beads would be just right for an ocean challenge!
 I started by sculpting the mermaid's tiny little head.  It's always a challenge to sculpt on such a small scale, but this one actually went pretty well.  Sometimes I have to remake a head up to 5 times!  I only had to remake this one twice ;-)  I used tiny blue glass beads for her eyes and gave her fairy ears.  I baked the head at this stage so further sculpting wouldn't distort all the tiny details.   A baked and hardened head is so much easier to work with.
 Next came the torso. I sculpted this and attached it to the neck, using diluent to make the seams perfectly smooth and invisible.  I wasn't ready to add the arms yet at this point.  I wanted to sculpt her tail and get her positioned on the pendant before I made her arms.  That way I would be able to position them perfectly so she was holding onto the pendant.
I swirled together several shades of blue and green Premo polymer clay to create a custom mix for the mermaid's tail and the teardrop shaped beads I planned on adding to the necklace.  Before positioning the mermaid around the beaded pendant I painted her facial features with acrylic paint and colored her lips and cheeks with powdered pink chalk mixed with interference red/ blue Pearl Ex powder.  I really wasn't sure what color I'd get when I mixed the two, but it turned into the perfect shade of pink with just enough of a sheen to make it look very realistic.  To be sure the mermaid was securely attached to the pendant I added liquid polymer clay where her body touched the pendant.  I baked the mermaid and beads at this point.
After the body and tail were baked and cooled I added her arms and hair.  I used wire through the eye pin to suspend the pendant in a coffee cup while it baked for one final time.  This assured that none of her delicate features would be crushed while baking.
The final step in the necklace was to create the beaded components, which were composed of blue and green glass beads, silver bead caps, and the blue and green swirled clay beads.
And this is how the final piece turned out.
OOAK Green and Blue Polymer Clay Fantasy Mermaid Necklace 
I've actually only made a few mermaids (so far), but I have to say this is my best one yet.  I'm very happy with the way she turned out, and I'm glad I took my time while creating this entire necklace.  Once again, this is something entirely new for me- definitely a one of a kind creation!
Thanks so much for joining me on another creative journey!

Friday, June 22, 2012

Featuring Wyvern Designs

Wyvern Designs offers a unique and eclectic mix of handcrafted items.All of her items are designed and created by her and each one is one of a kind.  She welcomes custom orders as well.  Within her shop you can find beautiful jewelry, items for children, ornaments, supplies, home decor, and more.  She's a graphics and jewelry designer who loves trying new materials and new techniques and is totally addicted to polymer clay.  She's also a member of the Polymer Clay Smooshers guild on ArtFire.
You can find Wyvern Designs online on ArtFire, Etsy, Twitter, MadeItMyself, her blog, and Facebook.
Below is just a small example of the wonderful items that can be found in her shop.
 Dragonfly and Fern Hand Made Light Switch Plate Cover
Dragonfly and Fern Hand Made  Light Switch Plate Cover
Scowling Pug Pendant
 Scowling Pug Pendant
North Atlantic Puffin Earrings
 North Atlantic Puffin Earrings
Ladybug Necklace Hand Made
 Ladybug Necklace Hand Made 
And these are just a few of the wonderful creations available from Wyvern Designs.  Be sure to check out all she has to offer!

Wednesday, June 13, 2012

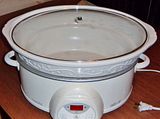
How to replace a missing crock pot lid handle

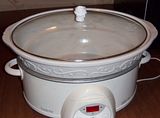
This weekend I got a really nice crock pot for just .50 from a garage sale.  The only thing wrong with it was that the handle for the lid had broken off.  This is pretty easy to fix, so I figured I'd do a little tutorial and show you one way to replace a missing or broken handle.  This would work on most types of lids.  Since I used polymer clay you wouldn't want to use this method for anything that goes into the oven or reaches temperatures above 275 degrees.
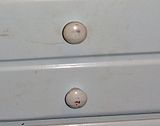
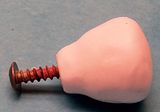
In preparation for my move I emptied out my old craft dresser, since I won't be taking it with me.  It has lots of nice wooden drawer handles that would make a good replacement for the lid handle.

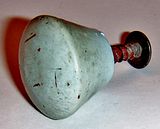
 I just removed one of the handles and covered it in Tacky glue.  This helps the clay stick to the wood better and reduces the chance of air bubbles under the clay. Since the screw was a little long I added a cardboard collar.  I used superglue to attach it to the drawer handle, then covered it in Tacky glue as well.
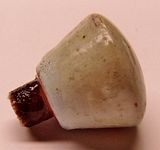
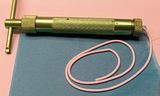
Then I covered the entire thing in a layer of white clay.  Once the clay was nice and smooth I used my clay extruder to make a long thin rope so I could add some swirls to the handle. 
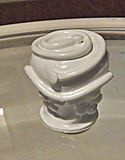
 I added a flat disk of clay to the bottom along with some small dots, then baked the handle for an hour.  Once it was cool I applied three coats of high gloss glaze and attached the handle to the glass lid.  I figure it will have to stand up to a lot of handling, so the glaze should help protect it, and make it easy to clean. 

I cooked some chicken in the crock pot today and the handle stayed nice
and cool and is very secure (better than many I have bought from the store!).
So there's a fairly easy way to replace missing or broken lid handles.  You
can make them in colors and designs to match the pot, and if you don't
want to play with clay, you could just simply paint and seal a well fitting
drawer handle.  Not bad for a .50 cent garage sale find, huh? And this one
is WAY nicer than my old crock pot- it's bigger and you can set the time and
temperature, as well as switch from high to low at any point during cooking.                                                                                                                 

Thursday, May 31, 2012

Inventory reduction moving sale at CreativeCritters

Within a few months I'll be moving and I've been slowly but surely packing things away and preparing to move.  I think I've thrown out about 3 tons of garbage over the last couple months!  It is amazing how things can accumulate over the years.  One thing I'm not looking forward to is packing up all my sculptures, dolls, jewelry, and home decor I have for sale at CreativeCritters.  There's just so much of it (over 400 items)!  So I decided to have an inventory reduction sale.  The less I have to pack and move, the better!  I'm offering 50% off all items in six different categories:
Sale Half Off miscellaneous items
Sale Christmas/ Winter
Sale Pen Sculptures
Sale Animal Sculptures
Sale Cloth Dolls
Sale Plush WoW Characters
These are the lowest prices I've ever offered on these items!  You can find whimsical handmade items like this plush Murloc with sound.
OOAK Plush Green and Gray World of Warcraft Murloc Doll with Sound 
Or a sweet handcrafted cloth doll you little girl will cherish.
 
You can even find wild (or maybe not so wild) cheetahs roaming the pages of my shop ;-)
Cute Whimsical Handmade Polymer Clay Cheetah sculpture 
There's also a wide variety of fun pens on sale too.
Handmade Polymer Clay Cute Black and White Cat Pen Sculpture 
You can even get a little early Christmas shopping done!
Handmade Skiing Polar Bear wearing Blue Knit Hat Christmas Ornament 
You can even find mythical beasties like this adorable Griffon on sale ;-)
Handmade Polymer Clay Mythological Fantasy Griffin Sculpture 
So come on over to CreativeCritters and browse the numerous items on sale.  I'd much rather sell them than have to move them! ;-)
Thanks for stopping by!

Saturday, May 19, 2012

My entries in the Smooshers May Flowers Challenge

The theme for the next Polymer Clay Smooshers guild Challenge is May Flowers, and I was able to come up with two pretty awesome entries.  I had decided to make a floral trinket box first, since I've been having a lot of fun creating unique trinket boxes lately.  These trinket boxes are also a great way to recycle all the aluminum cat food cans that would otherwise be thrown away around here.  I start these by thoroughly cleaning and drying the cans, then I cover them with tacky glue.  Once the glue dries the clay sticks much better and I have fewer issues with air bubbles.  For this particular box I mixed a custom shade of purple from blue and purple Premo clay.  I use Premo just about exclusively now, and I always seem to mix my own custom colors, making each creation truly one of a kind.Purple Pink and Blue Polymer Clay Trinket Box with Flowers and Birds 
The next step in the creation of this piece was to stamp pretty designs into the clay.  I've fallen in love with flexible rubber stamps and polymer clay over the last year or so.  Then add a bit of Pearl Ex powder (in this case Sky Blue mixed with Reflex Violet) and you've got something magical!  Then I went on to create the pink flowers.
. 
They have textured petals (each shaped by hand), and are attached to a metal filigree finding.  I spent a lot of time digging through my bead stash to find the perfect beads for this box.  These are my last two ceramic bird beads, and also the last of my red glass butterfly beads.
 
All the beads are secured with wire and liquid polymer clay, so there are no worries about anything coming loose.  The lid is made from polymer clay with reinforcing wires baked into the clay.  The large flower was rubbed with blue and purple Pearl Ex powders for a gorgeous color variation. 
To finish the box I covered the bottom with felt and lined the inside with felt as well.  I'm really very happy with the way this turned out.  I may have to make one of these for myself to hold my favorite jewelry ;-)

My second entry is a necklace I call Mai's Flowers.  Christi Friesen's book on sculpting dragons helped inspire this one, as did the Irises blooming in the front yard.  Irises are some of my favorite flowers and I love sculpting them.  The first thing I did to create this piece was to sculpt the Iris beads. 
These took many hours and four separate bakes to complete.  Although they look very fragile, I used the green leaves behind the flower petals to add strength to the flowers.  Each petal was carefully sculpted and textured, then I dusted the center petals with blue Pearl Ex powder and the outer petals with purple Pearl Ex.  Each flower was sculpted individually, and just like in nature, each is unique.  Once the flowers were sculpted it was time to move on to Mai the dragon. 
Isn't she sweet holding her favorite flower?  I used glass beads to embellish her and add a bit of bling (if you're familiar with Christi Friesen, you're familiar with this technique).  She even has blue glass heart beads on her head, since she's such a loving little dragon ;-)  She's named after Mei from the movie My Neighbor Totoro (my favorite Myazaki movie of all time), who is also a sweet, fun loving little girl.
To make this necklace even more special I used blue, pink, and purple Swarovski crystals.  Nothing sparkles quite like Swarovski!


I absolutely adore this necklace, and I might just have to make one for myself!  I definitely see more Christi inspired dragons in my future- sculptures, jewelry, trinket boxes- there's no end to the possibilities!
Both of these items are available for sale in my shop.  Just click on any of the pictures to be directed to the listing.
Thanks so much for stopping by and sharing another creative journey with me!


Sunday, April 22, 2012

Making a polymer clay dolphin jar

Recently my best friend, Monica, came for a visit.  Not only is Monica my very best friend (we were roommates in college and have been friends ever since), but she's also one of my best customers!  Every time she visits she checks out all the sculptures, plushies, and jewelry I have for sale.  This time around she spotted my clay covered jars, which can be found in the Housewares section of CreativeCritters.  She liked them all, but asked if I could make her a special jar with dolphins and make it in purple.  She's always loved dolphins and purple is her favorite color.  Of course I was more than happy to create a dolphin jar for her!  Once she described what she wanted I was able to visualize it quite clearly, and knew how to create the jar.  One of the hardest things was finding the perfect dolphin stamp.  I knew exactly what I was looking for, and spent over an hour online until I found exactly the right one.
To create the right color of clay I mixed equal amounts of purple, silver, and turquoise to come up with this beautiful shade of purple.
The next step was to cover the jar and lid with the clay.  I used a glass baby food jar with a metal lid and coated the jar and lid with tacky glue to help the clay stick to the smooth surfaces.  I let the glue dry then wrapped the clay around the jar, making sure to press out any air bubbles.
 
 
Then I stamped the dolphins around the jar.  I tried using the stamp while it was still mounted to the wooden block, but that didn't work out too well.  So I carefully cut the stamp off the block and had much better luck getting nice clear impressions.  I was able to wrap the stamp around the jar and press it deeply into the clay.

 
I changed the position of the stamp each time so the dolphins look like they're in motion.  I was thinking of a whole school of dolphins leaping through the water as I made this.
Once the dolphins were stamped onto the jar it was time to add that special Pearl Ex shimmer.  Once again, I knew exactly the color I wanted, and that required mixing several colors of Pearl Ex.  Over time I've gotten pretty good at figuring out what to mix to create a certain color.  This project required a bluish purple, which I achieved by mixing Sky Blue, Interference Blue, and Reflex Violet.
 
I adjusted the amounts of each color as necessary and came up with this beautiful shade of purple.
 
 
I used the pad of my finger to rub the purple powder on the raised surfaces of the clay.  Then I decided I wanted the dolphins to stand out from the background a bit more, so I rubbed their bodies with Sky Blue Pearl Ex.  I wanted to add a little something extra to the background, so I used part of another stamp to impress swirls and lines of movement.  It's amazing what a difference a tiny little thing like that can make.  Now it really looks like the dolphins are leaping through the water.
I also added a base and used a different part of the stamp to add texture.  I sculpted a wave for the lid and stamped watery swirls  on it as well.  I dusted the wave with Sky Blue and Interference Blue Pearl Ex powders.  I put the jar in the oven for it's first bake at this point.  I didn't want to mess anything up and I wanted the wave to be baked before I added the dolphin.
Once the jar cooled I added a string of beads along the base, added a rope of clay around the top of the jar to give it a more finished look, and added another string of beads around the lid.  I sculpted the dolphin using shades of blue gray clay (a custom mix, of course), and posed him on top of the wave.  I applied liquid clay to his belly and pressed him firmly onto the wave to be sure he was attached well.

After two coats of high gloss varnish dried I glued blue felt to the bottom of the jar, wrote a special message on the felt, and called it complete.  Now it's ready to be shipped off and make Monica very happy ;-)  The one thing that I added that can't be seen in pictures is plenty of love and positive energy.  The entire time I was working on this piece I was thinking happy thoughts of my friend and all the fun we had together.  I think that comes through in the finished product.  I want Monica to smile and be happy every time she looks at this jar. :-)
Thanks for stopping by and following me though another creative adventure!