Sunday, October 20, 2013

Miniature Halloween Haunted House sculpture from CreativeCritters

Well, it's that time of year again- the time when I (along with so many others) am inspired to make some spooky Halloween creations.  I'd been tossing around the idea of a miniature haunted house sculpture for some time, and recently my ideas came together and I got to sculpting.
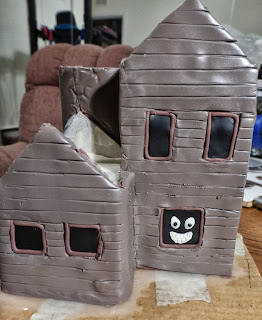
I used heavy cardboard for the base and to cut out the shapes of the house.  For the tower I used the tube from a roll of paper towels.  Everything was securely taped and glued together and then I wrapped the whole thing in black clay to make one solid piece and to make the windows look dark when I cut them out.  After I baked that it was easier to apply the walls of the house.  I cut out windows and the door and framed them with thin strips of clay.

Then I started having fun with the glow in the dark clay!  I made glow in the dark candle flames for the upper windows and made them resemble eyes and teeth.  I started the front porch and sculpted a door as well.  The ghost was sculpted from glow in the dark clay and is letting out a black cat with glow in the dark eyes.  For as tiny as he is (no more than 1/2" long) that cat took a long time to make!  It's not easy sculpting in such a small scale!
And this is what it looks like in the dark at this point.  Pretty cool, huh?
And this fun face in the back window was a suggestion from my boyfriend.  It's reminiscent of the Cheshire Cat from Alice in Wonderland, albeit slightly more spooky and evil looking, especially when it's glowing in the dark!
Then I started really getting into the details, adding a roof to the front porch, more spooky effects in the windows, and of course the resident skeleton.
All of the effects in the windows were sculpted from glow in the dark clay, as was the skeleton.
At this point I put the roof on, shingled the roof, and then added the large Oak tree at the back of the house.  The tree has a wire and foil armature ansd is securely attached to the base of the sculpture.  It looks somewhat delicate, but is really fairy strong and sturdy.
Spooky Glow in the Dark Miniature Halloween Haunted House Sculpture
I added a large glow in the dark full moon to the branches of the tree as well. Then  I added ivy climbing up the sides of the house along with red, yellow, and orange Maple and Oak leaves in the yard.
 Spooky Glow in the Dark Miniature Halloween Haunted House Sculpture
I also made three Jack O Lanterns with glow in the dark faces to decorate the front yard.  The whole thing looks pretty impressive during the day or at night!
You can click on any of the pictures to be taken to the listing and read more about this unique Halloween haunted house sculpture.  This took about three weeks to complete but I really enjoyed the process.  I wasn't just sure how it would come out until it was finished.  I must say, I'm really pleased with the results!  As with most of my work, this is another one of a kind creation. 

Thanks for joining me for yet another creative adventure!  Stayed tuned for more creativity- I've got plenty of new projects planned for the holiday season!
 ~Michelle of CreativeCritters

Wednesday, October 16, 2013

New Colorful Knit Dragon Joins the Menagerie at CreativeCritters

This colorful knit dragon is the latest addition to the menagerie of critters available from CreativeCritters.
I challenged myself to create a knitting pattern from scratch for a cute and brightly colored dragon.  I made it up as I went along, writing down what worked, and trying again when something didn't turn out quite as I wanted.  I learned how to follow a sewing pattern many years ago, and using that knowledge (and a lot of trial and error) I figured out how to make my own original patterns.  That's essentially how I made this guy.  I thought of the shapes I would need if I were to create a sewing pattern for a creature like this, then I figured out how to knit those shapes and sew them together.  It wasn't easy- that's for sure!  But I do enjoy a challenge, and I like testing and improving my artistic skills, so although it took a lot of time, I really had fun bringing this fantasy dragon to life,  I used bright purple (my favorite color) for his body, which I knit in a garter stitch.  I used a stockinette stitch and bright yellow yarn for the dragon's belly and the underside of his tail.
I gave him triangular spikes that were knit in bright red yarn.  I sewed all the various parts onto the dragon very securely and stuffed him with polyester fiberfill.  The wings were a bit of a challenge.  I considered creating knit wings, but really wanted them to be more lightweight.  I didn't want to have to use wires to help them hold their shape, as I've done with plush dragons in the past.  I wanted this to be a toy that kids could hugs and cuddle, without any sharp or hard parts.  So I decided to use red and purple felt (I just happened to have exactly the right colors in my fabric stash).  I drew out a wing pattern on paper and used that as my guide.  Then I sewed veins into the wings to give them more stability.
This cute stuffed animal measures about 15 inches long and 15 inches tall.  This guy's pretty special, and I hope when he sells he goes to a loving home.  Until then he can hang out here and make me smile =)  If you want to purchase this dragon, or read more details about him, just click on any of the pictures to be taken to the listing in my shop.
Thanks so much for stopping by!
~Michelle of CreativeCritters