
Well, it's been a busy day, which started about 3am. Let me just say, I'm glad I'm a night owl and was still up when I heard the sump pump kicking on constantly. It had been raining since about midnight, and there was at least a foot of snow on the ground, so I knew there was a chance we might get water in the basement. Usually only a little water comes in and only one spot. This time was very different. The sump pump couldn't keep up with all the water coming in, and within a very short time I noticed water seeping in along the front wall. What started as a trickle turned into a stream within minutes. All I could do was try to salvage everything I didn't want to get wet. It was a little scary when water started coming up from the cracks in the floor! That had NEVER happened before. So I was up until 6am moving furniture, boxes, books, and anything else I could possibly move to higher ground. Normally the cat's litter boxes are in the basement, but I moved them upstairs so they wouldn't have to go swimming in order to use them- LOL. Unfortunately Cedric doesn't like change of any sort and spent the entire night (well morning, actually) loudly complaining about not being allowed to go downstairs and having his litterbox moved. So I got absolutely no sleep, and still had to clean up today. I managed to save everything important, and got most of the water cleaned up today. A wet/ dry vac is a very useful tool! I'm hoping I can salvage the carpets. I vacuumed up as much water as possible out of them and have had a fan running all day. It's certainly better than it was when I went down there this morning! So that was pretty much the only thing I accomplished today, and I am beat! And I feel sorry for the garbage collectors this week, because I know I'm not the only one with a flooded basement in this neighborhood. People were putting out waterlogged stuff already this afternoon. I am so glad I was awake when the water started coming in, otherwise I'd have a lot more to go out on the curb myself. Now, I'm going to relax!
-Michelle of CreativeCritters
Monday, February 28, 2011
Saturday, February 26, 2011
10 minute lower body workout
Here's a great video from Shape.com that targets the lower body and strengthens and tones all the muscles of your legs as well as your entire core. A weight is optional if you'd like more of a challenge.
This workout is simple, but very effective, especially that frog move- I love that one!
-Michelle of CreativeCritters
This workout is simple, but very effective, especially that frog move- I love that one!
-Michelle of CreativeCritters
Friday, February 25, 2011
Starting seeds indoors
It may still be cold and snowy, but now is the time when I start planting my seeds indoors for the garden. I've been starting seeds indoors for years, and generally have been pretty successful. I started my lettuce a little earlier than usual this year, but I want to plant it outside sooner than I usually do. I have row covers for frost protection, so they should be OK if I put them outside in March. I also started my sweet Bell Pepper and my Eggplant seeds this week. They take longer to mature and produce vegetables, so I want to get them started as soon as possible. They won't go outside until May, maybe late April if I have enough Kozy Coats. You fill the tubes with water, which warms in the sun. The plant stays nice and cozy warm, even when the temperature outside drops.
This year I'm starting some of my seeds using the bottom of paper egg cartons. I filled each cell with seed starting mix and set the entire thing in a basin af warm water. The carton and seed starting mix soak up as much water as they need. Then I put the carton in a dry basin, add the seeds, and cover lightly with more starting mix. When it needs water I just add water to the basin and it's soaked up as needed. That way I don't disturb the seeds.
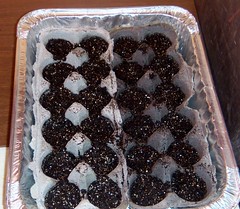
Once the roots start to grow through the bottom of the cups it's easy to separate each cup and plant the whole thing in a larger pot. This way you don't have to disturb the delicate roots. This year I'm using a spare closet for my plants. The florescent plant light hangs on the curtain rod and I've set it up so I can use the entire closet to grow my plants. The lettuce is doing quite well. I moved it into larger pots after about two week. I'm using plastic yogurt cups which I washed thoroughly. It's very important to keep everything clean if you want to keep your seedlings healthy. Now all the lettuce should be fine until I'm ready to plant it outdoors. And by the time I do get it outside it should be strong enough to handle the weather.
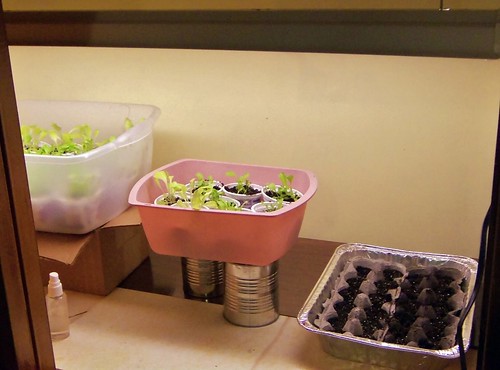
So this is how my garden gets started. And this really helps me get through the last month or two of winter! I like to take care of my little plants and enjoy their fresh green colors and scents. Plus it's SO much cheaper to start your own seeds than it is to buy plants at a nursery. Buying seeds rather than plants allows me to plant a wider variety of vegetables, without blowing my budget. Stay tuned to watch my little green seedlings turn into full grown plants full of delicious vegetables! =)
-Michelle of CreativeCritters
You fill the tubes with water, which warms in the sun. The plant stays nice and cozy warm, even when the temperature outside drops.This year I'm starting some of my seeds using the bottom of paper egg cartons. I filled each cell with seed starting mix and set the entire thing in a basin af warm water. The carton and seed starting mix soak up as much water as they need. Then I put the carton in a dry basin, add the seeds, and cover lightly with more starting mix. When it needs water I just add water to the basin and it's soaked up as needed. That way I don't disturb the seeds.
Once the roots start to grow through the bottom of the cups it's easy to separate each cup and plant the whole thing in a larger pot. This way you don't have to disturb the delicate roots. This year I'm using a spare closet for my plants. The florescent plant light hangs on the curtain rod and I've set it up so I can use the entire closet to grow my plants. The lettuce is doing quite well. I moved it into larger pots after about two week. I'm using plastic yogurt cups which I washed thoroughly. It's very important to keep everything clean if you want to keep your seedlings healthy. Now all the lettuce should be fine until I'm ready to plant it outdoors. And by the time I do get it outside it should be strong enough to handle the weather.
So this is how my garden gets started. And this really helps me get through the last month or two of winter! I like to take care of my little plants and enjoy their fresh green colors and scents. Plus it's SO much cheaper to start your own seeds than it is to buy plants at a nursery. Buying seeds rather than plants allows me to plant a wider variety of vegetables, without blowing my budget. Stay tuned to watch my little green seedlings turn into full grown plants full of delicious vegetables! =)
-Michelle of CreativeCritters
Wednesday, February 23, 2011
Black Pearl Creations- where glamour is a way of life
At Black Pearl Creations on ArtFire.com you can find everything from sweet, one of a kind, chunky cowls to bohemian hats to exclusive patterns. Her Bio reads: "Raised in the UK, the owner of Black Pearl Creations has always been fascinated with yarn and crocheting. Now, as the chief designer and master crocheter, she is able to take her fascination to a higher level through Black Pearl Creations. In a short 5 years, Black Pearl Creations has transformed from an obscure home decor line into an innovative, upscale clothing line. Its signature style is known in New England for its resort and luxury wear. This was accomplished by breaking stereotypes of African Americans, handicrafts and designing. Designing clothes that are sexy and wearable is the goal of the company. Cashmere, angora, and silk are some of the ways glamour and luxury are added to the line. Our line consists of contemporary pants, dresses,purses,skirts, bikinis, sweaters and many other items. We also offer whimsical hats, scarves and mittens." Black Pearl Creations can also be found online at http://blackpearlstyle.com/, http://blackpearlstyle.wordpress.com/, http://www.facebook.com/BlackPearlCreations, http://twitter.com/BlackPearlCreat, and http://www.youtube.com/user/joede1123. Below is a sample of what you can find in her shop.


And she even offers free shipping in the US! Stop in and see all she has to offer!
-Michelle of CreativeCritters
And she even offers free shipping in the US! Stop in and see all she has to offer!
-Michelle of CreativeCritters
Saturday, February 19, 2011
My Steampunk Pirate Cat sculpture is complete!
Well, he's finally done and listed. He took weeks to complete, and I loved every minute of it. Here's the finished Steampunk Pirate Cat.

I added feathers to both sides of the wings and baked them separately. I sculpted a harness onto the cat and pressed the center of the baked wings into the unbaked clay on the back of the harness so I would have a prefect fit when gluing the pieces together.

I gave him a watch that allows him to travel through time, and after everything was baked I decided he needed some kind of stolen treasure. So I strung together some very pretty crystals and jewelry findings to create the Time Crystal, which will make this pirate more powerful and harder to catch than ever. I also glued a vintage pirate cap gun into his right paw.

I made an eye patch out of clay and fastened a gear to the center of it, then dusted it with silver Pearl Ex powder. It sort of makes me think of the Borg on Star Trek, and it absolutely makes me think of Calcifer. That's his blind eye and it sometimes looks silvery like that.
This piece turned out better than I could have hoped, and sharing it's creation with all of you has been a wonderful experience. Thank you for following his progress and supporting me along the way!
-Michelle of CreativeCritters
I added feathers to both sides of the wings and baked them separately. I sculpted a harness onto the cat and pressed the center of the baked wings into the unbaked clay on the back of the harness so I would have a prefect fit when gluing the pieces together.
I gave him a watch that allows him to travel through time, and after everything was baked I decided he needed some kind of stolen treasure. So I strung together some very pretty crystals and jewelry findings to create the Time Crystal, which will make this pirate more powerful and harder to catch than ever. I also glued a vintage pirate cap gun into his right paw.
I made an eye patch out of clay and fastened a gear to the center of it, then dusted it with silver Pearl Ex powder. It sort of makes me think of the Borg on Star Trek, and it absolutely makes me think of Calcifer. That's his blind eye and it sometimes looks silvery like that.
This piece turned out better than I could have hoped, and sharing it's creation with all of you has been a wonderful experience. Thank you for following his progress and supporting me along the way!
-Michelle of CreativeCritters
Thursday, February 17, 2011
My niece's birthday
My oldest niece, Jessica, turned 9 this month, and of course Aunt Michelle had to send her a special birthday package! I wish my brother and his family lived closer so I could see them in person, but at least I can send awesome gifts. Jessica has always been very creative (I see a lot of myself in her), and I've always nurtured and encouraged that creativity. Now she's finally old enough to move from Play Doh to oven bake polymer clay, which probably excites me more than it does her- LOL. So for her birthday I got her a set of polymer clay in all the basic colors, a set of sculpting tools for kids (I use some of the same tools myself), and a beginner's sculpting book full of great projects that are easy for kids, but also really cute. I also made her this cute Birthday Bear sculpture.
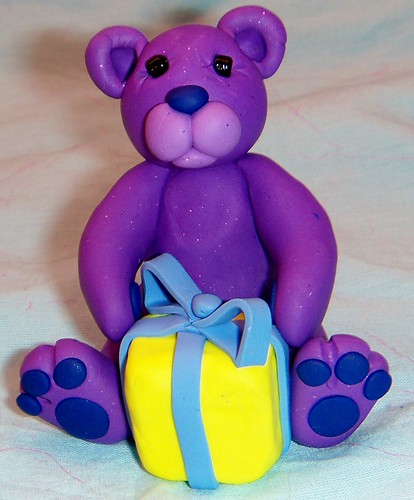
She loved everything in the package, and started sculpting right away (that's my girl!). My brother said she's making a bear for me that looks a lot the the one I made her. This was exactly how I started out when I was young, only I tried ceramic clay in art class before I discovered polymer clay. The great thing about polymer clay is that artists of all ages and skill levels can use it, and it bakes right in your home oven. I can't wait to see all the wonderful things Jessica is going to create. Creativity is so very important, and nurturing a child's natural creativity is incredibly rewarding.
Jessica's little sister, Andrea, has a birthday coming up in March, and I've already got her gift request. She wants a LaLa Loopsy doll, but my brother hasn't been able to find one, so I'll make her a cuddly rag doll that looks the the same. I checked out pictures on Google (I wasn't sure what they looked like before), and I can certainly make something very similar, with a cute little pet too. I love being the artistic aunt! And when the kids get something I made by hand, it inspires them to make things themselves. My grandmother sewed, did needlework, and made beaded ornaments, and passed that creativity down to me. My mother is very creative as well. She's an excellent writer, has worked in wood (making everything from shelves to really cool trains), has made awesome pewter miniatures, and probably even more I'm forgetting at the moment. Creativity is in my genes, and my mother and grandparents have always supported my creative endeavors. I plan to do the same for my nieces.
-Michelle of CreativeCritters
Wednesday, February 16, 2011
Life in polymer clay
Well, that's the topic for the Polymer Clay Smooshers Blogring. Life...hmm, that can have all sorts of interpretations, can't it? Of course there's plant, animal, and insect life- things that have always interested me. Maybe that's what I'll focus on for this post, which is especially appropriate with Spring approaching. And of course Spring is all about rebirth and life. Baby animals are born, the plants come back to life, the insects awaken from their winter hibernation and begin buzzing about again. Yes, I think Life and Spring go hand in hand. So let's see what I can find in the shops of my fellow Smooshers that represents Life.
A sure sign of Spring in the country is hearing the Spring Peepers singing their mating song in the evening. This trio of frogs from Art by Susmitha may or may not be peepers, but that's what they make me think of.

They also remind me of the spring I captured a bunch of tadpoles and raised them until they became frogs. Not that was a fun lesson on life! They turned out to be tree frogs and stayed in the yard after I released them. I loved growing up in the country!
This Flower Baby Sprite from Blue Jane makes me think of all the flowers starting to bloom and come to life in the Spring.

I love getting out in early spring and taking the fall leaves off the flower beds, exposing the tiny green shoots of emerging flowers. In a matter of days sometimes they open their leaves and petals to the warm sunshine, filling my garden with color and life.
And this Bee Skep with Honey Thief from ColtPixy reminds me how thrilled I always am to see the first honeybee of Spring come back to life.

For a gardener, bees are life. Without those busy little pollinators, we wouldn't get any fruits or vegetables from our gardens. And unless you're trying to steal their honey, like this naughty little fairy, bees will generally avoid conflict with people. I've never been stung, and consider bees my friends.
So there's a little slice of Life from the very talented Polymer Clay Smooshers guild. ;-)
The pictures are all linked, so just click them to view the listing for any of these items, and while you're there browse the rest of the shop- you won't be disappointed!
-Michelle of CreativeCritters
A sure sign of Spring in the country is hearing the Spring Peepers singing their mating song in the evening. This trio of frogs from Art by Susmitha may or may not be peepers, but that's what they make me think of.
They also remind me of the spring I captured a bunch of tadpoles and raised them until they became frogs. Not that was a fun lesson on life! They turned out to be tree frogs and stayed in the yard after I released them. I loved growing up in the country!
This Flower Baby Sprite from Blue Jane makes me think of all the flowers starting to bloom and come to life in the Spring.
I love getting out in early spring and taking the fall leaves off the flower beds, exposing the tiny green shoots of emerging flowers. In a matter of days sometimes they open their leaves and petals to the warm sunshine, filling my garden with color and life.
And this Bee Skep with Honey Thief from ColtPixy reminds me how thrilled I always am to see the first honeybee of Spring come back to life.
For a gardener, bees are life. Without those busy little pollinators, we wouldn't get any fruits or vegetables from our gardens. And unless you're trying to steal their honey, like this naughty little fairy, bees will generally avoid conflict with people. I've never been stung, and consider bees my friends.
So there's a little slice of Life from the very talented Polymer Clay Smooshers guild. ;-)
The pictures are all linked, so just click them to view the listing for any of these items, and while you're there browse the rest of the shop- you won't be disappointed!
-Michelle of CreativeCritters
Healthy Recipe for Chicken with Chunky Vegetable Sauce
I got this recipe from Fitnessmagazine.com, and with a few minor changes made it to suit my own tastes.
In a large skillet, cook onion in hot oil over medium heat for 3 minutes. Stir in garlic; push mixture to sides of pan. Add chicken. Cook 4 minutes, or until brown, turning once. Add tomatoes, artichokes, broth, and pepper; stir.
Bring to a boil; reduce heat. Simmer, covered, 10 minutes, or until chicken is tender and no longer pink. Remove chicken.
Simmer tomato mixture, uncovered, about 3 minutes, or until reduced to desired consistency. Stir in capers and oregano. Serve the chicken over rice; top with sauce. If desired, garnish with olives.
 Serves 4
Chicken with Chunky Vegetable Sauce
Ingredients
- 2 tablespoons all-purpose flour
- 4 medium skinless, boneless chicken breast halves (about 1 pound)
- 1 cup finely chopped onion
- 1 tablespoons olive oil
- 2 cloves garlic, minced
- 14-1/2 ounce can diced tomatoes, undrained
- 14 ounces can artichoke hearts, drained and halved
- 1/3 cup reduced-sodium chicken broth
- Dash of black pepper
- 2 teaspoons drained capers or 2 tablespoons chopped pitted ripe olives
- 1 tablespoons snipped fresh oregano or 1 teaspoon dried oregano, crushed
- 2 cups hot cooked rice
- Pitted ripe olives
Directions
Place flour in a shallow dish. Dip chicken in flour to coat. Set aside.In a large skillet, cook onion in hot oil over medium heat for 3 minutes. Stir in garlic; push mixture to sides of pan. Add chicken. Cook 4 minutes, or until brown, turning once. Add tomatoes, artichokes, broth, and pepper; stir.
Bring to a boil; reduce heat. Simmer, covered, 10 minutes, or until chicken is tender and no longer pink. Remove chicken.
Simmer tomato mixture, uncovered, about 3 minutes, or until reduced to desired consistency. Stir in capers and oregano. Serve the chicken over rice; top with sauce. If desired, garnish with olives.
Serves 4I left out the artichokes, capers, and olives, because I really don't care for them. And I used brown rice instead of white rice (brown rice has more health benefits). Either way, this is a fresh, healthy, and delicious meal! Enjoy!
-Michelle of CreativeCritters
Tuesday, February 15, 2011
Leelu Creations- Jewelry, Bobbies and Bookmarks
Leelu Creations on Artfire.com offers fun, unique jewelry at an affordable price. She loves anything vintage, from classic and simple to Hollywood glam. Cameos and charm bracelets are her favorites. She makes original one of a kind pieces that are limited edition. She also likes to work with vintage pieces and turn them into something new. You can also find Leelu Creations online at http://leelucreations.blogspot.com/, http://www.etsy.com/shop/leelucreations, Facebook, and Twitter. Below are a few of my favorite pieces from her shop. Be sure to stop and see all she has to offer!


And there's plenty more where these beauties came from!
-Michelle of CreativeCritters
And there's plenty more where these beauties came from!
-Michelle of CreativeCritters
Monday, February 14, 2011
Creating wings for my Steampunk Pirate Cat sculpture
At first I wasn't sure if I was going to make wings for this piece, or how I would make them, but lately I've been quite inspired by Christi Friesen (who does Steampunk really well), and I had a flash of inspiration. In my mind's eye I saw wings (sort of like angel wings) with metallic feathers. My Pirate Cat could strap these wings on and fly not only anywhere, but any TIME. I'm going to give him a time traveling watch as well. Of course I had to go all out on these wings and sculpt and texture each feather individually. This is the start of the wings.
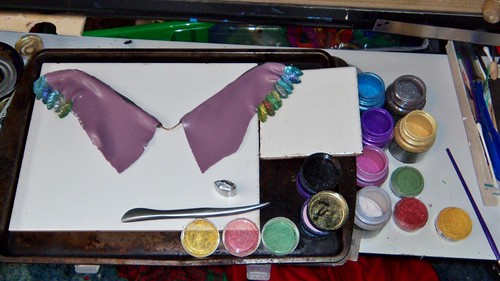
I used a wire armature covered in clay and added clay wing shapes over the frame. This will give me a base to attach the feathers too. As you can see, I have several different colors of Pearl Ex powders and I used a soft paint brush to dust color onto each textured feather. Christi Friesen's Gotta Have It tool worked perfectly for adding texture to the feathers, which I cut out with a clay cutter, then shaped by hand. By the time I was done with one side I had cut and shaped HUNDREDS of feathers! I think the effort was worth it to achieve this effect.
.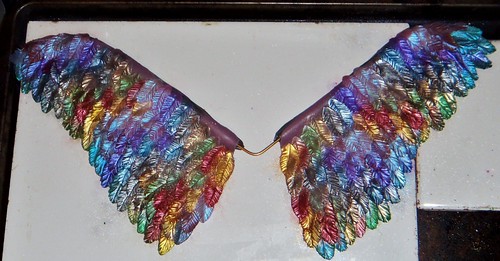
The picture really doesn't do it justice, but gives you an idea of how shiny and detailed the wings are. I'm working on the other side now that this side is baked. I believe I'll sculpt the polymer clay harness onto the cat and bake it, then attach the wings with glue. I don't think I want to try attaching them and baking the whole thing together- too much risk for breakage. I'm nearing the finish line an this project, and I'm so glad you've all shared the journey with me! Stay tuned to see the final results of all this work! ;-)
-Michelle of CreativeCritters
Saturday, February 12, 2011
Exercise to keep away the winter blues
It's certainly been a long, cold winter (seems longer and colder than usual this year)! Living in NE Ohio, you think I'd be used to it by now, but the fact is, I hate winter. It's too cold to get outside and walk every day like I usually do in the warmer weather, I can't get out in the garden, and it's just depressing. I have found that keeping up with my indoor workout routine does help keep my spirits up though. I don't even have to worry about getting out in the cold to drive to the gym (so there's no excuse to skip a workout or three). I have everything I need for a huge variety of cardio and strength workouts right here in my own (warm!) home. I got a new elliptical for Christmas, so that's even more motivation to get moving- I paid for it, I'm certainly not going to let it sit there and collect dust! Getting a new piece of workout equipment always makes me want to try it out. Even just a new sports bra gives me incentive to work out. I've also got dumbells from 2 pounds up to 15 pounds, a 10 pound kettle bell, mini trampoline, BOSU, and a huge variety of workout DVDs. Mixing it up keeps both your body and mind challenged. And my new Reebok Easy Tone shoes add a balance challenge to any workout. After just about a month I'm noticing a definite improvement in my rear view! ;-) On those days when I just have no motivation I make myself hop on the elliptical for just a few minutes, which usually turns into an hour long workout, just because it really does make me feel good, mentally and physically. Exercise improves your mood, and I always feel invigorated after a good workout. Plus, once the warm weather finally does return, I'll be ready to don those shorts and tank tops again. I've noticed a definite difference in my mood if I skip more than a day of exercise. I've also noticed that when I work out regularly I don't get sick as often as I do if I skip workouts. So far I haven't gotten sick once this winter. Exercise has been proven to improve your immune system (and eating healthy helps as well). So there are LOTS of excellent reasons to continue working out, ESPECIALLY when it's cold and nasty outside. And once I can see the sidewalks again I will be back outside, pounding the pavement and soaking up that lovely sunshine! So if you suffer with the winter blues (and I think most everybody does right about now- LOL), try working out regularly to feel better, mentally and physically. Check out Self.com, Fitness.com, or Shape.com for all sorts of workouts you can do right in your living room.
-Michelle of CreativeCritters
-Michelle of CreativeCritters
Wednesday, February 9, 2011
Striping my Cat Sculpture
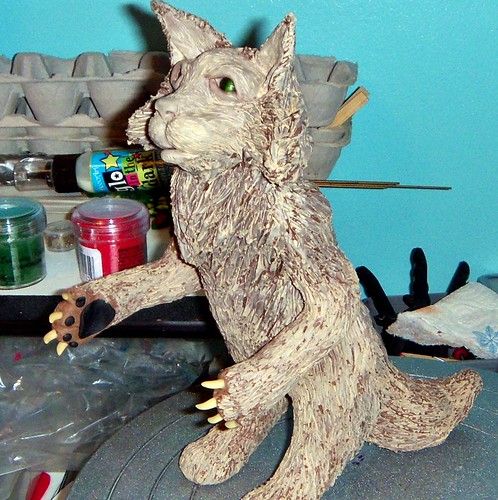
I've moved on to the painting stage of my Steampunk Pirate Cat sculpture, adding some of the darker colors and details. After letting the first wash of color dry, I dry brushed the belly with light tan acrylic paint. I painted the rest of the body a silver gray color. Here you can see what he looks like after starting to add some of the black areas.
Next come the stripes, and a light pinkish tan color for the nose and inner ears.
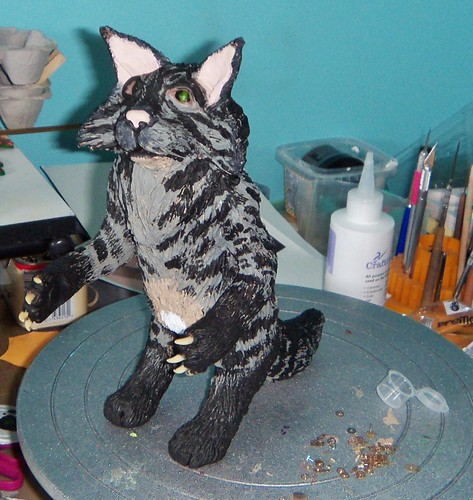
I also added that little white spot that Calcifer has on his belly. That's the only true white fur on him, and part of what makes him special. ;-)
This is by no means finished. Sometimes I find it helps to set a piece aside for a day or so, then look at it with fresh eyes to spot any additions or changes that need to be made. I also have to wait for my order of larger Steampunk parts to arrive before I can start making his wings and other accessories. The way I'm planning on making the wings will be very labor intensive, but I think the end result will look really cool. I want to give him a time traveling watch too (so he can travel through time like Dr. Who does in the TARDIS). I have some tiny Steampunk parts that should work well for that. I'm still thinking about other things to add. Suggestions or any thoughts you may have are always welcome, by the way. I love to hear what other people think! Thanks for stopping by and continuing to share this creative journey with me! =)
-Michelle of CreativeCritters
Next come the stripes, and a light pinkish tan color for the nose and inner ears.
I also added that little white spot that Calcifer has on his belly. That's the only true white fur on him, and part of what makes him special. ;-)
This is by no means finished. Sometimes I find it helps to set a piece aside for a day or so, then look at it with fresh eyes to spot any additions or changes that need to be made. I also have to wait for my order of larger Steampunk parts to arrive before I can start making his wings and other accessories. The way I'm planning on making the wings will be very labor intensive, but I think the end result will look really cool. I want to give him a time traveling watch too (so he can travel through time like Dr. Who does in the TARDIS). I have some tiny Steampunk parts that should work well for that. I'm still thinking about other things to add. Suggestions or any thoughts you may have are always welcome, by the way. I love to hear what other people think! Thanks for stopping by and continuing to share this creative journey with me! =)
-Michelle of CreativeCritters
Monday, February 7, 2011
Recipe for Pineapple Upside Down Muffins
I got this yummy recipe from Fitness Magazine, and thought I'd share it with you.
Healthy and delicious! Enjoy! =D
-Michelle of CreativeCritters
Pineapple Upside Down Muffins
Makes 12 muffins Ingredients
2 tablespoons packed light brown sugar
2 tablespoons chopped walnuts, or pecans (optional)
1 10-ounce can pineapple slices
3/4 cup whole-wheat flour
3/4 cup all-purpose flour
2 teaspoons baking powder
1/2 teaspoon baking soda
1/4 teaspoon salt
1 tablespoon ground cinnamon
2 large eggs
1/2 cup packed light brown sugar
1/4 cup canola oil
2 tablespoons pineapple juice, or orange juice
1 teaspoon vanilla extract
1 8-ounce can crushed pineapple, (not drained)
1 cup grated carrot, (1 large)
1/2 cup old-fashioned oats
3/4 cup raisins, preferably baking raisins (see Ingredient note)
1/4 cup chopped walnuts, or pecans (optional)
Directions
1. Preheat oven to 400 degrees F. Coat 12 muffin cups with cooking spray.
2. To prepare topping: Sprinkle 1/2 teaspoon brown sugar into each muffin cup. Sprinkle nuts, if using, over the sugar. Stack pineapple slices and cut into 6 wedges. Place 2 wedges in each muffin cup.
3. To prepare muffins: Whisk whole-wheat flour, all-purpose flour, baking powder, baking soda, salt and cinnamon in a large bowl.
4. Whisk eggs and brown sugar in a medium bowl until smooth. Whisk in oil, juice and vanilla. Stir in crushed pineapple. Make a well in the dry ingredients; add the wet ingredients and stir with a rubber spatula until just combined. Stir in carrot, oats, raisins and nuts, if using. Scoop the batter into the prepared muffin cups (they'll be quite full).
5. Bake the muffins until the tops are golden brown and firm to the touch, 15 to 25 minutes. Immediately loosen edges and turn muffins out onto a baking sheet. Restore any stray pineapple pieces and nuts. Let cool for at least 10 minutes. Serve upside-down, either warm or at room temperature.
Tip:
Ingredient Note: Baking raisins, moister than regular ones, ensure a better texture. To substitute regular raisins, plump them first: soak in boiling water for 10 minutes; drain well.
Ingredient Note: Baking raisins, moister than regular ones, ensure a better texture. To substitute regular raisins, plump them first: soak in boiling water for 10 minutes; drain well.
Nutrition Facts
Calories 211, Total Fat 6 g, Saturated Fat 1 g, Monounsaturated Fat 3 g, Cholesterol 35 mg, Sodium 185 mg, Carbohydrate 36 g, Fiber 3 g, Protein 4 g, Potassium 152 mg.Healthy and delicious! Enjoy! =D
-Michelle of CreativeCritters
Sunday, February 6, 2011
Tripicians Treasures offers a wide variety of handmade items
Tripicians Treasures on ArtFire.com offers everything from jewelry, to bottle caps, to vintage, photography and more. She enjoys working with photography, wood, jewelry, painting, and multimedia. She chose to do jewelry and clothes primarily because they are easier to ship, although she does sell larger pieces out of her home in Pa. Most of her items are one of a kind as well. You can also find her on Facebook and Etsy. Some of her satisfied customers have said "The fastest shipping possible and best communication on artfire I will buy from this seller many times over - I want to say thank you so much! Such gorgeous items. I received them today and am excited as heck! The opal is better than photographed and I am totally wearing this vintage purple ring. It's gorgeous and you are my best friend right now :)" and "I LOVE the bracelet the best! so clever! My mom will love these earrings, Exceptional style and quality. Thank you ever so much!! Top notch seller that any one can buy from with confidence.( and super fast shipping!)". And right now she's offering 40% off orders $40.00 and up! She's got a shop full of wonderful items, and these are just a few of my favorites.
.


Stop in to see all she has to offer!
-Michelle of CreativeCritters
.
Stop in to see all she has to offer!
-Michelle of CreativeCritters
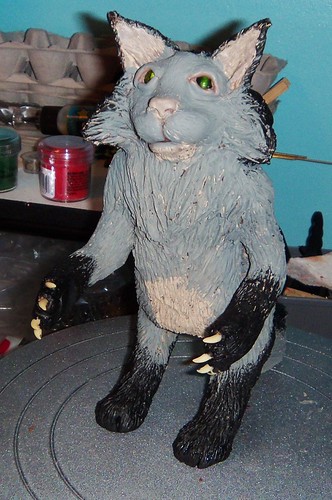
The Steampunk Pirate Cat sculpture gets a paint job
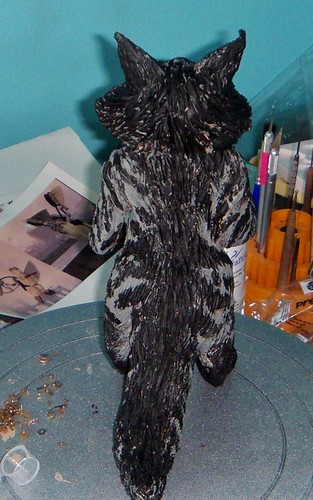
Sculpting the cat himself was only the beginning of this little polymer clay adventure. I am very thankful that my pirate cat has survived every trip in and out of the oven so far. I added a lot more more fur, black paw pads, and glow in the dark claws since I last shared with you. This is how my furry Steampunk Pirate looked after his last bake.
I love the way Calcifer's mane looks, and tried to imitate that look in clay. And while I adore Calcifer's cute kitten face, I wanted the sculpture to look like a more mature cat (and trust me, Calcifer is anything BUT mature- LOL!). Here's a tip for sculptors adding things like teeth, claws, or horns to their creation. Bake the claws first, let them cool, apply a drop of TLS (translucent liquid Sculpey) to the end, then press them into the unbaked clay of the paw. This is so much easier than trying to attach those tiny unbaked pieces of clay without distorting their shape.
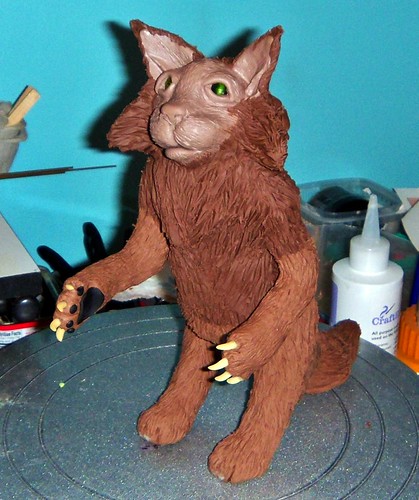
Now that we have the body completely baked, it's time for his paint job. I started with a light tan wash, since that's the color of Calcifer's undercoat. I wish I could replicate his coat exactly, but I just don't think it's possible. Each fur has at least 3 different colors on it, and his coloring is different depending on the light. So, I'll do the best I can and make good use of artistic license. This is how he looks after the first wash of color.
There will be many more layers of color added before this piece is done. Then of course I still need to add the details that will make this creation Steampunk. I've been thinking hard about those wings I was planning (while watching things like Dr. Who to spark my imagination), and I think I have a pretty cool idea on how i want to do them. I'll be adding an eye patch too (he IS a pirate after all!), as well as his gun, and possibly other accessories. I'm in no rush, so I'll just feel my way through and add what seems right. Pieces like this have a timetable all their own, and they can't be rushed, or forced (not if I want to end up with something I'm proud of). Thank you for continuing to share my creative journey! =)
-Michelle of CreativeCritters
I love the way Calcifer's mane looks, and tried to imitate that look in clay. And while I adore Calcifer's cute kitten face, I wanted the sculpture to look like a more mature cat (and trust me, Calcifer is anything BUT mature- LOL!). Here's a tip for sculptors adding things like teeth, claws, or horns to their creation. Bake the claws first, let them cool, apply a drop of TLS (translucent liquid Sculpey) to the end, then press them into the unbaked clay of the paw. This is so much easier than trying to attach those tiny unbaked pieces of clay without distorting their shape.
Now that we have the body completely baked, it's time for his paint job. I started with a light tan wash, since that's the color of Calcifer's undercoat. I wish I could replicate his coat exactly, but I just don't think it's possible. Each fur has at least 3 different colors on it, and his coloring is different depending on the light. So, I'll do the best I can and make good use of artistic license. This is how he looks after the first wash of color.
There will be many more layers of color added before this piece is done. Then of course I still need to add the details that will make this creation Steampunk. I've been thinking hard about those wings I was planning (while watching things like Dr. Who to spark my imagination), and I think I have a pretty cool idea on how i want to do them. I'll be adding an eye patch too (he IS a pirate after all!), as well as his gun, and possibly other accessories. I'm in no rush, so I'll just feel my way through and add what seems right. Pieces like this have a timetable all their own, and they can't be rushed, or forced (not if I want to end up with something I'm proud of). Thank you for continuing to share my creative journey! =)
-Michelle of CreativeCritters
Saturday, February 5, 2011
Fairy Tale Pieces from the Smooshers
I've gathered together some of the entries in the Polymer Clay Smooshers guild's Fairy Tale Challenge to share with you all. To see all the entries and vote for our next challenge theme, stop by the Smooshers blog. I just love the way everyone had a unique way of representing the theme. I think these challenges really bring out the creative best in all of us!
To see more pictures and read a full description, or purchase any of these items, simply click on the picture.
Thanks for stopping by!
-Michelle of CreativeCritters
To see more pictures and read a full description, or purchase any of these items, simply click on the picture.


Thanks for stopping by!
-Michelle of CreativeCritters
Cricket Creek Designs Jewelry and Accessories
Cricket Creek Designs, on ArtFire.com offers a beautiful selection of handcrafted jewelry and accessories. Phyllis loves making jewelry and working with smooth and rough gemstones, sparkling crystals, and shiny pearls. Her new passion is polymer clay. She says "It's really a lot of fun. It is an absolutely amazing material. I have a lot of ideas and plans for ways to use it. I wish there was more time in the day. My goal is to learn and master a new technique every month." I can certainly relate- I've had my own love affair with polymer clay for many years now! You can also find Cricket Creek Designs online at http://www.cricketcreekdesigns.com/ and on Twitter. Below are a few of my favorite pieces from her shop.


And right now she's having a Valentine's Day Sale and offering 20% off everything in her studio through February 15th. Hurry in and use coupon code BEMINE at checkout to get your savings!
-Michelle of CreativeCritters
And right now she's having a Valentine's Day Sale and offering 20% off everything in her studio through February 15th. Hurry in and use coupon code BEMINE at checkout to get your savings!
-Michelle of CreativeCritters
Friday, February 4, 2011
Total body toning with kettle bells
Kettle bells are a fun workout tool that can work your entire body with just a few simple moves. This total body strength workout comes from Self.com. I added in 2 minute high intensity intervals on the elliptical (total of 65 minutes) for added calorie burning. With the cardio intervals my workout was 1 hour 45 minutes long. I also did 3 sets of 15 reps of each strength move. I have a 10 pound kettle bell, but use the weight you feel comfortable with.
Don't forget to warm up before you start, and cool down at the end of the workout. Be sure to stretch all your muscles for at least 30 seconds and drink plenty of water.
-Michelle of CreativeCritters
Don't forget to warm up before you start, and cool down at the end of the workout. Be sure to stretch all your muscles for at least 30 seconds and drink plenty of water.
-Michelle of CreativeCritters
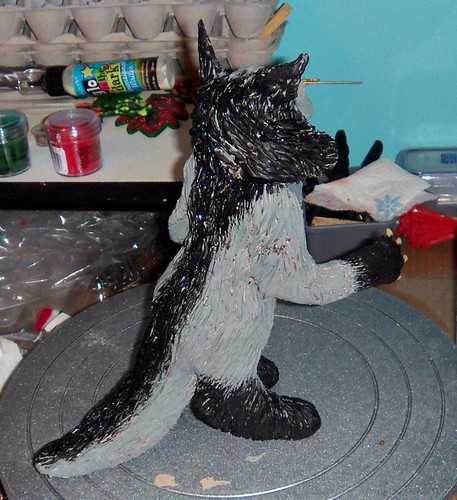
Progress on my Steampunk Pirate Cat sculpture
I've been adding layers and sculpting and shaping my latest piece (which is turning out bigger than I expected). The proportions are working out right though. This is what he looked like going into the oven for his first bake. Propping is very important. As the polymer clay warms, it becomes very soft and will break or crack if not properly supported. This sculpture has a foil core with heavy gauge wire in the legs and a wire and foil core for the tail. I try to make my pieces as sturdy as possible, especially the large ones like this.
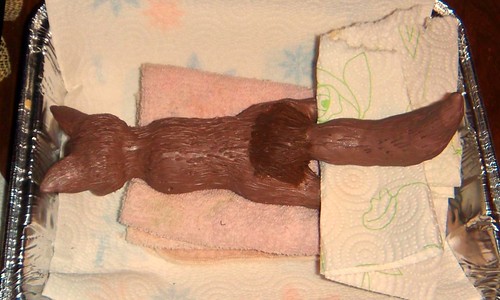
Even though I'll be adding more clay over most of this, I still textured the fur. This, along with a thin coating of tacky glue, will help the raw clay adhere to the baked clay. After baking for an hour and letting the piece cool completely, this is how he came out. No cracks, no sagging, no shifting- everything stayed right where it was supposed to.
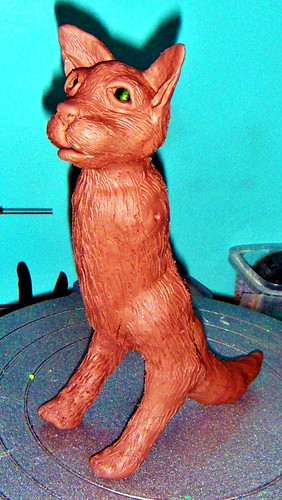
This is basically just a form for me to build upon. Now that it's baked, it's much easier to handle, and I don't have to worry about accidentally squishing the fine details of his face. Next comes a layer of "fur" for his tail and hind legs. I'm modeling this guy after Calcifer, and he's got what I call fuzzy breeches. His legs and butt are very fluffy, and I like that effect and the way it looks. His tail is very furry and sort of feathery. I did my best to capture that in clay.
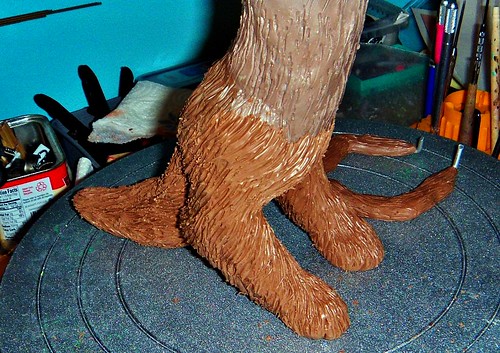
I used 3 different sized aluminum knitting needles to get this furry look. There's a lot of texture to Calcifer's fur, and I'll end up spending hours on just adding fur texture to this piece (not to mention all the time spent conditioning clay- lol). His arms come next. I made wire armatures, bent them in the right pose, and covered them with tacky glue. Once the glue was dry I shaped the arms, but made them smaller than the final size I want them to be. Once again, I'll be adding more clay after the arms are baked. You may notice that my clay isn't all the same color. That's OK for a few reasons. First, Calcifer has lots of different colors in his fur, and second, I'll actually be painting this one after he's finished. I learned some pretty cool painting technique from Katherine Dewey, and it's sometimes easier to paint an animal's color variations than it is to try to make clay in those exact colors and patterns.
This is a complex piece, which I'm figuring out as I go. Thanks for sharing the journey with me! Stay tuned to see how it turns out! =)
-Michelle of CreativeCritters
Even though I'll be adding more clay over most of this, I still textured the fur. This, along with a thin coating of tacky glue, will help the raw clay adhere to the baked clay. After baking for an hour and letting the piece cool completely, this is how he came out. No cracks, no sagging, no shifting- everything stayed right where it was supposed to.
This is basically just a form for me to build upon. Now that it's baked, it's much easier to handle, and I don't have to worry about accidentally squishing the fine details of his face. Next comes a layer of "fur" for his tail and hind legs. I'm modeling this guy after Calcifer, and he's got what I call fuzzy breeches. His legs and butt are very fluffy, and I like that effect and the way it looks. His tail is very furry and sort of feathery. I did my best to capture that in clay.
I used 3 different sized aluminum knitting needles to get this furry look. There's a lot of texture to Calcifer's fur, and I'll end up spending hours on just adding fur texture to this piece (not to mention all the time spent conditioning clay- lol). His arms come next. I made wire armatures, bent them in the right pose, and covered them with tacky glue. Once the glue was dry I shaped the arms, but made them smaller than the final size I want them to be. Once again, I'll be adding more clay after the arms are baked. You may notice that my clay isn't all the same color. That's OK for a few reasons. First, Calcifer has lots of different colors in his fur, and second, I'll actually be painting this one after he's finished. I learned some pretty cool painting technique from Katherine Dewey, and it's sometimes easier to paint an animal's color variations than it is to try to make clay in those exact colors and patterns.
This is a complex piece, which I'm figuring out as I go. Thanks for sharing the journey with me! Stay tuned to see how it turns out! =)
-Michelle of CreativeCritters
Thursday, February 3, 2011
A collection of lovely Valentines gifts from the Smooshers
Just thought I'd share a few beautiful creations from the Polymer Clay Smooshers guild on ArtFire. Any of these would make great Valentines Day gifts. Give a gift from the heart- shop Handmade! =)
And you can find plenty more beautiful items in each of these shops- stop in and browse around for a bit!
-Michelle of CreativeCritters
And you can find plenty more beautiful items in each of these shops- stop in and browse around for a bit!


-Michelle of CreativeCritters
Subscribe to:
Posts (Atom)


