Showing posts with label work in progress. Show all posts

Friday, August 16, 2013

Completing the World of Warcraft Pandaren Wedding Cake topper

To see how this all started check out post one, two, three, and four in this series.  Here's the final installment of my work in progress posts for the World of Warcraft Pandaren wedding cake topper.  In the last post I showed you how I finished sculpting the pretty Pandaren bride.  The poor groom was still headless at that point, but here you can see what he looks like with a good head on his shoulders ;)
And here's a shot of what he looks like from behind.  I textured the eyebrows,  hair, and beard and gave him a topknot as well.
After a final smoothing the wedding cake topper was ready to be baked.  I baked this one all in one shot, rather than doing several short bakes before the final longer bake.  When I'm working with white clay I try to just do one bake since the clay can sometimes darken with multiple bakes.  And since I used foil armatures to fill the larger parts, rather than solid clay, baking the piece for an hour and letting it cool in the oven was completely sufficient.  After the sculpture was cooled I mixed pearlizing medium with high gloss glaze to add a pretty shimmer to the bride's dress.
I used acrylic paint to add the gray stripes under her eyes and painted her nose and both their mouths with black acrylic paint.  I also added shine to their eyes and noses with a coat of high gloss glaze.  The final touch was to seal the entire piece with several layers of matte glaze.  This helps protect the sculpture and makes it easier to clean.

This wedding cake topper measures about 4 1/2 inches wide and 6 inches tall and is actually quite lightweight, especially considering that Pandaren are very solid, thick creatures.


I'm very happy with the way this piece turned out and I hope to get the chance to sculpt more Pandaren, as well as other World of Warcraft characters, in the future.  I really enjoy creating wedding cake toppers because a wedding is such a special event, and the cake topper is a lasting reminder of that very important day in a couple's life.  And don't forget, I'll sculpt just about any character you've got pictures of, so just contact me at macreativecritters@gmail.com if you'd like me to create a customized cake topper for your wedding, anniversary, birthday, or other celebration.
Thanks for following another creative adventure with me!
~Michelle of CreativeCritters

Monday, August 5, 2013

World of Warcraft Pandaren Wedding Cake Topper Work in progress- the groom gets arms and the bride is completed


 Progress on the World of Warcraft wedding cake topper is moving forward and the sculpture is nearing completion.  To see how this all started check out posts one, two, and three in this series.  In the last post I showed you how I dressed the bride and groom , but neither had their arms or heads yet.  Now you can see how the Pandaren groom's hands and arms started out.  I used a wire armature bent into the proper shape and sculpted the gray and black polymer clay fingers and hands onto the wire.  They're still a little rough in this picture, but you get the idea.
Next I sculpted the arms and added cuffs to the black tuxedo jacket.  The cuffs also help secure the hands even more firmly to the arms.  I left enough wire sticking out of the shoulders to insert into the groom's body. 
I did the same thing with the bride's arms and managed to to arrange their arms so they were holding hands.  It took several tries to get this right, but I managed to achieve the look I wanted.  This is a very sturdy sculpture as well.  Not only do the arms have wire armatures but I also pressed them against the bodies wherever possible, forming one solid piece.
The next step was to sculpt the bride's head.  Although I've never sculpted a Pandaren before, my years of experience sculpting a variety of animals came into play and I was able to create a female Pandaren in polymer clay without too much difficulty.  I also had several good pictures to go by, which always helps.
Here you can see that I've added her hair, put a purple (polymer clay) bow in it, and inserted a pair of hair sticks.  I also added gray piping to her bodice and gray details to the shoulders of the dress.  The piping helps distinguish the white dress from her white flesh and the shoulder details not only add a bit of color but also help attach the arms even more firmly to her body.
And here you can see what she looks like from the back.  I used thin strands of clay to create her hair and styled it into a bun encircled with a gold band.  Making hair in this manner does take quite a bit of time, but I just love the way it looks- so much more natural than a sheet of textured clay.  At this point the sculpting phase is finished for the bride.  Once I'm finished sculpting the groom I'll bake the entire piece then do some detail painting. 
In the next post I'll finish sculpting my Pandaren groom and I'll be able to share the final cake topper with you.  Thanks for joining me in this creative World of Warcraft wedding cake topper adventure! ;)
~Michelle of CreativeCritters


Tuesday, July 30, 2013

Progress on the Pandaren Wedding Cake Topper: the Bride and Groom Get Dressed

To see how this all started be sure to check out the first two posts on this project at Making a Custom Order World of Warcraft Pandaren Wedding Cake Topper and Work in Progress (Pandaren Pants). 

Work on the custom World of Warcraft Pandaren wedding cake topper has been coming along nicely and the Pandaren couple are now getting dressed in their sharp looking tuxedo and pretty white wedding dress.
Now that the groom's pants are complete I've started to add his jacket and belt.  This is the view from the rear.
And this is the view from the front.  As you can see, I've added lots of little details, including the white shirt under the tuxedo jacket, a black bow tie, and silver buttons down the center of the jacket.  I made the belt to resemble the picture that bride sent me as closely as possible.  All of this is done by hand using Premo polymer clay.
Once I completed the main part of the groom's tuxedo I attached the bride to the base, sculpted her feet in the same manner as I did the groom's, and used a thin sheet of white polymer clay to create the skirt of her wedding gown.  As with the groom, the bride has a foil and wire armature with the wire going through her feet and into the base.  All of my pieces are created with durability in mind.  I want my work to be around for years to come!
I used my fingers and a soft paint brush to create the folds I wanted and position the skirt exactly the way I wanted it to lay.  I smoothed the waist of the skirt onto her body in preparation for adding the bodice.  One reason I love Premo polymer clay is that you can roll it out very thin and it still remains strong and flexible.  When I make clothing like this I usually run the clay through my pasta machine on #4 or #5, which makes it very thin and easy to drape.  Of course it also takes a very light touch to avoid stretching or ripping the clay!
And here you can see I've added not only the bodice of the dress, but also sculpted a layer of white clay over the brown to create the Pandaren bride's skin.  I added a purple sash with a little bow at the waist as well.  In the next post you'll see how I add details to the bodice to make it stand out against her white skin.
And here's a slightly different angle.  You can see my laptop with the pictures I'm using in the background.  The bride sent me several good shots of the Pandaren couple, which made it much easier to include all these little details and reproduce the characters in clay.  I've also bent the wire for the arms of the bride and groom.  This next part is going to be a bit complicated because I want the couple to be holding hands.  It may sound easy enough, but it can be difficult to get each arm and hand positioned just right.  So be sure to check back and see if I can do it!
Thanks so much for sharing another creative adventure with me!

~Michelle of CreativeCritters


Tuesday, July 16, 2013

Work in Progress- The World of Warcraft Pandaren Wedding Cake Topper (Pandaren Pants- LOL)

If you've been paying attention you know I got a custom order for a World of Warcraft Pandaren wedding cake topper recently.  I've been having a lot of fun working on this project and things are coming along quite nicely.  You can check out this post to see how I started the armatures for the bride and groom.  Once the armatures were complete I made the base.  I wanted it to resemble a stone floor so I mixed several shades of brown and gray polymer clay together and then used my stone texture plate to create the look I wanted.
I do love those texture plates- they come in mighty handy for things like this!  I just cut a free form shape from the clay, making sure it was large enough to hold the bride and groom, but not too large.  This does have to fit on top of a wedding cake after all.
Then I set the base aside and got back to work adding a base layer of clay to the bride and groom.  I used brown clay for no other reason than the fact that I had an ample supply of it.  This base layer will be covered anyway, so it really didn't matter what color clay I used.
Instead of giving the bride separate legs I just made one solid piece in order to make her more sturdy.  Her dress will completely cover her lower half, so I just wanted to get the shape right and make sure she would attach solidly to the base.  She will have feet, though, which I'll sculpt right onto the base.
Here you can see the groom attached to the base with his feet sculpted and wearing his fancy black and gold spats.  I even made sure to sculpt toenails!
There's a heavy gauge wire that runs through his body, out the bottom of his feet, and into the clay base.  I want to be absolutely certain that this wedding cake topper is going to be a strong, solid piece.  Next I made some Pandaren pants, a first for me- LOL
I think he looks pretty good with his pants on!  I actually use my sewing and pattern making skills to make the patterns for these clothes in clay.  It's the same process really, only you're using thin sheets of polymer clay instead of fabric.  It helps to be skilled in a variety of different crafts.  These things do tend to overlap.  And here's a shot of the groom's back side.  Of course I had to add that cute little tail ;)
In my next Pandaren post the groom will finish getting dressed in his tuxedo.  So far this project has gone quite smoothly and I hope it continues like this.  I have most of it planned out, although sometimes I need to change my plans as I sculpt and come across issues.  I'm still trying to figure out exactly how I want to sculpt their arms.  I'd like them to be holding hands, but that's not as easy as it sounds.  Any time you're working on two sculptures simultaneously things can be a bit complicated.  Their arms will have to be positioned perfectly and I'll have to measure constantly as I'm sculpting.  But I'll cross that bridge (or those arms) when I come to it.  Until then, thanks for joining me on another creative adventure!
~Michelle of CreativeCritters


Friday, July 12, 2013

Making a custom order World of Warcraft Pandaren wedding cake topper

So I got my first order for a World of Warcraft Pandaren wedding cake topper last week, and I'm really excited to be working on this project.  Business had been slow for the last few weeks, and while that did allow me to catch up on some things around the house and the yard, it's always nice to have a project or two going on the work table.  And this one is just really cool!  First of all, wedding cake toppers are such special and important keepsakes, second of all Pandaren are just some really awesome WoW characters! Pandaren are large bipedial panda-like humanoids that live in mountainous bamboo laden areas (just like your average panda bear).  Their main homeland is in a portion of Azeroth known as Pandaria.  Personally, I think they're adorable!  I also like that Pandaren get along with any races that don't attack their homeland. In terms of the war between The Alliance and The Horde the Pandaren remain neutral. Yep, Pandaren are certainly critters after my own heart ;)  This is a screen shot of the Pandaren couple I'll be sculpting in polymer clay.
Now I've never sculpted  Pandaren before, but ever since WoW introduced these characters I've been wanting to either sculpt them or create them as plushies.  Before now I really didn't have the time to do it just for fun.
Before I started sculpting I carefully examined all the pictures my customer sent me and planned out exactly how I was going to create this couple.  I drew a rough sketch of the bride and groom and covered it with tape to keep it clean and make sure it lasted through the entire project.  This drawing will help me keep everything in the right proportion and size.  Then I had to make the armatures, using my sketch to measure against.  Since this sculpture will be sitting on top of a wedding cake I not only want it to be strong, but very lightweight as well.  Pandaren have large, thick bodies and if I were to make them from solid clay not only would it be very expensive in terms of the amount of clay needed, but the sculpture would be pretty heavy.  So I created a wire armature covered with foil for their bodies.

By filling the groom's body cavity with tightly packed foil I saved at least a full bar of clay, if not more.  The legs are also very thick so covering them in foil saves clay and gives the groom an even stronger base of support.  I left enough wire sticking out at the bottom so I can insert it into the base.  These wedding cake toppers are meant to last!
The bride's body isn't nearly as big or thick, but I still want to keep things as light as possible, so I built up her torso with foil as well.  After shaping the foil I wrapped it with floral tape and coated it with tacky glue.  This helps smooth the surface and will allow the base layer of clay to adhere easily without any air bubbles.
So that's the basic armature for my Pandaren bride and groom.  I'll continue to post my progress on this fun World of Warcraft wedding cake topper as I go.  This is a truly enjoyable project and I hope the real bride and groom get as much pleasure from it as I do!  To order your own custom wedding cake topper (I can create any characters you like, not just World of Warcraft) just click Made To Order Personalized Unique Wedding Cake Topper.  Here you can read more about my custom cake toppers (I'll do birthdays, anniversaries, or any other type of cake topper you'd like as well) and place your deposit.  If you have questions just send me an email at macreativecritters@gmail.com.
Thanks so much for sharing in another creative adventure!
 
~Michelle of CreativeCritters


Monday, July 4, 2011

Work in Progress- Rudy the Dog Gets His Fur

This custom dog sculpture has been a bit complicated and is taking more time than I anticipated, but after some changes I'm happy with the progress up to this point.  And even more importantly, the customer is happy with progress.  When I last posted, this Irish Wolfhound/ Collie mix only needed some refinement to his basic body shape and the layers of clay that would become his fur.

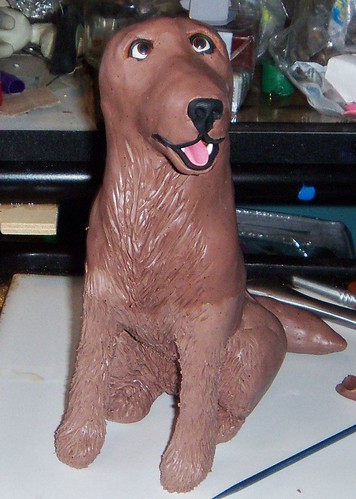
Before adding a new layer of clay I covered the sculpture in a thin layer of Tacky Glue and let it dry.  This helps the fresh clay adhere much better.  This is the sculpture after it's been completely covered.  I've started to texture the belly and back paws.  When adding fur texture to animal sculptures I usually start with those hard to reach places first.  This allows me to hold the piece without distorting anything.  Generally I'll texture the back last, because I can usually do this without touching any other part of the sculpture.
Next I start adding fur texture to the front legs and chest.  I added more clay as needed to fill out the chest and shoulders.  I used various sized knitting needles and Christi Friesen's Gotta Have It tool to create all the texture on this piece.  Rudy had many different textures to his fur, so I had to change tools and strokes for the different parts of his body.
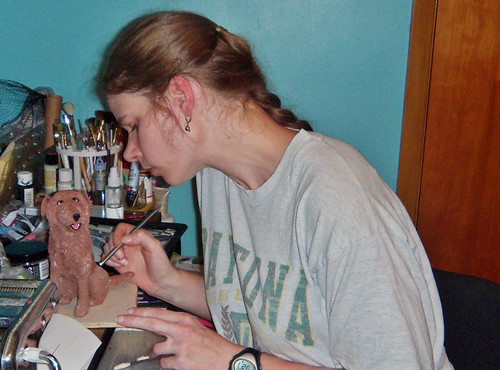
It took about a week to completely texture the entire piece.  I ended up cutting off the original tail and creating a new one as well.  The more I looked at it and compared it to the pictures, the more i realized it was going to be too thick as it was. The ears were added after I had textured the head, and I tried several different pairs of ears before I was satisfied.  Rudy's ears are very important to his expression, so I had to be sure I got them just right.   Once the head and ears had been textured I was able to move on to the back and hips.  Here you can see me texturing the back of the dog, nearing the end of this stage of the sculpture.
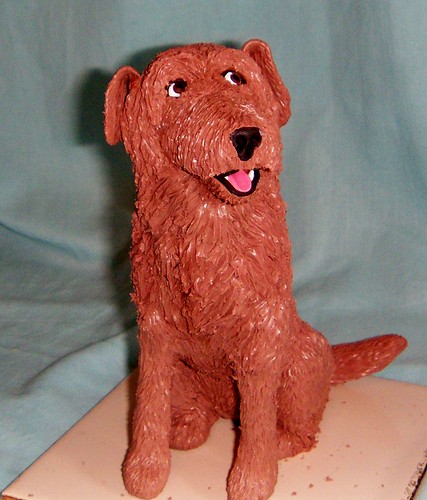
And here is the handsome pup ready to be baked.  I also repainted the eyes so they were both looking in the right direction, and this little change really perfected Rudy's expression.
The next step will be to paint him with acrylic paint.  And then I believe I will be able to call this project complete.  By now I feel almost as though I knew Rudy.  Working on a big project like this one brings me very close to the subject being sculpted.  Some part of my mind is constantly thinking about not only the sculpting process, but the animal himself.  Pieces like this help to keep a beloved pet's memory alive.  Stay tuned to see the final results of more than a month of work!  Thanks for sharing this creative journey with me!
-Michelle of CreativeCritters

Tuesday, June 14, 2011

How to fix mistakes in baked polymer clay

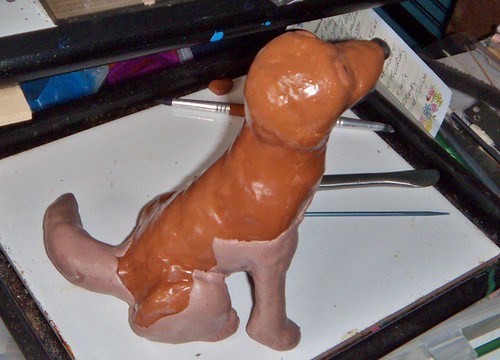
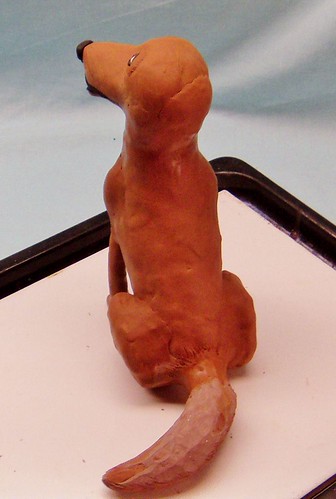
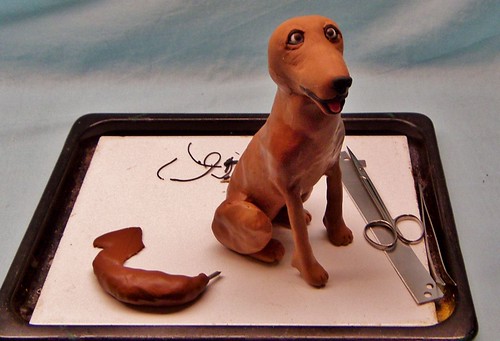
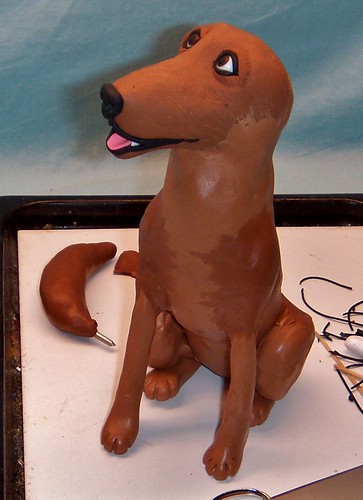
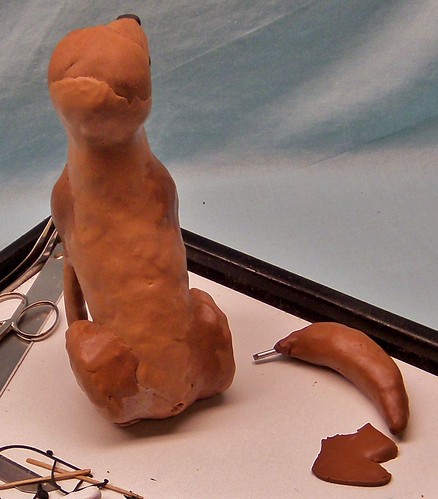
I've been working on a custom order dog sculpture for a few weeks now.  You may have read some of my Work in Progress posts on my blog or Fan Page.  The sculpture was coming along quite nicely and I emailed the customer pictures of my progress so far.  Everything was just fine except for one little detail- the dog's head and tail were facing the wrong direction!  When we first discussed the sculpture the customer said he wanted the dog looking to the right.  He also sent a lot of pictures of the dog in a variety of poses so I would know what he looked like from all angles.  I think I was looking at the wrong picture when I positioned the head and tail.  And to complicate matters a bit I had already baked the sculpture.  This is what he looked like yesterday.

I plan to add another layer of clay which will be textured like fur.  The customer graciously said that it was all right if I couldn't change the sculpture, but I really want to do the best job possible on this order.  So after some thinking and looking at the piece I decided I could safely cut off the head and tail and turn them to the right.  Polymer clay is an amazing substance, and after working with it for many years I've learned a few tricks to repair mistakes.  I heated the sculpture in the oven until it was just warm.  When the clay is slightly warm it's easier to cut through it.  You don't want to get it too hot because you have to be able to handle it and you don't want the clay to be too soft either.
I used a serrated blade to saw through the thick clay of the neck and base of the tail.  Then I used an exacto blade to carve away some of the chest and narrow the neck.  I don't want that area to get too thick after I start adding the raw clay.  I've also used this method to repair or replace faces on my sculptures, or carve away misshapen or burned areas on sculptures.  Before putting the head and tail back on I coated the wires with liquid polymer clay, which acts as glue when baked.  I also put some liquid polymer clay on the neck, head, and tail.  Once baked this will become a solid piece again.
With the head and tail in the proper position I'll add thin ropes of clay to completely fill the gaps and more clay to cover the neck and head and base of the tail.  While I was working with the tail I decided I wasn't completely satisfied with the way it looked, so I carved it down a bit and reshaped it some. 
And this is what the dog looks like now,  You'd never know he'd had his head and tail chopped off!
The next step in this project is to add more clay which will be textured to look like fur.  Accidentally sculpting the dog looking the wrong way could have been a real problem, but with a bit of creative thinking I was able to fix the problem.  Stay tuned to see how he looks with his fur on! =)
-Michelle of CreativeCritters

Saturday, June 11, 2011

My Custom Dog Sculpture Gets Legs, Tail, and a Body

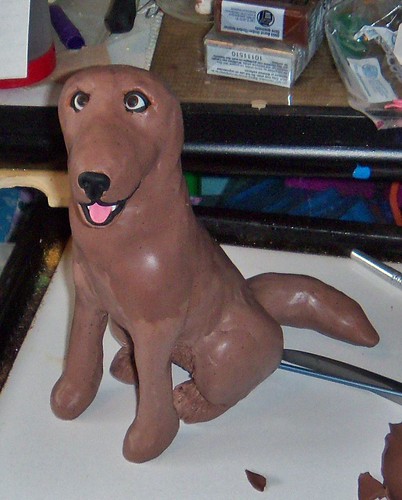
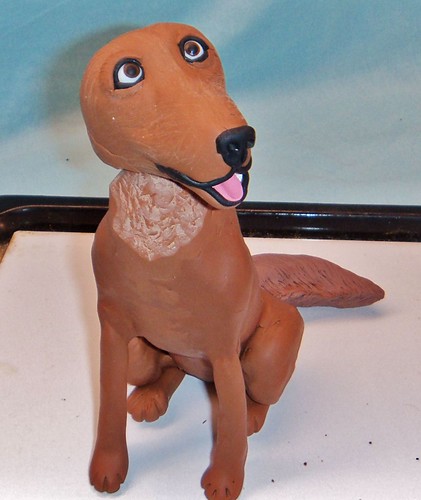
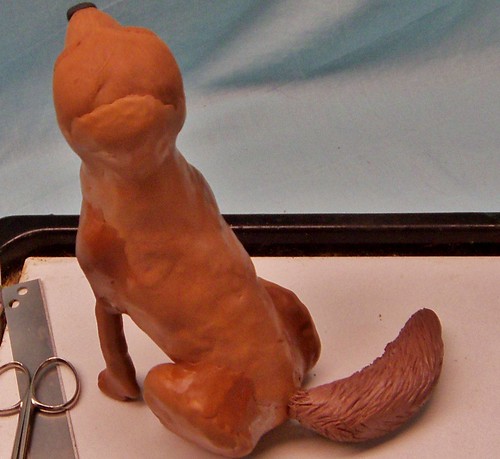
Well, Rudy the dog now has a body, legs, and a tail.  I sculpted most of the head first, and baked it to preserve the details.  One of the nice things about polymer clay is that it can be baked repeatedly, and fresh clay added at any point.  I sculpted the head around a foil core with a heavy gauge wire embedded in it.  After the head was baked I inserted the wire into the foil core of the body and used clay to attach the head to the body.

The front legs were sculpted over thick wire coated in Tacky glue.  The sculpture needs a stable base.  I bent the ends of the wire and inserted them into the foil core of the body.  Right now this is just a rough base to start with.  More clay will be added to smooth and shape the legs and body after it's been baked.  Deciding when to bake can be difficult sometimes.  I considered adding more clay before baking, but the legs just didn't feel stable enough.  After the piece has been baked it will be much easier to add clay without distorting or moving anything.
Since I'll be painting Rudy after the final bake, the color of the clay used isn't that important.  I am using Premo polymer clay exclusively because of it's strength and the way it holds details.  It's my favorite brand of clay to work with, especially when I'm sculpting animals.  The fur seems to flow so nicely when I texture it.  I'll share more about that in the next post, when I start adding the fur.  You can also see that I've started the dogs tail.  I shaped foil around a wire, then covered that in clay.  I left enough wire uncovered to insert into the body.
I peirced a hole in the rump first, and added the fur texture to most of the tail before attaching it to the body.  You'd be surprised at how long it can take just to texture one dog's tail!  I am pretty meticulous though.  I have a few good pictures of Rudy''s tail for reference, so I know just how I want it to look. 
First I textured the bottom of the tail, then I was able to do the top after I attached the tail to the body.
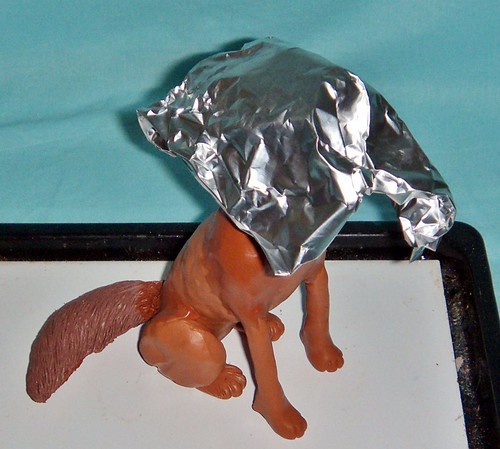
I textured the fur right up to the body, even though I'll be adding fresh clay to the base of the tail and rump.  The texture will help the unbaked clay stick better, and I'll be able to pull the lines of the fur from the unbaked clay onto the baked fur seamlessly.  And now Rudy, the Irish Wolfhound/ Collie mix, is ready to go into the oven.  This is always a slightly nervous time for me.  I don't want anything break, or sag, or burn.  I'll often cover more delicate parts with aluminum foil.
It looks funny, I know, but now his light colored eyes, tongue, and teeth won't darken or scorch.  Once the piece has been baked and cooled I'll start smoothing out the lines of the body, filling in the areas that need more clay.  Once I've got the final shape I'll start adding the fur texture.  But that's for the next post ;-)
Thanks for joining me on another creative journey!  Stay tuned to see the final results!
-Michelle of CreativeCritters

Thursday, June 2, 2011

Work in Progress- Custom Dog Sculpture

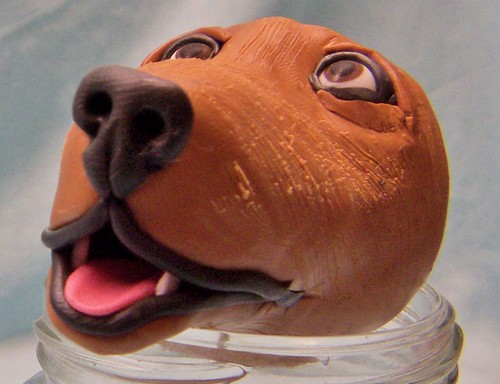
My custom sculpture of Rudy, a Collie/ Irish Wolfhound mix is progressing nicely.  I'm continuing to sculpt his head , refining it's shape and adding the lower jaw. I made eyes which I painted with acrylic paint.  I find it easier to paint the eyes before I insert them.  I rimmed the eyes with black clay and built up the brow and forehead.  I also sculpted his nose in black clay.
According to the customer Rudy was a fun loving character.  He sent me a picture with Rudy "smiling", mouth open, tongue out just a bit (and he looked ready for anything!).  So I'm trying to recreate that look for this sculpture.   I sculpted tiny white teeth, which I baked before putting them into the unbaked clay of the jaw.
 
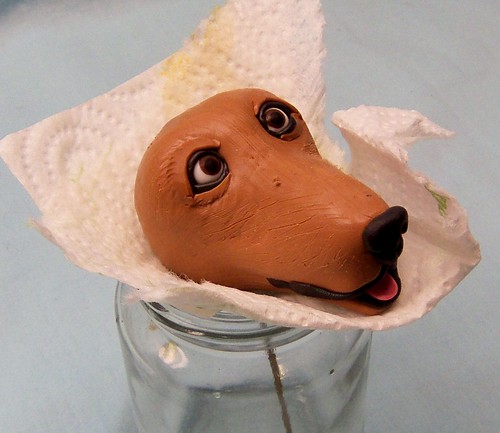
I made the lips using a thin rope of black clay, and sculpted a pink tongue as well.  With the brow and muzzle built up and the mouth just right, I now have the head the way I like it.  I decided this was a good time to bake the head.  I didn't want to distort what I had already sculpted.  At this point the head has to be handled very carefully.  I inserted a heavy gauge wire through the clay and into the center of the foil head armature.  This will help attach the head to the body and give added strength to the neck.  To support the head safely without damaging any of my work I positioned it in a glass jar and cushioned the bottom of the head with paper towels.
 
I gave the clay a bit of texture to help the next layer of clay adhere better.  After the head is baked and cooled I'll attach it to the body and start adding fur.  What you see here will look pretty different once I've added and textured the fur.  I'll also have to paint the entire piece once it's baked.  This has been a challenging order, but I'm really enjoying that challenge!  Stay tuned to see more of this dog being sculpted!
Thanks for sharing another creative journey!
-Michelle of CreativeCritters

Monday, April 25, 2011

My polymer clay flower garden gets more blooms

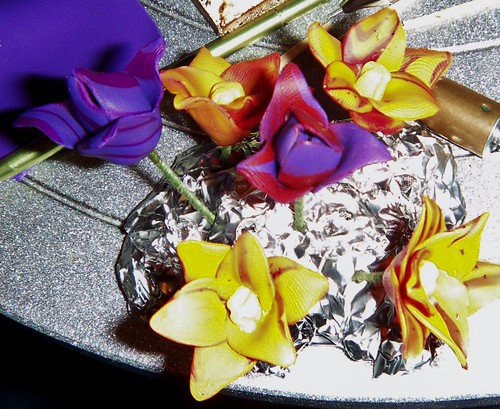
I continue to work on my polymer clay flower garden, and have added tulips and hyacinths to the other flowers.  I believe the type of tulips Gramma had were called Rembrandt tulips. They had streaks and swirls of different colors on their petals.  I sculpted several tulips in shades of purple and red, as well as shades of red and yellow.  Gramma loved a big bouquet of multi-colored tulips in the house!

The tulips have been sculpted around pre-baked centers and are ready to go into the oven.

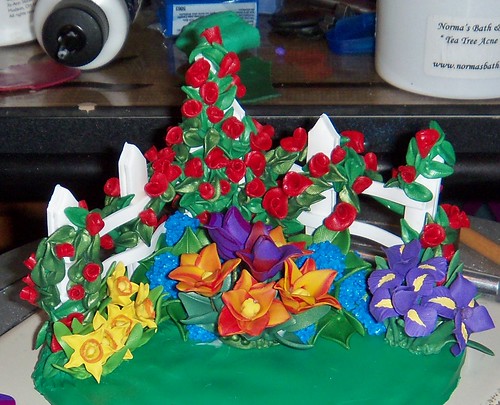
And here you can see them "planted" in the garden with the addition of their leaves.  You'll also notice that the bunny is now hidden.  You can still see him, you just have to look a little harder, which is the way I want it.  This garden is meant to draw you in and make you want to stay a while.
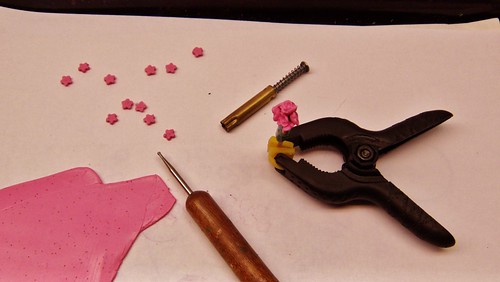
I studied hyacinths very closely and eventually  figured out how to create them on this very small scale.  I just love hyacinths- they smell divine!  Gramma loved their fragrance too, and I made sure to plant plenty of them right next to the front door.  She liked to stand there in the door and just enjoy their perfume.  For my miniature versions I used a toothpick as a support.  I cut out tiny flower shapes, refined them by hand, and carefully attached them to the stem.  I kept the toothpick long enough to hold with a clamp, which made it much easier to work with and avoid distorting any of the tiny flowers.

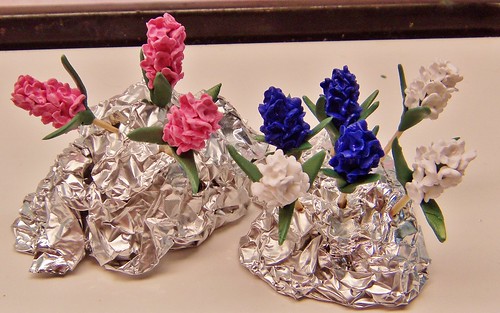
I used a ball tipped stylus to shape the flowers.  I covered the toothpick in green clay, giving the flowers something to hold on to.  And here you can see the blue, pink, and white hyacinths ready to be baked.  It took an hour to make just two hyacinths, but they look just perfect!  I will take the time to create just the look I want.  The end result is totally worth the effort!  I baked most of the flowers for this piece before adding them to the garden.  It's much easier to avoid damaging the delicate petals if they're baked before I handle them.  Of course it still requires a light touch!

The leaves were added to these before baking.  This way I can push them into the unbaked clay of the base and they'll have a more solid base of support.  I'll cut the toothpicks near the base before I set them into the clay.  They look incredibly delicate, but with that toothpick in the center they have a very strong support and I'll be able to handle them without too much worry.  Stay tuned to see the final results of my pretty polymer clay flower garden!  Thanks for visiting!
-Michelle of CreativeCritters