

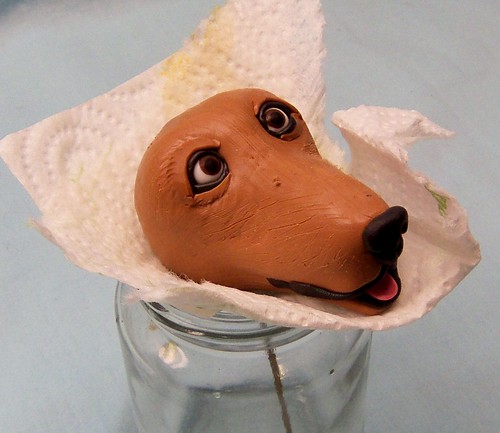
According to the customer Rudy was a fun loving character. He sent me a picture with Rudy "smiling", mouth open, tongue out just a bit (and he looked ready for anything!). So I'm trying to recreate that look for this sculpture. I sculpted tiny white teeth, which I baked before putting them into the unbaked clay of the jaw.

I made the lips using a thin rope of black clay, and sculpted a pink tongue as well. With the brow and muzzle built up and the mouth just right, I now have the head the way I like it. I decided this was a good time to bake the head. I didn't want to distort what I had already sculpted. At this point the head has to be handled very carefully. I inserted a heavy gauge wire through the clay and into the center of the foil head armature. This will help attach the head to the body and give added strength to the neck. To support the head safely without damaging any of my work I positioned it in a glass jar and cushioned the bottom of the head with paper towels.
I gave the clay a bit of texture to help the next layer of clay adhere better. After the head is baked and cooled I'll attach it to the body and start adding fur. What you see here will look pretty different once I've added and textured the fur. I'll also have to paint the entire piece once it's baked. This has been a challenging order, but I'm really enjoying that challenge! Stay tuned to see more of this dog being sculpted!
Thanks for sharing another creative journey!
-Michelle of CreativeCritters


Rudy is looking fantastic! Beautiful work! ~Val
ReplyDelete