Sunday, January 29, 2012

Smooshers Blog Roll- White

The theme for this week's Blog Roll is White.  Many things come to mind when I think of white.  There's the beautiful pure white of fresh fallen snow for one thing.  When I was a teen I lived in the country and the woods and lake were just magical after a snowfall.  And there were no other people around to mar that perfection.  The only prints I saw in the snow were those of the birds and animals.  I had fun trying to identify the different prints and often followed their path for as long as I could.  Our dog Bill loved playing in the snow and joining me on my winter treks through the woods and across the frozen lake.  The ice of the lake held it's own beauty, and often had swirls of color trapped in the frozen water.  That's what this necklace and earring set from Danas Jewelry Etc reminds me of.
Blue and Off White Necklace and Earring Set 
My brothers and I used to love it when the snow was wet and heavy and perfect for packing.  We'd build snow forts and have snowball fights, and of course we made plenty of snow men.  We'd play outside in the snow and cold until we couldn't feel our hands anymore ;-)  These snowman earrings from WyvernDesigns remind me of those fun afternoons spent playing in the snow with my brothers.
Too Cute Winter Snowman Earrings
Of course white has always been a symbol of purity and goodness.  The good guys in movies wear white, the bad guys wear black ;-)    And of course there's the white wedding dress, symbolizing the bride's purity and innocence.  I think of white unicorns, magical and so pure, only creatures pure of heart can approach them.  I've loved unicorns since I was a little girl.  They symbolize strength, beauty, and absolute purity and devotion.  I love this sweet unicorn pendant from Positively Charming Things!Polymer Clay Unicorn pendant 
And as I write this post white snowflakes are falling fast and furious outside my window ;-)  So I leave you with a bit of winter white from the Polymer Clay Smooshers guild.

Friday, January 27, 2012

My second entry for the Smooshers Valentines Challenge

My second entry for the Smooshers Valentines Challenge was certainly a challenge to create!  I wasn't even sure exactly what I was creating until I neared the end of the project- LOL!  I knew I want to create something around the words Love Birds, and that I wanted to include birds and hearts, but that was about all I knew at first.  I started sculpting the red bird first, and was thinking of possibly creating a necklace, but by the time I had the first bird finished I felt that it would be too big for a necklace.  I created a blue bird as the red bird's mate next.

 
I textured each feather and highlighted them with various Pearl Ex powders to add a gorgeous shimmer.  I also attached acrylic crystals to the backs of the birds.  Once they were baked I started rummaging through my odds and ends looking for something that would grab my eye and lead me in the direction this project wanted to go in.  I happened to find a round mirror, and suddenly I knew exactly what I wanted to create with these birds.  I saw a mirror wall hanging with the birds on either side and hearts at the top and bottom in my mind's eye.  The next component I created was this three layer heart with a beaded dangle attached to the bottom.
Each heart was made from a different shade of red clay and the top one was dusted  with Pearl Ex powders.  I strung a blue and white porcelain bird bead between a pink and a blue glass flower bead, then added a clear glass heart bead with a swirl of blue color running through.  I attached the polymer clay teardrop shape, which was highlighted with Pearl Ex powder, using a heart shaped jump ring.
I made several smaller hearts to adorn the top of the mirror as well.  Then I sandwiched the mirror with blue polymer clay and added all the different elements.  Here's how it turned out.
 
One of the things I love about these challenges is how they push me to try new things.  For me, there are no rules when it comes to creating.  I envision the finished piece, and then just figure out how to make that vision a reality.  There were many times while I was creating this when I wasn't sure what my next step would be.  So I relaxed myself, not forcing any ideas, and let my muses lead me.  I found my porcelain bird beads, heart jump rings, and glass hearts just when I needed to.  And each new thing I found in my stash was exactly the right piece to add.  I don't know if other artists work like this, but I usually just go with the flow and see where it takes me.  Whether it's my muse, my inner self, or just blind luck, I usually end up with a piece that I love.  Thanks for spending a little time with me as I share my creations and my creative process!  
 

Thursday, January 19, 2012

Smooshers Blog Roll- Hearts

Smoosher member Kris of Art Asylum, was kind enough to start up the Blog Roll again for the Polymer Clay Smooshers guild.  The theme for this week is Hearts, which is just perfect, since most of us have been busy making plenty of Valentines themed items.
This meaningful sculpture from Amy Crawley reminds us that Hope Heals.
Red Heart Sculpture Held in Hands 
The word Hope is carved into the front of the heart, and the word Heals is carved into the back.  The heart can even be removed from the hands and carried with you if you choose.

Of course I love this heart necklace from AverilPam- it's purple after all!
Pendant Necklace Handmade Polymer Clay Heart Purple and Silver 
Not only do I like the fact that this heart is purple, but I love the effect of the crackled silver leaf on the pink clay.

This black heart flower necklace from Christina Kosinski Designs is very unique and striking.
 
I love the way the pretty flowers stand out against the black background. 

And this heart necklace and earring set from Danas Jewelry Etc is so pretty and feminine!Lacey Heart Necklace and Earrings 
I love the way she made white polymer clay resemble lace- it adds a dainty touch.

So these are just a few of the beautiful polymer clay hearts that can be found in the shops of the Smooshers!  With Valentines Day only a few weeks away now is the perfect time to find a special gift for your Valentine!


Tuesday, January 17, 2012

From the bottom of my heart- handmade collection from the Crafting for Animals guild

The members of the Crafting For Animals guild love animals from the bottom of their heart, and do all they can to them a better life.  To view an item simply click on the picture, and while you're there check out all the great things these talented artists have to offer!


Saturday, January 14, 2012

Dragons in love- unique Valentines sculpture

The theme for the Polymer Clay Smooshers Challenge is Valentines (appropriately enough) and I just finished my first entry.  As always, I wanted to sculpt something different and unique.  I toyed around with several ideas before an image of two dragons popped into my head.  The boy dragon was offering a pretty heart to the girl dragon, who had a look of surprised delight on her face.  Once I had the idea and a rough sketch I got started sculpting the dragons.  First thing I needed to do was form the foil armatures for their bodies.  I made the boy dragon's armature a bit bigger than the girl's.

 
Next I covered the foil with clay and added a tail.

 
I made a custom sparkling pink mix of clay for the girl dragon by combining sparkling red clay with a bit of pink and white clay (even my colors are one of a kind- LOL).  For the boy dragon I mixed Cobalt blue with silver, which creates the most beautiful shimmery blue color.  I took my time getting the colors just the way I wanted them because they help to define each dragon's personality.  She's soft and sweet and feminine in pink, with a little sparkliness (yes, I know that's not a word-LOL!) to her personality.  And he's strong and brave and confident- a knight in shining (blue) armor ;-)
I worked on these dragons one at a time, completing the girl first.  The next step in her creation was to add a head and belly plates.
 
I used my own custom mix of purple clay to create her belly and impressed lines across it to resemble plates.  Additional work will be done on her head and face, but I made sure to give her a big smile and a happy expression right from the start.
Next I added the arms and legs, posing the hands just so.  This helps add to her expression of joy and surprise.  I also added a spine of purple starting at her head and going all the way to the tip of her tail.
 
I used my fingernail tool to add the look of scales .  The next step was adding a bit of bling to her spine.  I used red, white, and purple beads and secured them with wire and liquid polymer clay.  I also gave her beaded horns with a purple acrylic flower at the base.  I had a bunch of bead caps mixed with the rest of my jewelry supplies, and the gold filigree cone shaped one looked prefect for adding to the tip of her tail.
 
Then all that was left was to dust her with purple Pearl Ex powder and add her wings.
 
I embedded a wire in the center of the wings to make them even stronger and attach them securely to the body.  Then I carefully propped her and baked her.
Now on to the boy dragon.  He started with the same basic shape then I added his head and belly plates, done in essentially the same way as the female, only in shimmery green.  His hind legs were formed in the same way as the girl's, only slightly larger.
 
Next comes his green spine and his arms.  The arms have to be carefully positioned and propped so they hold this pose.  I prebaked the heart he'll be holding and glued an acrylic heart jewel to the center.  Since the jewel is acrylic I didn't want to risk having it melt in the oven, so I glued it to his hands after the dragon was baked.
I textured him with the fingernail tool to give him scales too.  Then I added blue and green beads down his spine and a matching bead cap to his tail.  He has a single horn on his forehead made from blue glass beads.
 
His wings were made in two shades of green gold and also have a wire in them.  They slightly larger and a little different from the girl's wings.
 
And now he's ready to be baked.  Of course the dragons were only the beginning of this piece.  I had to create a setting for this romantic little scene to occur in.  For the base of the sculpture I covered a metal lid (I have no idea what happened to the box the lid came from) with green polymer clay and sculpted flowers in shades of pink and purple for each corner.  In the center of the flowers is a purple acrylic flower bead topped with a yellow bead.  I positioned the dragons and attached them to the base with liquid polymer clay.  Next I stamped the words MY HEART IS YOURS into a rectangle of purple polymer clay and baked it.  Once it was cool I painted the letters with red paint and sealed it with high gloss varnish.  I positioned the plaque and sculpted tiny pink flowers growing all around it.
 
After baking the entire piece for one final time I glued the heart in the dragon's hands and glued colorful marble chips to the base.  I covered the bottom of the base in green felt and signed and dated the piece.  
Now how sweet is that?  Love is in the air, even for fearsome dragons ;-)  
Thanks for joining me on another creative adventure!

Friday, January 6, 2012

Peacock projects inspired by Christi Friesen

Not too long ago i came across this tutorial from Christi Friesen on making a peacock necklace 
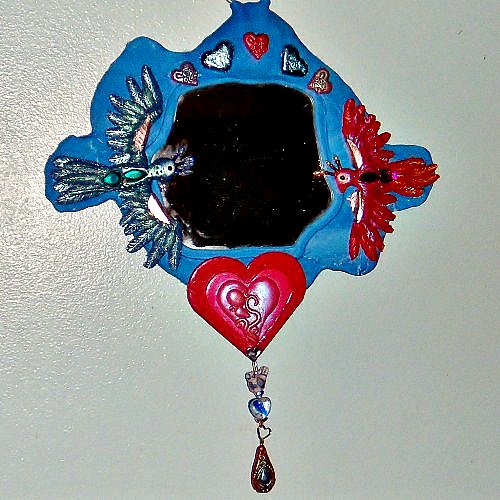
http://www.firemountaingems.com/galleryofdesigns/jewelry_design_gallery.asp?docid=940J&sact=search&kwsearch=christi+friesen.  (Looks pretty impressive, doesn't it?)  I also got her book Birds of a Feather shortly before Christmas.  While I haven't sculpted too many birds, the necklace tutorial and the fun projects in her book inspired me to start trying my hand at them.  The pictures of the peacocks were just so colorful and striking I decided to start with some peacock projects.  My first peacock project was this colorful wall hanging.

The three little mirrors added the perfect amount of sparkle and shine to his tail feathers.  I've had these mirrors for years now and was never quite sure what to do with them.  This type of project is a great way to make use of all my beads and findings too.  I've got a lot of really cool beads and vintage findings but not all of them match.  Projects like this allow me to use single beads to add color, texture, and interest.
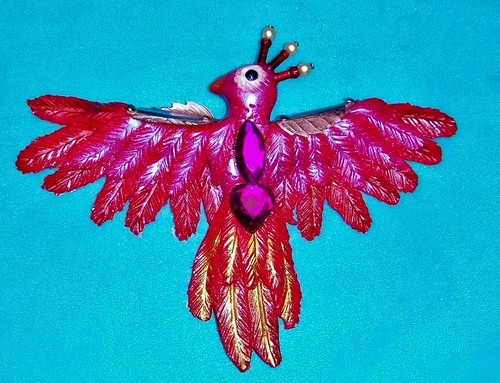
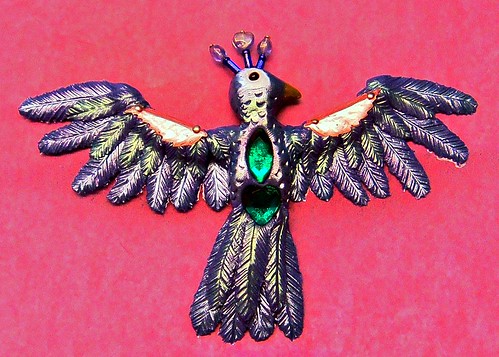
After working on this somewhat large project, I decided I wanted to make some peacocks that you could wear.  So I created these colorful little peacock earrings.

I used tiny glass seed beads and tube beads to accent these fun post  earrings.  One of the things I love about Christi Friesen is that she always encourages you to take projects in your own direction and get creative with them.  I have a tendency to wander off on my own path anyway (or maybe I'm just not good at following directions- LOL).  It's all about having fun and creating something that will make you smile.
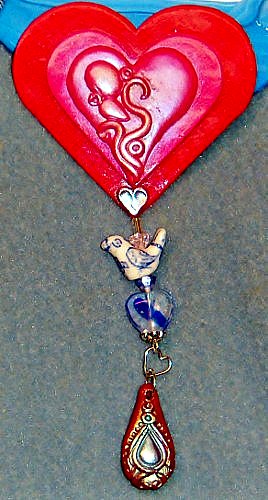
My newest, and most challenging peacock piece is this necklace.

I must admit, I love this necklace!  I've never created anything quite like this before and I really only had a very vague idea of what I wanted to do when I started this project. Some elements of the necklace were inspired by leftover beads and findings. I had four red Swarovski beads left over from another project, and those inspire the flowers.  And I always have fun with Pearl Ex powders- they add such beautiful iridescence to the clay.  The teal blue Pearl Ex on the body and the bright blue Pearl Ex on the tail add the most gorgeous shimmer.  I even created my own polymer clay beads by mixing the leftover clay from the flowers and the peacock.  Then to make them even more interesting I added a band of mixed Pearl Ex powders around the center of the beads.  To create this unique look I coated the beads with glaze, and while it was still wet (and the bead was on a skewer so it could roll), I rolled the beads through a dusting of mixed pearl Ex powders in shades of red, blue, and purple.  Once the glaze was dry I added another coat of glaze to protect the powders.  The effect is very unique and no two beads are quite the same.

I think I spent as much time choosing beads and designing the layout of the necklace as I did sculpting the focal peacock, flowers, and polymer clay beads.  And it lays perfectly when you wear it too.  This is the kind of necklace that makes people say "Wow!  Where did you get that?!" 
I had so much fun creating these pieces, I'm sure you'll be seeing more birds from me in the future!
Thanks for stopping by and sharing another creative adventure! =)
~Michelle of CreativeCritters

Wednesday, January 4, 2012

Video of Ginko kitten playing with Calcifer's catnip toy

It didn't take long at all for Ginko to discover the joys of catnip (especially my very pungent organic catnip).  Within a few hours of bringing my adorable new kitten home he found Calcifer's catnip sack and immediately began playing with it and rubbing his face all over it.  It was so funny to watch!  And Calcifer was so good about sharing his toy, although he made sure to keep a very close eye on his new little brother!  Luckily I had the video camera handy and was able to capture the cuteness so I could share it with all of you ;-)
 
Thanks for watching!  I hope you enjoyed the show! ;-)
~Michelle of CreativeCritters