

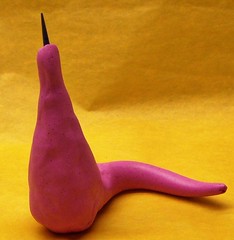
Next I covered the foil with clay and added a tail.
I made a custom sparkling pink mix of clay for the girl dragon by combining sparkling red clay with a bit of pink and white clay (even my colors are one of a kind- LOL). For the boy dragon I mixed Cobalt blue with silver, which creates the most beautiful shimmery blue color. I took my time getting the colors just the way I wanted them because they help to define each dragon's personality. She's soft and sweet and feminine in pink, with a little sparkliness (yes, I know that's not a word-LOL!) to her personality. And he's strong and brave and confident- a knight in shining (blue) armor ;-)
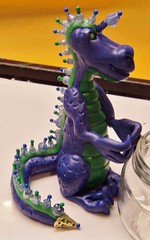
I worked on these dragons one at a time, completing the girl first. The next step in her creation was to add a head and belly plates.

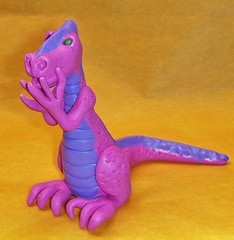

I used my own custom mix of purple clay to create her belly and impressed lines across it to resemble plates. Additional work will be done on her head and face, but I made sure to give her a big smile and a happy expression right from the start.
Next I added the arms and legs, posing the hands just so. This helps add to her expression of joy and surprise. I also added a spine of purple starting at her head and going all the way to the tip of her tail.
I used my fingernail tool to add the look of scales . The next step was adding a bit of bling to her spine. I used red, white, and purple beads and secured them with wire and liquid polymer clay. I also gave her beaded horns with a purple acrylic flower at the base. I had a bunch of bead caps mixed with the rest of my jewelry supplies, and the gold filigree cone shaped one looked prefect for adding to the tip of her tail.
Then all that was left was to dust her with purple Pearl Ex powder and add her wings.

I embedded a wire in the center of the wings to make them even stronger and attach them securely to the body. Then I carefully propped her and baked her.
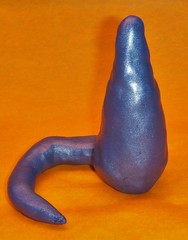
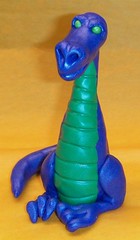
Now on to the boy dragon. He started with the same basic shape then I added his head and belly plates, done in essentially the same way as the female, only in shimmery green. His hind legs were formed in the same way as the girl's, only slightly larger.
Next comes his green spine and his arms. The arms have to be carefully positioned and propped so they hold this pose. I prebaked the heart he'll be holding and glued an acrylic heart jewel to the center. Since the jewel is acrylic I didn't want to risk having it melt in the oven, so I glued it to his hands after the dragon was baked.
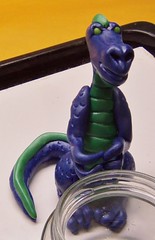
I textured him with the fingernail tool to give him scales too. Then I added blue and green beads down his spine and a matching bead cap to his tail. He has a single horn on his forehead made from blue glass beads.
His wings were made in two shades of green gold and also have a wire in them. They slightly larger and a little different from the girl's wings.


And now he's ready to be baked. Of course the dragons were only the beginning of this piece. I had to create a setting for this romantic little scene to occur in. For the base of the sculpture I covered a metal lid (I have no idea what happened to the box the lid came from) with green polymer clay and sculpted flowers in shades of pink and purple for each corner. In the center of the flowers is a purple acrylic flower bead topped with a yellow bead. I positioned the dragons and attached them to the base with liquid polymer clay. Next I stamped the words MY HEART IS YOURS into a rectangle of purple polymer clay and baked it. Once it was cool I painted the letters with red paint and sealed it with high gloss varnish. I positioned the plaque and sculpted tiny pink flowers growing all around it.
After baking the entire piece for one final time I glued the heart in the dragon's hands and glued colorful marble chips to the base. I covered the bottom of the base in green felt and signed and dated the piece.
Now how sweet is that? Love is in the air, even for fearsome dragons ;-)
Thanks for joining me on another creative adventure!
~Michelle of CreativeCritters
Become a fan of CreativeCritters on Facebook
Check out CreativeCritters on YouTube


No comments:
Post a Comment