Monday, June 25, 2012

My entry for the Smooshers In The Ocean Challenge

The theme for the Polymer Clay Smoosher's Challenge this month is In The Ocean.  Once again I had lots of ideas swimming through my head (and not enough time to sculpt them all)!  Eventually I settled on a mermaid.  I always enjoy adding an element of fantasy to projects whenever possible ;-)  Not too long ago I made several beaded pendants using some of my mismatched glass beads.  The beads were all very pretty, but none of them matched.  When I make jewelry I generally like to use matching, or at least similar beads, so this was a good way to display the beads.  I decided that a miniature mermaid wrapped around a pendant made of blue and green beads would be just right for an ocean challenge!
 I started by sculpting the mermaid's tiny little head.  It's always a challenge to sculpt on such a small scale, but this one actually went pretty well.  Sometimes I have to remake a head up to 5 times!  I only had to remake this one twice ;-)  I used tiny blue glass beads for her eyes and gave her fairy ears.  I baked the head at this stage so further sculpting wouldn't distort all the tiny details.   A baked and hardened head is so much easier to work with.
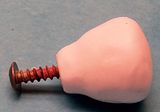
 Next came the torso. I sculpted this and attached it to the neck, using diluent to make the seams perfectly smooth and invisible.  I wasn't ready to add the arms yet at this point.  I wanted to sculpt her tail and get her positioned on the pendant before I made her arms.  That way I would be able to position them perfectly so she was holding onto the pendant.
I swirled together several shades of blue and green Premo polymer clay to create a custom mix for the mermaid's tail and the teardrop shaped beads I planned on adding to the necklace.  Before positioning the mermaid around the beaded pendant I painted her facial features with acrylic paint and colored her lips and cheeks with powdered pink chalk mixed with interference red/ blue Pearl Ex powder.  I really wasn't sure what color I'd get when I mixed the two, but it turned into the perfect shade of pink with just enough of a sheen to make it look very realistic.  To be sure the mermaid was securely attached to the pendant I added liquid polymer clay where her body touched the pendant.  I baked the mermaid and beads at this point.
After the body and tail were baked and cooled I added her arms and hair.  I used wire through the eye pin to suspend the pendant in a coffee cup while it baked for one final time.  This assured that none of her delicate features would be crushed while baking.
The final step in the necklace was to create the beaded components, which were composed of blue and green glass beads, silver bead caps, and the blue and green swirled clay beads.
And this is how the final piece turned out.
OOAK Green and Blue Polymer Clay Fantasy Mermaid Necklace 
I've actually only made a few mermaids (so far), but I have to say this is my best one yet.  I'm very happy with the way she turned out, and I'm glad I took my time while creating this entire necklace.  Once again, this is something entirely new for me- definitely a one of a kind creation!
Thanks so much for joining me on another creative journey!

Friday, June 22, 2012

Featuring Wyvern Designs

Wyvern Designs offers a unique and eclectic mix of handcrafted items.All of her items are designed and created by her and each one is one of a kind.  She welcomes custom orders as well.  Within her shop you can find beautiful jewelry, items for children, ornaments, supplies, home decor, and more.  She's a graphics and jewelry designer who loves trying new materials and new techniques and is totally addicted to polymer clay.  She's also a member of the Polymer Clay Smooshers guild on ArtFire.
You can find Wyvern Designs online on ArtFire, Etsy, Twitter, MadeItMyself, her blog, and Facebook.
Below is just a small example of the wonderful items that can be found in her shop.
 Dragonfly and Fern Hand Made Light Switch Plate Cover
Dragonfly and Fern Hand Made  Light Switch Plate Cover
Scowling Pug Pendant
 Scowling Pug Pendant
North Atlantic Puffin Earrings
 North Atlantic Puffin Earrings
Ladybug Necklace Hand Made
 Ladybug Necklace Hand Made 
And these are just a few of the wonderful creations available from Wyvern Designs.  Be sure to check out all she has to offer!

Wednesday, June 13, 2012

How to replace a missing crock pot lid handle

This weekend I got a really nice crock pot for just .50 from a garage sale.  The only thing wrong with it was that the handle for the lid had broken off.  This is pretty easy to fix, so I figured I'd do a little tutorial and show you one way to replace a missing or broken handle.  This would work on most types of lids.  Since I used polymer clay you wouldn't want to use this method for anything that goes into the oven or reaches temperatures above 275 degrees.
In preparation for my move I emptied out my old craft dresser, since I won't be taking it with me.  It has lots of nice wooden drawer handles that would make a good replacement for the lid handle.

 I just removed one of the handles and covered it in Tacky glue.  This helps the clay stick to the wood better and reduces the chance of air bubbles under the clay. Since the screw was a little long I added a cardboard collar.  I used superglue to attach it to the drawer handle, then covered it in Tacky glue as well.
Then I covered the entire thing in a layer of white clay.  Once the clay was nice and smooth I used my clay extruder to make a long thin rope so I could add some swirls to the handle. 
 I added a flat disk of clay to the bottom along with some small dots, then baked the handle for an hour.  Once it was cool I applied three coats of high gloss glaze and attached the handle to the glass lid.  I figure it will have to stand up to a lot of handling, so the glaze should help protect it, and make it easy to clean. 

I cooked some chicken in the crock pot today and the handle stayed nice
and cool and is very secure (better than many I have bought from the store!).
So there's a fairly easy way to replace missing or broken lid handles.  You
can make them in colors and designs to match the pot, and if you don't
want to play with clay, you could just simply paint and seal a well fitting
drawer handle.  Not bad for a .50 cent garage sale find, huh? And this one
is WAY nicer than my old crock pot- it's bigger and you can set the time and
temperature, as well as switch from high to low at any point during cooking.