Showing posts with label how to. Show all posts

Wednesday, June 13, 2012

How to replace a missing crock pot lid handle

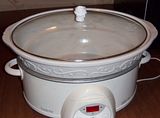
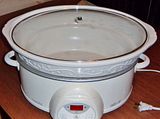
This weekend I got a really nice crock pot for just .50 from a garage sale.  The only thing wrong with it was that the handle for the lid had broken off.  This is pretty easy to fix, so I figured I'd do a little tutorial and show you one way to replace a missing or broken handle.  This would work on most types of lids.  Since I used polymer clay you wouldn't want to use this method for anything that goes into the oven or reaches temperatures above 275 degrees.
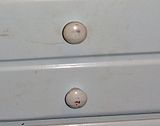
In preparation for my move I emptied out my old craft dresser, since I won't be taking it with me.  It has lots of nice wooden drawer handles that would make a good replacement for the lid handle.

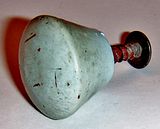
 I just removed one of the handles and covered it in Tacky glue.  This helps the clay stick to the wood better and reduces the chance of air bubbles under the clay. Since the screw was a little long I added a cardboard collar.  I used superglue to attach it to the drawer handle, then covered it in Tacky glue as well.
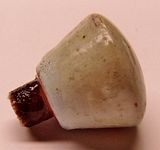
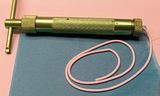
Then I covered the entire thing in a layer of white clay.  Once the clay was nice and smooth I used my clay extruder to make a long thin rope so I could add some swirls to the handle. 
 I added a flat disk of clay to the bottom along with some small dots, then baked the handle for an hour.  Once it was cool I applied three coats of high gloss glaze and attached the handle to the glass lid.  I figure it will have to stand up to a lot of handling, so the glaze should help protect it, and make it easy to clean. 
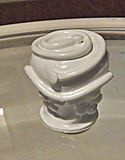
I cooked some chicken in the crock pot today and the handle stayed nice
and cool and is very secure (better than many I have bought from the store!).
So there's a fairly easy way to replace missing or broken lid handles.  You
can make them in colors and designs to match the pot, and if you don't
want to play with clay, you could just simply paint and seal a well fitting
drawer handle.  Not bad for a .50 cent garage sale find, huh? And this one
is WAY nicer than my old crock pot- it's bigger and you can set the time and
temperature, as well as switch from high to low at any point during cooking.                                                                                                                 

Friday, March 9, 2012

How to sculpt a cat pendant from polymer clay part 3 video tutorial

And here's the final video in my How To A Sculpt a Cat Pendant series.  You can find part 1 here http://www.youtube.com/watch?v=N2JXmTdGlig and part 2 here http://www.youtube.com/watch?v=vHZKTzuLAeg.  And of course you can always subscribe to my YouTube channel to keep up with all my newest tutorials and other videos.
Thanks so much for watching!  I hope you enjoyed this series, and if there's something you'd like to see me do a tutorial about, just leave me a comment! =)
~Michelle of CreativeCritters

Thursday, March 8, 2012

How to sculpt a cat pendant from polymer clay part 2 video tutorial

Here's part 2 of my 3 part video tutorial on  how to sculpt a cat pendant in polymer clay.  There's a link to part 1 in the video description, and you can also subscribe to my channel to keep up with all my tutorials.
Thanks for watching, and be sure to stop by for the final installment of this series!
~Michelle of CreativeCritters

Wednesday, March 7, 2012

How to sculpt a cat pendant from polymer clay part 1 video tutorial

I just finished uploading part 1 of my how to sculpt a cat pendant to YouTube and wanted to share it here as well.  I'll be uploading parts 2 and 3 in the next few days, so be sure to check back or subscribe to my YouTube channel so you don't miss any new tutorials.  Since I was sculpting a cat Calcifer figured he'd better supervise this project very closely.  Plus he just loves being on camera- LOL ;-)
 Thanks for watching!
~Michelle of CreativeCritters

Saturday, December 17, 2011

How To Make a Teddy Bear Christmas Ornament in Polymer Clay

Just in time for Christmas, I finished my first full length video tutorial on sculpting a cute teddy bear ornament wearing a scarf and Santa hat.  This is a fairly easy sculpture to make and only requires a small amount of polymer clay and a few basic tools.
2011
 
This bear is also available in my shop, just click the picture to be taken to his listing.
Thanks for watching!  Have a Merry Christmas and Happy Holidays!

~Michelle of CreativeCritters
Get CreativeCritters e-books from Smashwords and Amazon

Sunday, June 19, 2011

Learn how to make amazing videos with Video Magic for Non Techies Artists and Crafters Edition


Many of you may not know that when I'm not making sculptures, cat toys, and other crafty things I'm making videos.  A few years ago I never would have believed that I would be able to make really cool videos (for some pretty big clients, too!).  I jumped in with both feet, even though I knew nothing about videos.  My mom taught me a lot, and some things we learned together.  She's very familiar with the craft world and has made stained glass, wooden decorations and toys, and pewter figures, which she sold at craft shows, flea markets, and renaissance fairs.  She's also spent 30 years teaching people all thing tech related, and let me tell you, she's one heck of a teacher!  She and I took all we learned about making videos and put together an 8 part course in video and PDF format to teach other crafters how to make their own awesome videos, without spending tons of money on video editing software.  Video Magic for Non Techies gives you The Who, What, Where, and Why of Video Marketing, the How of Making Videos, Gathering Images for Videos, Using an Online Video Creation Site, Using the Best Online Video Creation Site, Sound and Final Production, and Tips and Tricks to work around common problems.  This course was created specifically for crafters and artists, and is priced with the starving artist in mind.  For $9.95 you get everything you need, and nothing you don't need!  Some video courses have SO MUCH information and options, you just get completely lost.  We made it simple and included just the information you need, and put it in an easy to follow format that anyone can understand.  Remember, when I started making videos I was absolutely clueless- LOL!  So if I can do it, anyone can do it.  Just click on Video Magic for Non Techies, check out the page (we try to give you as much info as possible, so you know what you're getting) and click the Buy Now button at the bottom of the page to purchase this program.  You won't regret it!  And you'll be amazed at the awesome videos you can create.  Videos are one of the best ways to promote your work- Google loves video ;-)  There are also 3 sample videos I created on the page to give you some ideas of ways to use video, and just what can be done using these techniques.  And if you have any questions there's an email link at the bottom of the page and your emails will be answered promptly.  I'm so happy to be able to share what I've learned with my fellow artists and crafters!
-Michelle of CreativeCritters 

Thursday, April 14, 2011

Video Tutorial on How To Sculpt Roses in Polymer Clay

This three part video series will show you how to sculpt detailed realistic roses from polymer clay.  You can subscribe to CreativeCritters on YouTube to keep up with all my latest tutorials.
And when I finished these roses I created this pretty necklace and earring set.  I had Mother's Day in mind when I started sculpting these roses.  I knew I wanted to create pretty and feminine jewelry, and I really love the pastel pink mixed with the white beads.
Pink and White Polymer Clay Rose Memory Wire Necklace and Earring Set 
Of course you can do anything you like with your roses, and if you want them to have stems just use floral wire instead of the toothpick.  Bend a small loop at the end of the wire, coat it with Tacky glue, and form the rose bud around that.  Happy crafting! =)
-Michelle of CreativeCritters

Sunday, January 23, 2011

How to make a catnip mouse

I've been making catnip mice and other catnip toys for my own cats for years. After I started making them as gifts for friends and family, I found out just how popular they really were!  They're not hard to make, and they're a good way to recycle scraps of fabric.  I grow my own organic catnip, which I sell in 1/2 ounce bags at CreativeCritters.  This catnip is perfect for stuffing toys, or sprinkling on your cats favorite areas.
 
To make a catnip mouse you'll need:
dried catnip, cardboard pattern for body and ears, scrap fabric, yarn, needle, thread, marker, and scissors

I just drew a very simple mouse shape onto cardboard for the body pattern and a large rounded ear pattern.  Fold your fabric so the right side (the side that will show when the mouse is finished) is on the inside.  Trace two ears and one body pattern onto the wrong side (the side that will be inside the mouse when he's done) of the fabric using a marker.  Be sure to mark an opening on the body for turning and stuffing.
 
Sew around the ears, leaving the bottom open for turning.  I sew these by hand and use a small back stitch.  Cut the ears and body out, leaving about 1/4" to 1/2" seam allowance.  Before sewing the body, we want to make the tail.  Decide how long you want the tail to be and cut 9 strands of yarn (I chose red and green to match the fabric).  Tie them together at the top with a strong knot, then braid them tightly together, tying them at the bottom.
Take the tail and place it between the layers of the body, with the knot sticking out and the rest of the tail inside the mouse.  As you sew the body, be sure to trap the tail in the seam.  I recommend sewing over this area a few times, just to be sure your cat can't pull the tail out. Now you're ready to turn your mouse right side out and stuff him with catnip and fabric scraps.
After your mouse is firmly stuffed, sew up the opening securely using a ladder stitch and sew the ears onto the body.  You can give your mouse all sorts of personality, depending on how you position his ears.  Use yarn or embroidery thread to make the eyes (simple knots), and the whiskers, which can be as long as you choose.  And this is what you end up with.


Handmade Red and Green Plaid Castnip Mouse Cat Toy with organic catnip 
This little mouse will provide your cat hours of fun play time!  Stop in to CreativeCritters to see my other catnip toys, or purchase some garden grown organic catnip for your furry friend!
Thanks for stopping by!
-Michelle of CreativeCritters