Wednesday, June 29, 2011

My Cedric Kitty is Sick


I haven't blogged much lately because I've had my hands full with a sick kitty.  Last week I noticed that Cedric, my 13 year old cat, wasn't eating or using the litter box.  My first suspicion was that he had a hairball he couldn't pass.  That's happened to him a few times, and I was usually able to give him some Petromalt and get things moving.  After two days of not eating and looking very listless and ill I called the vet.  Something was definitely not right with my kitty.  The fact that I was able to get him into the cat carrier without a fight shows just how bad he felt.  Blood tests revealed that he had kidney disease, which I believe was the cause of Ozzy's death only about a year and a half ago.  The vet said that we could try giving Cedric subcutaneous fluids to get him rehydrated, Pecid for the ulcers that the come with kidney disease, and antibiotic drops to combat whatever infection he was fighting.  She gave him his first dose of fluids in the office and showed me how to insert the needle under skin.  I don't like poking my kitty, but I'll do whatever I can to help him feel better.  After we got home I opened a fresh can of food to see if he would try any and was very happy when he ate about 1/4 of it.  Drinking is also an issue- he needs to get as much liquid as possible to help his kidneys flush the toxins out.  The problem is, Cedric's always been a little weird about drinking.  I've had to get creative since he doesn't like to drink out of bowls.  For years now his water bowl has been a glass measuring cup- it was the only thing he would drink out of, other than the toilet.  Now I've been taking glasses of water (and it has to be in a glass) to him wherever he's laying in order to encourage him to drink.  Calcifer helps by taking a few sips to show Cedric it's good.  It works too- Cedric sees Calcifer drinking and he wants it too.  We've been doing the same thing with the food.  Calcifer takes a few bites, then sits back and lets Cedric eat.  Calcifer also gives moral support while Cedric's getting his fluids.  He sits nearby, nice and calm, and watches over his big brother.

  He's a very calming influence for all of us! When I give him his fluids I put Cedric in his round cat bed with high sides so he feels safe and comfortable and doesn't squirm around while the needle is in.  First I tried simply doing it on a table like they did at the vet's office, but he kept trying to get away.  The cat bed works out so much better.  I've seen a huge improvement in him the last few days.  He looks healthier and more alert, has an appetite again, and is pretty much following his usual schedule, including watching the birds from the back of the couch.  It's so nice to see him interested in things again!

  Calcifer has been amazing and so gentle with Cedric.  He's just 1 1/2 years old, but so full of love and understanding.  Hopefully he can have his big brother around for as long as possible.  I'll continue to give Cedric fluids and Pepcid, and I'm looking into Azodil as well.  If he starts to decline in spite of this, I'll have to trust that I'll know what to do when the time comes.  I knew when Ozzy was ready to pass away (he told me, in that special way cats have), and he actually passed away shortly before the vet appointment.  Cedric isn't ready to go yet, but I'm sure he'll tell me when the time comes.  Until then I'll enjoy every moment I have with my very special cat.
-Michelle of CreativeCritters

Tuesday, June 21, 2011

Barb's Designs for Mom and Kids

At Designs by Barb you can find children's clothing, crocheted household items, cowboy boots, shoes, and hats, along with afghans.   Barb has been involved in some sort of craft work most of her life. She's owned and operated a handmade clothing and lingerie shop as well as a ceramic and porcelain doll shop where she taught ceramics and porcelain doll making.  She also did oil paintings for a few years, but no longer has time to do it all.  Barb has been sewing for over 50 years, and all that experience certainly shows in her adorable clothes for kids!  Barb's Designs can also be found online at http://togs4tots.blogspot.com/, http://www.flickr.com/people/togs4tots/, Facebook, and Twitter.  Below is just a small sample of what can be found in her shop.

Custom Orchid Plaid Shirred Top Halter Girls Dress-Boutique 
And there is SO much more available in her shop!  Be sure to spend a little time browsing Barb's wonderful handmade items for kids and moms alike!
-Michelle of CreativeCritters

Sunday, June 19, 2011

Learn how to make amazing videos with Video Magic for Non Techies Artists and Crafters Edition


Many of you may not know that when I'm not making sculptures, cat toys, and other crafty things I'm making videos.  A few years ago I never would have believed that I would be able to make really cool videos (for some pretty big clients, too!).  I jumped in with both feet, even though I knew nothing about videos.  My mom taught me a lot, and some things we learned together.  She's very familiar with the craft world and has made stained glass, wooden decorations and toys, and pewter figures, which she sold at craft shows, flea markets, and renaissance fairs.  She's also spent 30 years teaching people all thing tech related, and let me tell you, she's one heck of a teacher!  She and I took all we learned about making videos and put together an 8 part course in video and PDF format to teach other crafters how to make their own awesome videos, without spending tons of money on video editing software.  Video Magic for Non Techies gives you The Who, What, Where, and Why of Video Marketing, the How of Making Videos, Gathering Images for Videos, Using an Online Video Creation Site, Using the Best Online Video Creation Site, Sound and Final Production, and Tips and Tricks to work around common problems.  This course was created specifically for crafters and artists, and is priced with the starving artist in mind.  For $9.95 you get everything you need, and nothing you don't need!  Some video courses have SO MUCH information and options, you just get completely lost.  We made it simple and included just the information you need, and put it in an easy to follow format that anyone can understand.  Remember, when I started making videos I was absolutely clueless- LOL!  So if I can do it, anyone can do it.  Just click on Video Magic for Non Techies, check out the page (we try to give you as much info as possible, so you know what you're getting) and click the Buy Now button at the bottom of the page to purchase this program.  You won't regret it!  And you'll be amazed at the awesome videos you can create.  Videos are one of the best ways to promote your work- Google loves video ;-)  There are also 3 sample videos I created on the page to give you some ideas of ways to use video, and just what can be done using these techniques.  And if you have any questions there's an email link at the bottom of the page and your emails will be answered promptly.  I'm so happy to be able to share what I've learned with my fellow artists and crafters!
-Michelle of CreativeCritters 

Tuesday, June 14, 2011

How to fix mistakes in baked polymer clay

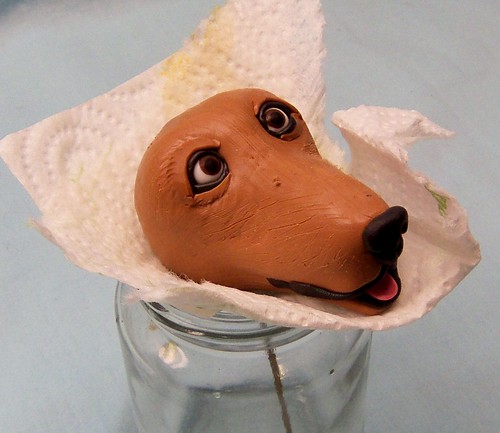
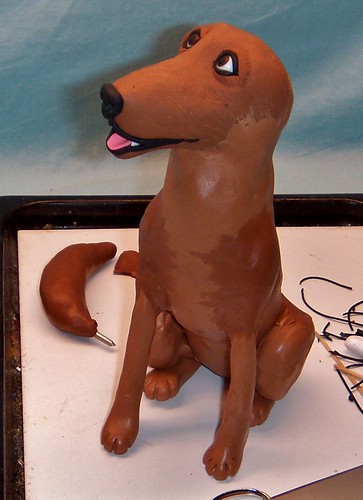
I've been working on a custom order dog sculpture for a few weeks now.  You may have read some of my Work in Progress posts on my blog or Fan Page.  The sculpture was coming along quite nicely and I emailed the customer pictures of my progress so far.  Everything was just fine except for one little detail- the dog's head and tail were facing the wrong direction!  When we first discussed the sculpture the customer said he wanted the dog looking to the right.  He also sent a lot of pictures of the dog in a variety of poses so I would know what he looked like from all angles.  I think I was looking at the wrong picture when I positioned the head and tail.  And to complicate matters a bit I had already baked the sculpture.  This is what he looked like yesterday.

I plan to add another layer of clay which will be textured like fur.  The customer graciously said that it was all right if I couldn't change the sculpture, but I really want to do the best job possible on this order.  So after some thinking and looking at the piece I decided I could safely cut off the head and tail and turn them to the right.  Polymer clay is an amazing substance, and after working with it for many years I've learned a few tricks to repair mistakes.  I heated the sculpture in the oven until it was just warm.  When the clay is slightly warm it's easier to cut through it.  You don't want to get it too hot because you have to be able to handle it and you don't want the clay to be too soft either.
I used a serrated blade to saw through the thick clay of the neck and base of the tail.  Then I used an exacto blade to carve away some of the chest and narrow the neck.  I don't want that area to get too thick after I start adding the raw clay.  I've also used this method to repair or replace faces on my sculptures, or carve away misshapen or burned areas on sculptures.  Before putting the head and tail back on I coated the wires with liquid polymer clay, which acts as glue when baked.  I also put some liquid polymer clay on the neck, head, and tail.  Once baked this will become a solid piece again.
With the head and tail in the proper position I'll add thin ropes of clay to completely fill the gaps and more clay to cover the neck and head and base of the tail.  While I was working with the tail I decided I wasn't completely satisfied with the way it looked, so I carved it down a bit and reshaped it some. 
And this is what the dog looks like now,  You'd never know he'd had his head and tail chopped off!
The next step in this project is to add more clay which will be textured to look like fur.  Accidentally sculpting the dog looking the wrong way could have been a real problem, but with a bit of creative thinking I was able to fix the problem.  Stay tuned to see how he looks with his fur on! =)
-Michelle of CreativeCritters

Monday, June 13, 2011

The Dog Days of Summer


I hope you enjoyed all these wonderful handmade dogs!  Be sure to click on the pictures to view the item listing, and browse the shops of these very talented artists!
-Michelle of CreativeCritters

Saturday, June 11, 2011

My Custom Dog Sculpture Gets Legs, Tail, and a Body

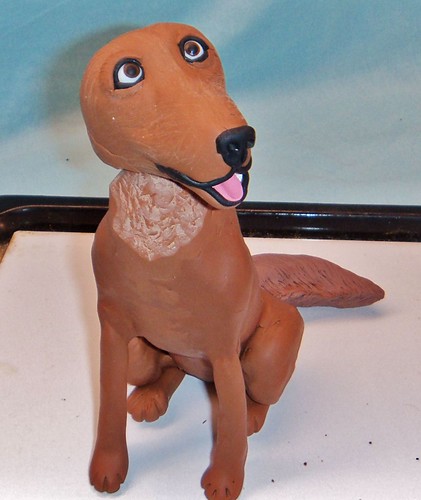
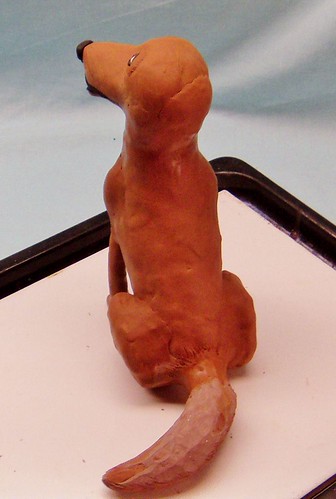
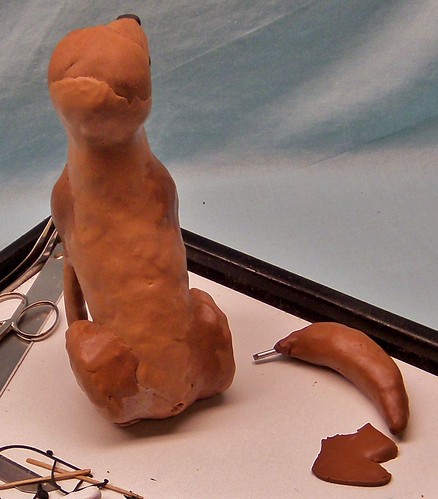
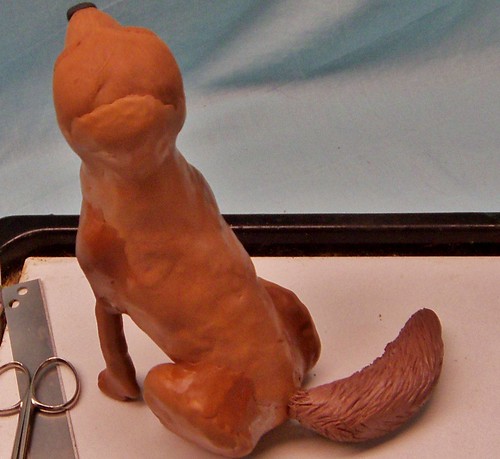
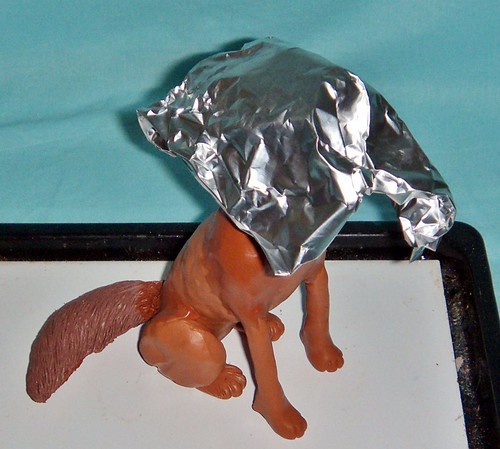
Well, Rudy the dog now has a body, legs, and a tail.  I sculpted most of the head first, and baked it to preserve the details.  One of the nice things about polymer clay is that it can be baked repeatedly, and fresh clay added at any point.  I sculpted the head around a foil core with a heavy gauge wire embedded in it.  After the head was baked I inserted the wire into the foil core of the body and used clay to attach the head to the body.

The front legs were sculpted over thick wire coated in Tacky glue.  The sculpture needs a stable base.  I bent the ends of the wire and inserted them into the foil core of the body.  Right now this is just a rough base to start with.  More clay will be added to smooth and shape the legs and body after it's been baked.  Deciding when to bake can be difficult sometimes.  I considered adding more clay before baking, but the legs just didn't feel stable enough.  After the piece has been baked it will be much easier to add clay without distorting or moving anything.
Since I'll be painting Rudy after the final bake, the color of the clay used isn't that important.  I am using Premo polymer clay exclusively because of it's strength and the way it holds details.  It's my favorite brand of clay to work with, especially when I'm sculpting animals.  The fur seems to flow so nicely when I texture it.  I'll share more about that in the next post, when I start adding the fur.  You can also see that I've started the dogs tail.  I shaped foil around a wire, then covered that in clay.  I left enough wire uncovered to insert into the body.
I peirced a hole in the rump first, and added the fur texture to most of the tail before attaching it to the body.  You'd be surprised at how long it can take just to texture one dog's tail!  I am pretty meticulous though.  I have a few good pictures of Rudy''s tail for reference, so I know just how I want it to look. 
First I textured the bottom of the tail, then I was able to do the top after I attached the tail to the body.
I textured the fur right up to the body, even though I'll be adding fresh clay to the base of the tail and rump.  The texture will help the unbaked clay stick better, and I'll be able to pull the lines of the fur from the unbaked clay onto the baked fur seamlessly.  And now Rudy, the Irish Wolfhound/ Collie mix, is ready to go into the oven.  This is always a slightly nervous time for me.  I don't want anything break, or sag, or burn.  I'll often cover more delicate parts with aluminum foil.
It looks funny, I know, but now his light colored eyes, tongue, and teeth won't darken or scorch.  Once the piece has been baked and cooled I'll start smoothing out the lines of the body, filling in the areas that need more clay.  Once I've got the final shape I'll start adding the fur texture.  But that's for the next post ;-)
Thanks for joining me on another creative journey!  Stay tuned to see the final results!
-Michelle of CreativeCritters

Friday, June 10, 2011

Turquoise

That's this week's blog ring topic for the Polymer Clay Smooshers guild.  I love Turquoise- the color and the stone.  I still have a necklace with a Turquoise pendant that a boy gave me when I was about 14.   I do believe that was the first jewelry I ever got from a guy. ;-)  And I love the beautiful turquoise colors that can be found on some birds, like these Angry Birds from Popnicute.  These are just about the cutest angry birds I've seen!
Handmade Angry Birds in A Cup Copper Argentium Silver Artisan Earrings 
I love the turquoise polymer clay beads in this bracelet from Life Art Designs.  Such a beautiful color!  And they look just perfect with the translucent aqua blue glass beads.
Turquoise and Aqua Mixed Media Bracelet 
This Faux Turquoise bracelet and earring set from Haffina Creations looks just like the real thing!  One really fun aspect of polymer clay is the ability to mimic just about anything.  Although it does take a talented artist to make them look this good ;-)
Faux Turquoise Two Strand Bracelet and Matching Earrings 
Turquoise and silver are such a classic combination, and I love the way they're mixed in this necklace and earring set from Dana's Jewelry Etc.
Turquoise and Silver Necklace and Earring Set 
So many beautiful Turquoise creations can be found within the ArtFire shops of the members of the Smooshers guild!  Be sure to do some browsing and find a few treasures of your own!
-Michelle of CreativeCritters

Wednesday, June 8, 2011

Kraftouch Treasures- Jewels with Style

Kraftouch Treasures is the collaborative crafts of Marilou and her mother.   Marilou creates the jewelry and her mother makes the lei.  Marilou's passion for crafting and jewelry making is a treasure she holds close to her heart because it allowed her to enjoy time with her children.  That's where the name "Kraftouch Treasures" comes from.
Her work is inspired by the warmth of the beautiful island of Hawaii. She transforms delicate beads and precious jewelry findings into a distinctive works of art.  She takes pleasure in creating special pieces that are one of a kind and of limited quantity.  She's been designing and creating jewelry since the spring of 2000.  You can also find Kraftouch Treasures online on Facebook, http://kraftouchtreasures.blogspot.com/, and Twitter.   Below is just  a sample of the beautiful work available in her shop.  Be sure to check out everything she has to offer!

White/Yellow Hibiscus May day Bracelet Fuschia Hibiscus May Day Bracelet 

Freeform Shell Clover Necklace-Victorian Pink

-Michelle of CreativeCritters

New from CreativeCritters- Catnip Mats!

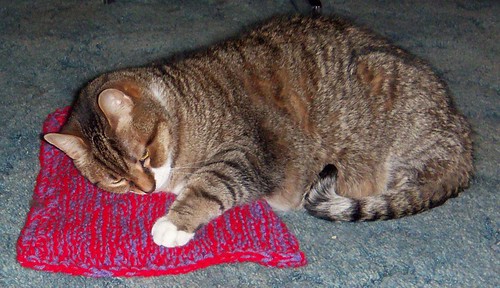
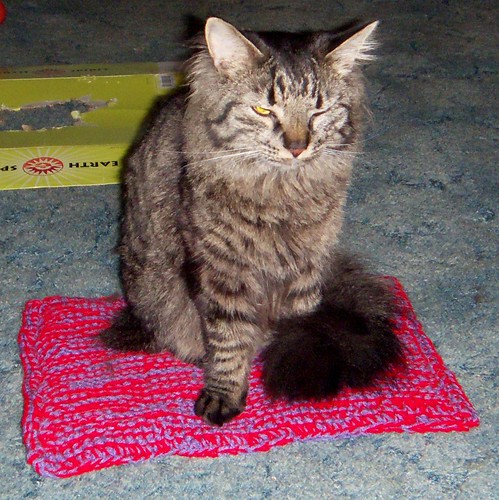
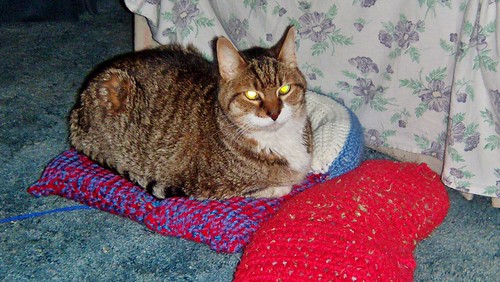
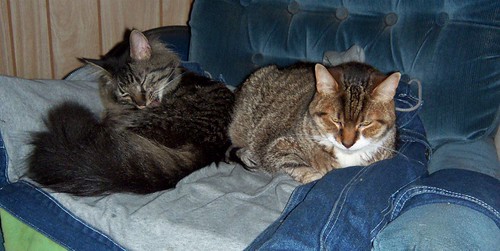
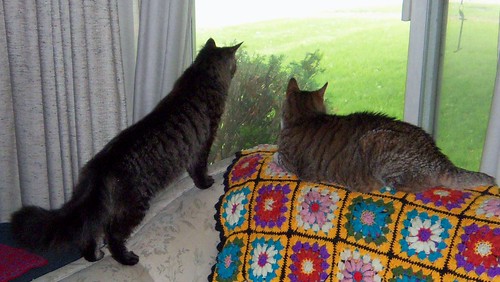
I just added a brand new catnip item to CreativeCritters- hand knit Catnip Mats.  Cats can use these soft mats as a bed or pillow, or just roll around on the catnip scented mat.  These were inspired by my own cat, Cedric.  Cedric's about 13 years old, and although he still loves his catnip, he doesn't play with the toys as much as he used to.  He's one of those cats who enjoys just laying on a pile of catnip.  He also loves laying on my knit blanket, so I figured I'd make him his own knit bed stuffed with catnip.  Once it was finished and I put it on the floor for Cedric's approval it took about two seconds for him to claim it as his own!

And when Cedric isn't sleeping on it Calcifer takes his turn.
Seeing how happy this creation made my kitties, I knew I had to make some for my shop.  This one was knit holding two strands of blue and one strand of gray yarn together.  When I knit using several strands of yarn it makes a very thick, soft fabric.
This bed measures 16 inches long and 12 inches wide and is about an inch thick in the center.  I sewed a fabric lining and stuffed it wirth several large handfuls of my own organic dried catnip.  Then I securely sewed the lining in the knit pillow.  The edges have a crocheted border.  I made this one a little larger than Cedric's to be sure it would be big enough for large cats.  Cedric weighs about 20 pounds and is a very big boy, but he fits comfortably on his mat.  Having in house product testers is very handy!  So if you want to make your kitty happy, and give him the best bed ever, get him a Catnip Mat from CreativeCritters!
Thanks for stopping by!
-Michelle of CreativeCritters

Saturday, June 4, 2011

Cozy Cottage Creations- Handmade Crocheted and Stitched Gifts

At Cozy Cottage Creations on ArtFire.com you will find a variety of crocheted and stitched items for you, your home, and special gift giving needs.  Her biography reads "I'm a freelance writer/copy editor with a Master's degree in English. And when I'm not writing, I'm most likely crocheting or sewing!  I've been sewing, crocheting, and general crafting for over 20 years now and still enjoy creating new items. I'm also a Certified Crochet Instructor and proud member of the Crochet Guild of America. I love anything retro or vintage, and of course, flowers are a must. Many of my creations will reflect my passion for bright, happy colors!"  I really love her shop- it's just so bright and cheery!  Below is just a sample of the colorful creations available from Cozy Cottage Creations.  Be sure to check out the entire shop to see everything she has to offer!
Lavender Ring of Roses Crocheted Doily 
Springtime Pot Holders 
Retro Coffee Print Apron With Pockets 
Patriotic Crocheted Doily 
And everything is on sale right now!  All items in this shop have been marked down 25%!  Hurry in and save on these beautiful creations!
-Michelle of CreativeCritters

Thursday, June 2, 2011

Work in Progress- Custom Dog Sculpture

My custom sculpture of Rudy, a Collie/ Irish Wolfhound mix is progressing nicely.  I'm continuing to sculpt his head , refining it's shape and adding the lower jaw. I made eyes which I painted with acrylic paint.  I find it easier to paint the eyes before I insert them.  I rimmed the eyes with black clay and built up the brow and forehead.  I also sculpted his nose in black clay.
According to the customer Rudy was a fun loving character.  He sent me a picture with Rudy "smiling", mouth open, tongue out just a bit (and he looked ready for anything!).  So I'm trying to recreate that look for this sculpture.   I sculpted tiny white teeth, which I baked before putting them into the unbaked clay of the jaw.
 
I made the lips using a thin rope of black clay, and sculpted a pink tongue as well.  With the brow and muzzle built up and the mouth just right, I now have the head the way I like it.  I decided this was a good time to bake the head.  I didn't want to distort what I had already sculpted.  At this point the head has to be handled very carefully.  I inserted a heavy gauge wire through the clay and into the center of the foil head armature.  This will help attach the head to the body and give added strength to the neck.  To support the head safely without damaging any of my work I positioned it in a glass jar and cushioned the bottom of the head with paper towels.
 
I gave the clay a bit of texture to help the next layer of clay adhere better.  After the head is baked and cooled I'll attach it to the body and start adding fur.  What you see here will look pretty different once I've added and textured the fur.  I'll also have to paint the entire piece once it's baked.  This has been a challenging order, but I'm really enjoying that challenge!  Stay tuned to see more of this dog being sculpted!
Thanks for sharing another creative journey!
-Michelle of CreativeCritters