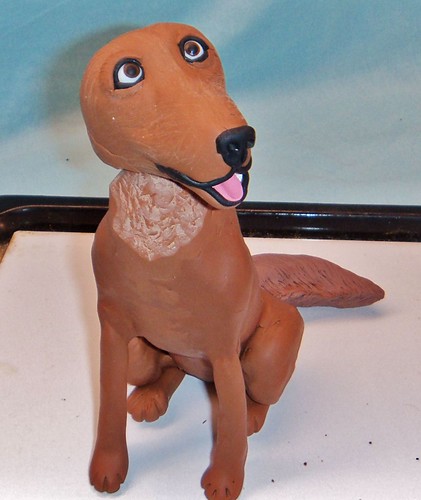
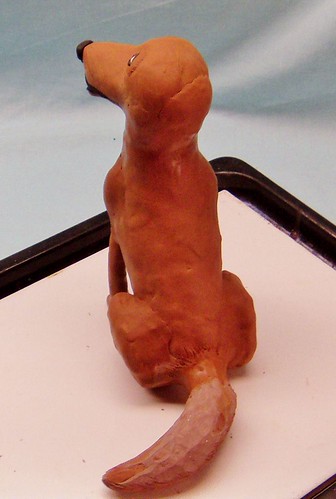
I've been working on a custom order dog sculpture for a few weeks now. You may have read some of my Work in Progress posts on my blog or Fan Page. The sculpture was coming along quite nicely and I emailed the customer pictures of my progress so far. Everything was just fine except for one little detail- the dog's head and tail were facing the wrong direction! When we first discussed the sculpture the customer said he wanted the dog looking to the right. He also sent a lot of pictures of the dog in a variety of poses so I would know what he looked like from all angles. I think I was looking at the wrong picture when I positioned the head and tail. And to complicate matters a bit I had already baked the sculpture. This is what he looked like yesterday.

I plan to add another layer of clay which will be textured like fur. The customer graciously said that it was all right if I couldn't change the sculpture, but I really want to do the best job possible on this order. So after some thinking and looking at the piece I decided I could safely cut off the head and tail and turn them to the right. Polymer clay is an amazing substance, and after working with it for many years I've learned a few tricks to repair mistakes. I heated the sculpture in the oven until it was just warm. When the clay is slightly warm it's easier to cut through it. You don't want to get it too hot because you have to be able to handle it and you don't want the clay to be too soft either.
I used a serrated blade to saw through the thick clay of the neck and base of the tail. Then I used an exacto blade to carve away some of the chest and narrow the neck. I don't want that area to get too thick after I start adding the raw clay. I've also used this method to repair or replace faces on my sculptures, or carve away misshapen or burned areas on sculptures. Before putting the head and tail back on I coated the wires with liquid polymer clay, which acts as glue when baked. I also put some liquid polymer clay on the neck, head, and tail. Once baked this will become a solid piece again.
With the head and tail in the proper position I'll add thin ropes of clay to completely fill the gaps and more clay to cover the neck and head and base of the tail. While I was working with the tail I decided I wasn't completely satisfied with the way it looked, so I carved it down a bit and reshaped it some.
And this is what the dog looks like now, You'd never know he'd had his head and tail chopped off!
The next step in this project is to add more clay which will be textured to look like fur. Accidentally sculpting the dog looking the wrong way could have been a real problem, but with a bit of creative thinking I was able to fix the problem. Stay tuned to see how he looks with his fur on! =)


I just finished making two bunnies, they were supposed to be a couple and they were perfect until a leg fell off of one of them while it was baking! I tried to stick it back on but the clay had already hardened too much and I thought all of my hard work had gone down the drain :( Thank you for giving me a little hope that it can still be fixed! hopefully it works for me too! I've been trying to make and sell cake toppers..I have yet to learn many tricks about polymer clay
ReplyDeleteI'm so glad I could share my experience and possibly help you salvage your bunny! I learn new things about clay all the time ;-)
ReplyDelete