Showing posts with label dragon. Show all posts

Wednesday, October 16, 2013

New Colorful Knit Dragon Joins the Menagerie at CreativeCritters

This colorful knit dragon is the latest addition to the menagerie of critters available from CreativeCritters.
I challenged myself to create a knitting pattern from scratch for a cute and brightly colored dragon.  I made it up as I went along, writing down what worked, and trying again when something didn't turn out quite as I wanted.  I learned how to follow a sewing pattern many years ago, and using that knowledge (and a lot of trial and error) I figured out how to make my own original patterns.  That's essentially how I made this guy.  I thought of the shapes I would need if I were to create a sewing pattern for a creature like this, then I figured out how to knit those shapes and sew them together.  It wasn't easy- that's for sure!  But I do enjoy a challenge, and I like testing and improving my artistic skills, so although it took a lot of time, I really had fun bringing this fantasy dragon to life,  I used bright purple (my favorite color) for his body, which I knit in a garter stitch.  I used a stockinette stitch and bright yellow yarn for the dragon's belly and the underside of his tail.
I gave him triangular spikes that were knit in bright red yarn.  I sewed all the various parts onto the dragon very securely and stuffed him with polyester fiberfill.  The wings were a bit of a challenge.  I considered creating knit wings, but really wanted them to be more lightweight.  I didn't want to have to use wires to help them hold their shape, as I've done with plush dragons in the past.  I wanted this to be a toy that kids could hugs and cuddle, without any sharp or hard parts.  So I decided to use red and purple felt (I just happened to have exactly the right colors in my fabric stash).  I drew out a wing pattern on paper and used that as my guide.  Then I sewed veins into the wings to give them more stability.
This cute stuffed animal measures about 15 inches long and 15 inches tall.  This guy's pretty special, and I hope when he sells he goes to a loving home.  Until then he can hang out here and make me smile =)  If you want to purchase this dragon, or read more details about him, just click on any of the pictures to be taken to the listing in my shop.
Thanks so much for stopping by!
~Michelle of CreativeCritters

Saturday, May 19, 2012

My entries in the Smooshers May Flowers Challenge

The theme for the next Polymer Clay Smooshers guild Challenge is May Flowers, and I was able to come up with two pretty awesome entries.  I had decided to make a floral trinket box first, since I've been having a lot of fun creating unique trinket boxes lately.  These trinket boxes are also a great way to recycle all the aluminum cat food cans that would otherwise be thrown away around here.  I start these by thoroughly cleaning and drying the cans, then I cover them with tacky glue.  Once the glue dries the clay sticks much better and I have fewer issues with air bubbles.  For this particular box I mixed a custom shade of purple from blue and purple Premo clay.  I use Premo just about exclusively now, and I always seem to mix my own custom colors, making each creation truly one of a kind.Purple Pink and Blue Polymer Clay Trinket Box with Flowers and Birds 
The next step in the creation of this piece was to stamp pretty designs into the clay.  I've fallen in love with flexible rubber stamps and polymer clay over the last year or so.  Then add a bit of Pearl Ex powder (in this case Sky Blue mixed with Reflex Violet) and you've got something magical!  Then I went on to create the pink flowers.
. 
They have textured petals (each shaped by hand), and are attached to a metal filigree finding.  I spent a lot of time digging through my bead stash to find the perfect beads for this box.  These are my last two ceramic bird beads, and also the last of my red glass butterfly beads.
 
All the beads are secured with wire and liquid polymer clay, so there are no worries about anything coming loose.  The lid is made from polymer clay with reinforcing wires baked into the clay.  The large flower was rubbed with blue and purple Pearl Ex powders for a gorgeous color variation. 
To finish the box I covered the bottom with felt and lined the inside with felt as well.  I'm really very happy with the way this turned out.  I may have to make one of these for myself to hold my favorite jewelry ;-)

My second entry is a necklace I call Mai's Flowers.  Christi Friesen's book on sculpting dragons helped inspire this one, as did the Irises blooming in the front yard.  Irises are some of my favorite flowers and I love sculpting them.  The first thing I did to create this piece was to sculpt the Iris beads. 
These took many hours and four separate bakes to complete.  Although they look very fragile, I used the green leaves behind the flower petals to add strength to the flowers.  Each petal was carefully sculpted and textured, then I dusted the center petals with blue Pearl Ex powder and the outer petals with purple Pearl Ex.  Each flower was sculpted individually, and just like in nature, each is unique.  Once the flowers were sculpted it was time to move on to Mai the dragon. 
Isn't she sweet holding her favorite flower?  I used glass beads to embellish her and add a bit of bling (if you're familiar with Christi Friesen, you're familiar with this technique).  She even has blue glass heart beads on her head, since she's such a loving little dragon ;-)  She's named after Mei from the movie My Neighbor Totoro (my favorite Myazaki movie of all time), who is also a sweet, fun loving little girl.
To make this necklace even more special I used blue, pink, and purple Swarovski crystals.  Nothing sparkles quite like Swarovski!


I absolutely adore this necklace, and I might just have to make one for myself!  I definitely see more Christi inspired dragons in my future- sculptures, jewelry, trinket boxes- there's no end to the possibilities!
Both of these items are available for sale in my shop.  Just click on any of the pictures to be directed to the listing.
Thanks so much for stopping by and sharing another creative journey with me!


Tuesday, April 10, 2012

The Knit Dragon I Made for Morgan

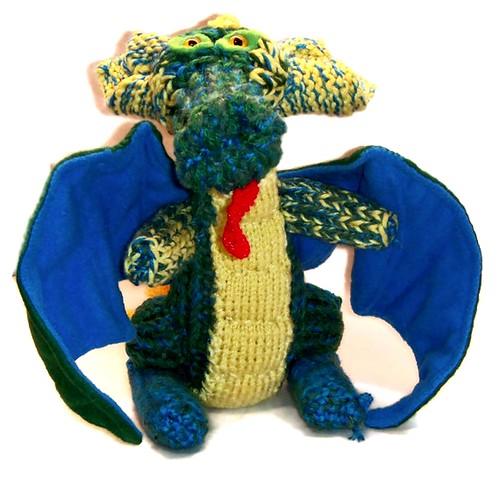
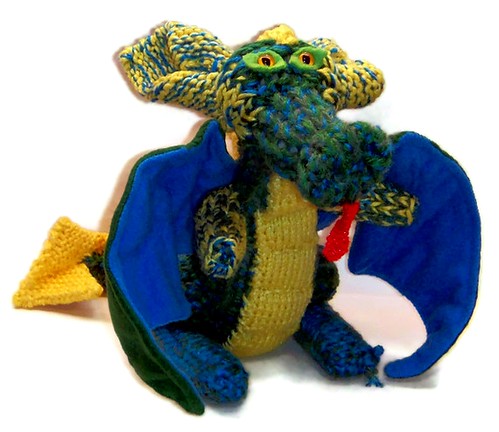
My best friend's son, Morgan, just turned 9 and they'll be visiting this weekend.  I wanted to make something special for his birthday and decided to knit him a dragon.  Morgan loves dragons and I've made him several different types of dragons in the past (even a dragon trinket box).  I only had a vague idea of how I wanted this dragon to turn out when I first started knitting, and I made the pattern up as I went along.  This is definitely a one of a kind creation!  I used a combination of knitting looms in different sizes to create the body, head, and tail of the dragon. 
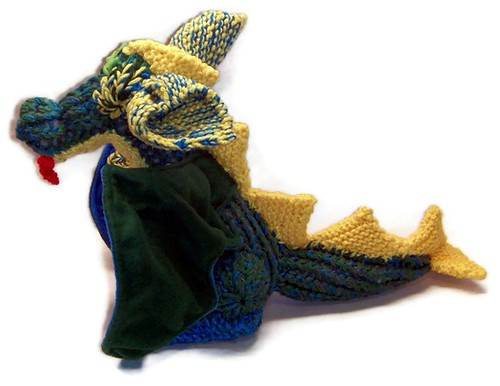
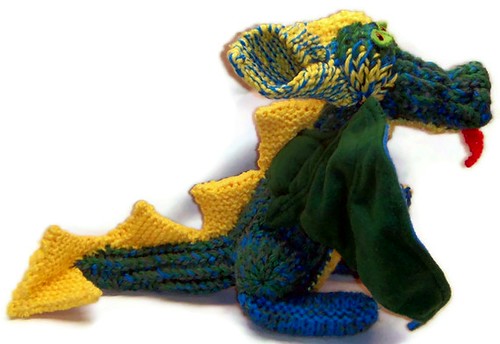
I held two strands of different shades of green and  one strand of blue yarn together as I knit the body. head and tail.  The underbelly was knit using knitting needles and yellow yarn and I just sewed it right to the belly.  At each step in the creation of this dragon I had to visual how I wanted a particular part to look, and then figure out the best method to use to achieve that look.  It was a bit like sculpting in polymer clay, actually.  I used a small knitting loom to create his haunches and knit his lower legs with needles, then sewed all the parts to the dragon, shaping as I attached them.
 
I needle sculpted his face to get the right shape and even knit a red tongue for him.  His oversized ears add to the whimsical look.  I want Morgan to smile every time he sees this dragon ;-)  I cut out green felt and attached the eyes through the felt.  This gives a little more definition to the eyes and also ensures that they won't pull out through the stitches in the yarn.
 
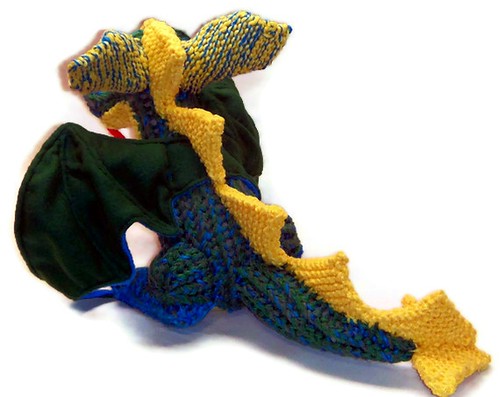
I knit yellow triangles for spike and for the tip of his tail.  I wanted to have a nice bright, cheerful color.  I know Morgan likes blue and green dragons (they're the good ones, according to him), and I think the yellow is a nice contrast to these colors.  
 
The only thing that isn't knit from yarn on the dragon are the wings.  I chose to sew them from green and blue fleece instead.  I sewed pipe cleaners between the layers of fleece to help support the wings and allow them to hold their shape.
 
I can attest to the fact that this dragon is a lot of fun to play with too ;-)  I can't wait to see my friend and her family, and get Morgan's reaction to his new friend!  I'm already thinking about making a knight to go with the dragon.  That might be a good gift for Christmas.  One of the many things I love about Morgan is that he really appreciated the gifts he's given, and he plays with them for years.  He still plays with the first toy I made for him!  
Thanks for joining me for another creative adventure into the land of fantasy! ;-)
 

Sunday, November 13, 2011

Animals inspire the artwork of CreativeCritters

477
A quick browse through my studio will be enough to tell you that I love animals.  My Maine Coone, Calcifer was kind enough to pose as my avatar.  And although they've both passed away, my cats Ozzy and Cedric inspired many of my creations and were the original testers of my catnip toys.  Calcifer has since taken up the role as Catnip Product Tester. The picture above shows my fluffy kitty after a hard day of work ;)  I've had pets ever since I was a young child, and simply can't imagine life without animals. I've shared my heart and my home with everything from dogs and cats to ferrets, turtles, bunnies, and more.
  It wasn't until I got Katherine Dewey's "Creating Lifelike Animals in Polymer Clay" that I felt I could sculpt a truly realistic animal though. You'll find many animal sculptures in my studio that were created with guidance from that book.
OOAK Realistic Black and White Tuxedo Cat with Blue Eyes polymer clay animal sculpture
  I now am confident enough with my skills to sculpt many different types of animals, and have created several custom pet sculptures for customers.  The sculpture below is Rudy, a Collie/ Irish Wolfhound mix.  This sculpture became an integral part of Rudy's memorial.
Custom Order OOAK Irish Wolfhound Collie Mix Dog Sculpture for John
  I also enjoy creating whimsical and fantasy animals- I have several dragon sculptures, a unicorn, a griffin, and more available.
Red and Black Dragon Playing  Guitar OOAK  Fantasy Clay sculpture
  Animals have also found their way into my jewelry.  I offer several one of a kind dragon necklaces and bunny rabbits and cats can be found in jewelry sets, earrings, and necklaces.
And then there are stuffed animals, which I never really grew out of.  Once I learned how to sew and follow a pattern I made all sorts of stuffed animals, some to keep for myself and some to give as gifts.  I love being able to make my own teddy bears and share their cuddliness with my customers!
Handmade OOAK Plush White Teddy Bear Stuffed Animal with Pink Paws
  When I (finally) figured out how to knit, and consequently found some books on knitting stuffed toys, I found a new avenue for my creativity.  I'm now able to create my own sewing and knitting patterns, making many of my stuffed animals one of a kind original creations. 
 

And I'm always adding more, so be sure to check back often!  Thanks for looking!
-Michelle of CreativeCritters

Monday, April 18, 2011

Stuffed Animals from CreativeCritters

I never really did outgrow my childhood love of stuffed animals, and once I learned how to sew my own stuffed toys I created my own little zoo.  I have a wide variety of stuffed animals available at CreativeCritters, and continue to add new critters on a regular basis.  Some are plush and sewn from soft fur fabrics, fun prints, and soft chenille,  and some are knit in different types of yarn.  My most recent addition is my knit penguin.

Cute and Cuddly Handmade Knit Penguin Stuffed Animal Toy

I created my own pattern for this funny penguin and even sculpted the eyes from polymer clay.  I like having the ability to completly customize my creations.  I've used polymer clay to make my own eyes, teeth, claws, noses, and other parts for my stuffed animals.

I also make plush teddy bears with jointed arms and legs.  These bears are just full of personality, and each is a one of a kind creation.  I use high quality fur fabric and sew the bears by hand.  Right now I have bears in blue, pink, brown, purple and white.  They range in size from my tiny 7 inch bear up to my big 18 inch tall bear.

Handmade OOAK Plush White Teddy Bear Stuffed Animal with Pink Paws

And for Easter I've got an adorable knit purple and white bunny rabbit.  The variegated purple yarn inspired this rabbit.  The color made me think of Easter, and Easter bunnies.  When I was little Gramma would always hide a stuffed animal with my Easter basket, and I just loved those bunnies!

Cute Handmade Pink Purple and White Knit Easter Bunny Stuffed Animal

And to indulge my love of fantasy I've sewn stuffed dragons as well.  This one was created using some of Gramma's floral print dresses.  The bold bright colors make this a very happy dragon!  This  large dragon is 22 inches tall and she took many hours to sew.  Her wings, claws, and tail are wired so they can be positioned into different poses.

Handmade Purple Pink and Blue Floral Print Stuffed Fantasy Dragon

My love of animals certainly shows up in my creations.  I've got everything from little ladybugs, to hedgehogs, cats, dogs, walruses, to fish and birds.  From cute and cuddly to wild and whimsical, you just never know what kind of animals might show up at CreativeCritters! ;-)

-Michelle of CreativeCritters
Wednesday, March 16, 2011

A treasure box guarded by dragons

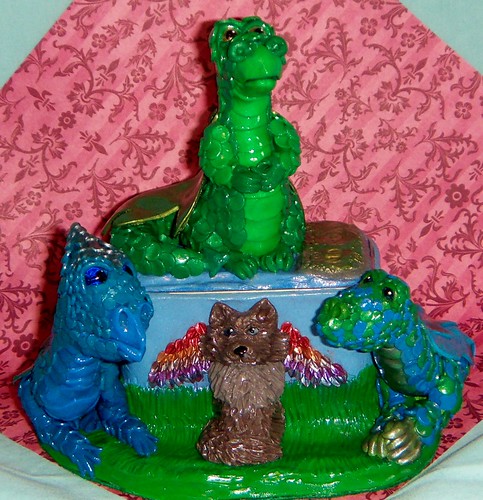
I managed to finish the Dragon trinket box I've been creating for my best friend's son.  It's now ready to be shipped for his birthday.  This piece took MANY hours to complete (all those scales were cut out one by one and carefully attached to each dragon), but it was totally worth the effort.  After I finished sculpting Mother and Father dragon, I went to work on Baby Dragon.   His scales are blue and green, a combination of his mother and father, of course!  Each dragon is a unique individual though, with their own personality ;-)
I used blue glass beads for his eyes and rubbed silver Pearl Ex powder on his belly scales, wings, and claws.  The dragons are just hanging out with their friend the Dragon Kitty, and guarding all the treasures that might be in the box.

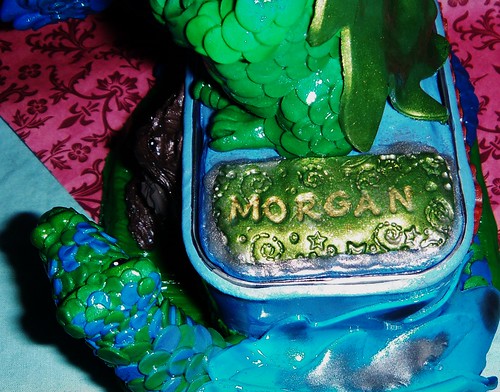
I stamped Morgan's name on the lid to make it even more personalized and special.

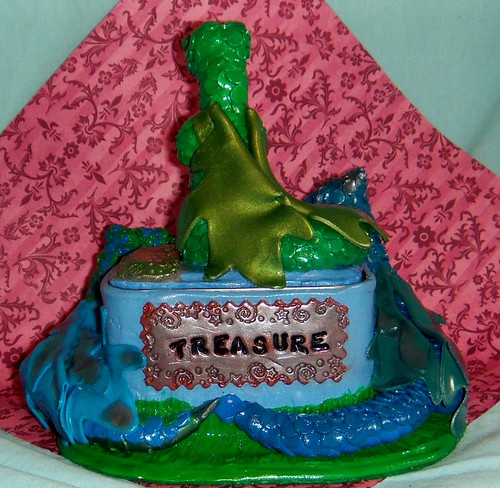
On the back I added a plaque with the word "treasure" stamped on it.  All of Morgan's extra special treasures will be well protected by this family of dragons!  I only wish I could be with him when he opened it up.  Unfortunately Monica and her family live out of state, and I don't get to see them nearly as often as I'd like.  Special gifts like these bring them a little closer though, and they'll always be able to look the gifts I've made them and think of me.  I hope all the love I put into this comes through every time Morgan looks at this special treasure box!  Thanks for coming along on another creative journey!
-Michelle of CreativeCritters

Sunday, March 13, 2011

Work on Morgan's Dragon Trinket Box continues

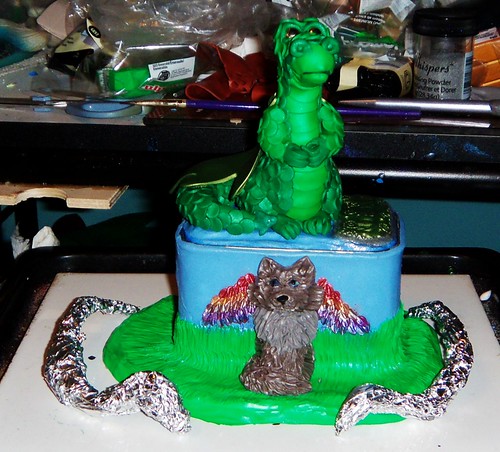
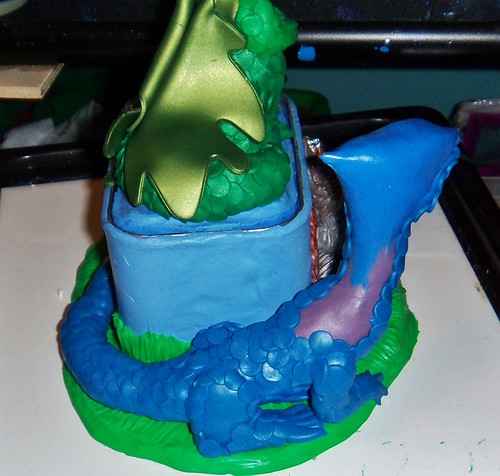
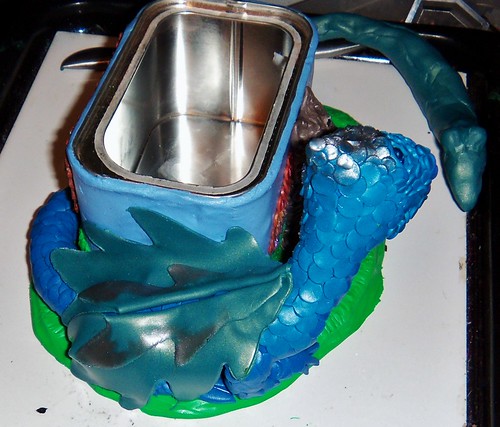
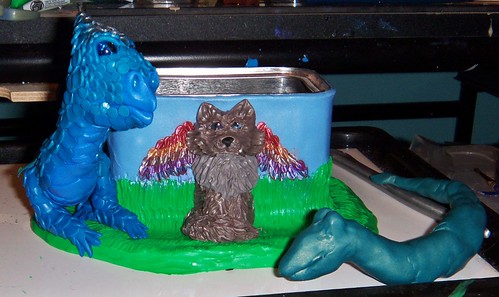
Morgan is my best friend's son, and he has a birthday coming up this month.  I've been sculpting a very special polymer clay Dragon Trinket Box for him since he loves dragons.  Father dragon is complete, and I decided to add a Dragon Kitty to the box next.  That's what Morgan calls Calcifer: "Aunt Michelle's Dragon Kitty".  So I thought the Dragon Family should be visiting with their friend and neighbor, Dragon Kitty.  I gave him iridescent wings and fluffy gray fur.  I think Calcifer would approve of these wings ;-)
 
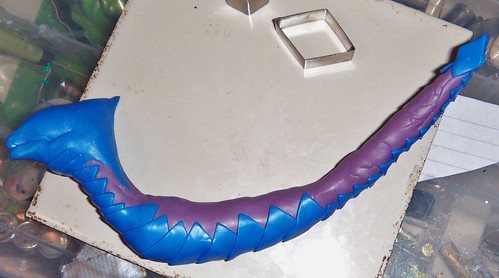
Next I started sculpting the Mother Dragon.  I chose to make her in shades of blue.  I covered the foil armature with scrap clay, then began adding the underbody plates, which I cut out with a diamond shaped clay cutter.
 
Then I started adding blue scales.  I sculpted the legs, covered them with scales, then attached them to the body, adding more scales to help secure them.  I didn't use any wire armatures for the legs because they'll be firmly attached to the base, and have little chance of breaking.
 
Once I covered her body and head in scales I added wings, which I made sure to press close to the body and box.  This lessens the chance of them breaking.  I also used blue glass beads for her eyes and highlighted her wings and head with silver Pearl Ex powder. 
 
You can see that I've started covering the baby dragon's armature in clay.  But we'll save his construction for another day.  So far I'm very happy with the progress of this piece.  I think Morgan will really like it too.  Stay tuned to see how this project turns out!
-Michelle of CreativeCritters

Monday, March 7, 2011

Work in progress- a Dragon trinket box for Morgan

My best friend's son, Morgan, has a birthday coming up in a few weeks and I've started making him his own dragon trinket box.  The last time they were here he saw the one I have for sale in my shop and just loved it.
OOAK Polymer Clay Trinket Box with Three Fantasy Dragon Sculptures 
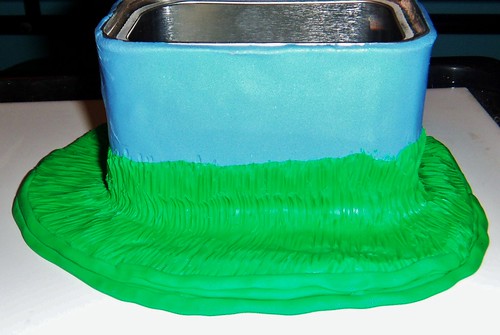
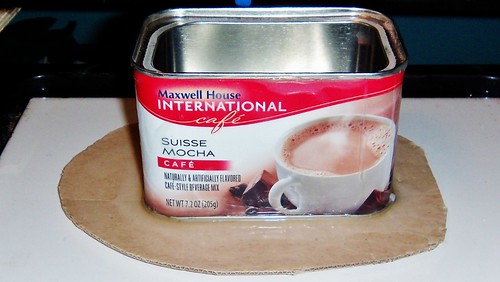
This one's a bit delicate for a child, but I think Morgan will like the one I'm making him.  Like most of my trinket boxes, this one started out with a metal coffee tin, which I covered in Tacky glue (that helps the polymer clay adhere to the metal box).  For this one I added a cardboard base, also covered in glue. 
Then I covered the tin in blue clay and the base in green clay, which I textured to look like grass.
 
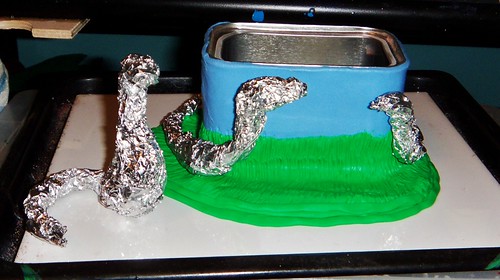
Next I made foil armatures for each of the three dragons.  By using a foil armature I can create a stronger sculpture and use less clay. 
 
The one on the left will be the father dragon, and he'll be on the lid.  The middle one will be the mother, and the one on the right will be the baby.  For the lid I cut 2 rectangles from sheets of clay, sandwiching a wire between the layers and leaving about 2" of wire sticking up in the middle of the lid.  I pierced the dragon armature and used liquid polymer clay on the wire and in the hole to secure him to the lid. 
Here's Daddy Dragon after being attached to the lid.  I cut out each of his scales individually.  Here you can see how he looks before he has all his scales on. 
I'm giving these dragons more of a cute look, since they're for a child.  And I'm making them in shades of blue and green, because Morgan said that good dragons are blue and green, and mean dragons are red (wouldn't want to give him a trinket box with mean dragons on it!).  Stay tuned to see how this one turns out!
-Michelle of CreativeCritters

Tuesday, January 18, 2011

Been smooshing some clay

Lately I've been doing a lot of sculpting and have been inspired by Boris and Dinko Tilov.  I've created several fun pieces, and have really been in a good creative groove.  The Dragons I sculpted for Mother for Christmas were made with guidance from the Tilov's book Sculpting Mythical Creatures in Polymer Clay.  The projects in this book are so much fun, and the possibilities for variations are limitless.

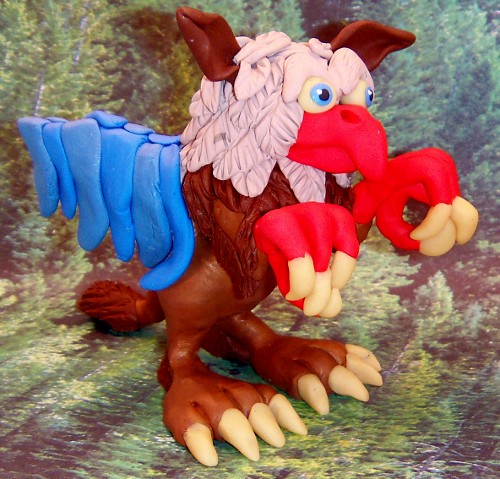
My Griffin sculpture was created as an entry in the Polymer Clay Smooshers guild Mythology Challenge.  This was another whimsical project from the same book.  He was also the first griffin I've sculpted, but certainly not the  last!  I like the way he came out.  I think he's got a lot of character!

My best friend's birthday is coming up, so I sculpted a lighted Mushroom Gnome house for her.  I included a funny gnome based on Tilov's gnomes.  I've sculpted several lighted houses, but this was the first lighted mushroom house in my repertoire.  Right now I'm putting the finishing touches on another lighted mushroom house.  The first turned out so well, I just had to make another.  This one will have a gnome and a halfling sharing his garden vegetables.  That would represent my longing to get back out in the garden- LOL!  My next sculpture will be another project from Tilov's book.  I'm sure I'll create several versions of just about all of the projects in this book.  They're so much fun to create, and while I'm sculpting the story of the piece plays itself out in my mind.
So that's what I've been up to lately. ;)
-Michelle of CreativeCritters

Friday, December 31, 2010

Christmas Dragons for Mother

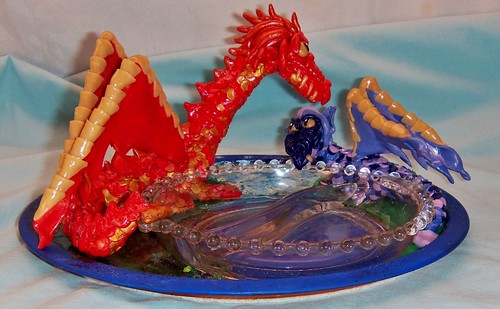
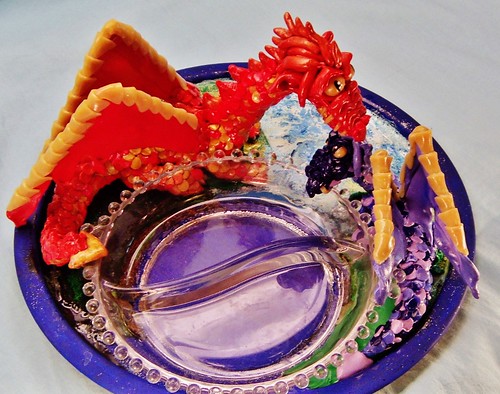
I had a lot of fun creating Mother's Christmas gift this year.  I had been thinking about something with dragons for her for quite a while, but the entire thing didn't totally come to me until I was about halfway through sculpting.  My mother is pretty cool, you see.  She likes things like dragons, wizards, World of Warcraft, and all sorts of other fun stuff.  I love making gifts for her because we have so many of the same interests.  So much of who I am comes from my mother.  The creativity that runs through me, runs through her as well.  We often think along the same lines, so I was pretty sure she'd like this dragon candy dish.  There's a heavy dose of whimsy added to this piece! 

It took a while for the entire piece to come to together, but once I figured out what to use for a base (a metal plate with a lip which I painted)  the whole thing really started coming together.  At first I was just going to make one dragon, but once the red dragon was almost complete, I decided she needed some company.

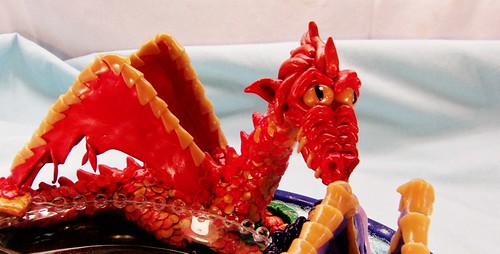
The symbolism (Mother and Daughter dragons) came into play after I started making the smaller dragon.   While I was making and placing the dragons I was thinking of how I've always looked up to Mother, and how important she is in my life.  Of course I couldn't get too sappy, because that's just not the way Mother is- LOL!  And that's where the whimsy comes in.  Mother has a wonderfully warped sense of humor, and I knew she'd appreciate the large glow in the dark eyes and fangs.
These dragons were inspired by Dinko and Boris Tilov's dragons in Sculpting Mythical Creatures.  Of course I've been creating dragons with individual scales like these for quite a few years.  I do like their faces though- this was a different approach than usual.  And the wings are different than my usual dragon wings, but I really like this version.  I added glow in the dark plates along the wings just for fun.  Mother really liked it, and I can guarantee that it's a one of a kind piece.  I do plan on adding more dragons to CreativeCritters in 2011, and I'll be employing some of the new techniques I've learned.
I wish all my friends, family, fans, and supporters a Happy and Healthy New Year! :)

Friday, October 15, 2010

My newest fantasy sculpture

Dragon Fairy OOAK sculpture

My one of a kind Dragon Fairy sculpture is the latest polymer clay addition to CreativeCritters.  A lot of emotion (and time and effort) went into this sculpture. I really put my soul into this piece.  I love sculpting dragons, and I've been quite inspired by Halloween lately, so that set the tone of the sculpture.  When choosing the clay colors I wanted for this project, I was thinking of Halloween colors- red, black, and purple.  One of the things I wanted to get across is that the fairy is NOT human.  That's one of the reasons I chose to make her green and made sure her pointed ears showed through her black, purple, and red hair.  Of course the large dragon wings growing from her back make it pretty clear that she's not human as well.  And another small, but surprisingly effective, touch was to give her simple reptilian eyes with elliptical black pupils.  Once I painted her facial features she really came to life.  I also wanted to express the intense bond between the fairy and her dragon.  They will be together their whole lives (100's of years) and are completely devoted to one another.  When the baby dragon is old enough they'll soar through the skies together surveying their vast territory.  Another inspiration for this piece was my kitten Calcifer.  I feel that devotion from him, and this is the exact position he likes to cuddle in.  He even buries his face in my hair, just like the blue eyed dragon.  I do believe there's a bit of fairy magic in this sculpture, and my muse worked overtime providing ideas and inspiration for this one!OOAK Red Purple and Black Dragon Fairy Polymer Clay Fantasy Sculpture

OOAK Red Purple and Black Dragon Fairy Polymer Clay Fantasy Sculpture
If you click on the pictures they'll take you directly to the listing.  Thanks so much for sharing the creativity!
-Michelle of CreativeCritters
Monday, September 13, 2010

The Whimsical Fantasy World of CreativeCritters

These are a few of my fun fantasy creations, everything from polymer clay and plush dragons, World of Warcraft plush Taurens and Murlocs, trinket boxes, to miniature houses with lights, and more delightful handmade creations. If you've got a fantasy lover on your Christmas list, CreativeCritters is the place to shop!