
I continue to work on my polymer clay flower garden, and have added tulips and hyacinths to the other flowers. I believe the type of tulips Gramma had were called Rembrandt tulips. They had streaks and swirls of different colors on their petals. I sculpted several tulips in shades of purple and red, as well as shades of red and yellow. Gramma loved a big bouquet of multi-colored tulips in the house!
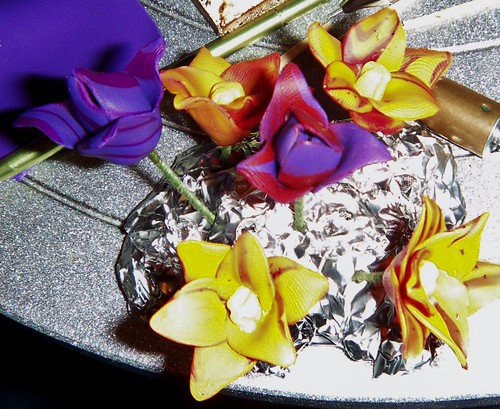
The tulips have been sculpted around pre-baked centers and are ready to go into the oven.

And here you can see them "planted" in the garden with the addition of their leaves. You'll also notice that the bunny is now hidden. You can still see him, you just have to look a little harder, which is the way I want it. This garden is meant to draw you in and make you want to stay a while.
I studied hyacinths very closely and eventually figured out how to create them on this very small scale. I just love hyacinths- they smell divine! Gramma loved their fragrance too, and I made sure to plant plenty of them right next to the front door. She liked to stand there in the door and just enjoy their perfume. For my miniature versions I used a toothpick as a support. I cut out tiny flower shapes, refined them by hand, and carefully attached them to the stem. I kept the toothpick long enough to hold with a clamp, which made it much easier to work with and avoid distorting any of the tiny flowers.
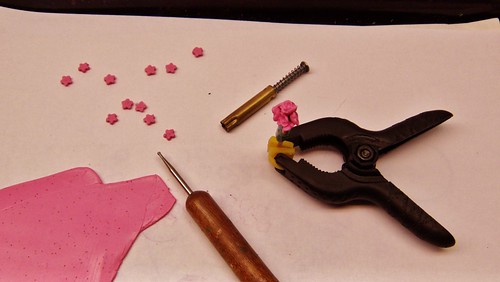
I used a ball tipped stylus to shape the flowers. I covered the toothpick in green clay, giving the flowers something to hold on to. And here you can see the blue, pink, and white hyacinths ready to be baked. It took an hour to make just two hyacinths, but they look just perfect! I will take the time to create just the look I want. The end result is totally worth the effort! I baked most of the flowers for this piece before adding them to the garden. It's much easier to avoid damaging the delicate petals if they're baked before I handle them. Of course it still requires a light touch!
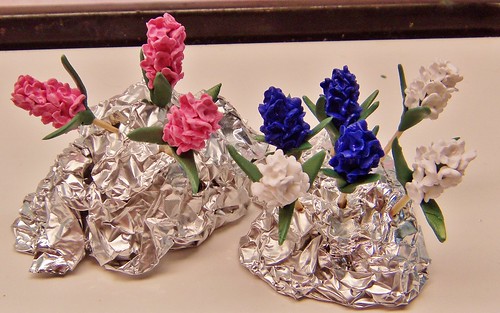
The leaves were added to these before baking. This way I can push them into the unbaked clay of the base and they'll have a more solid base of support. I'll cut the toothpicks near the base before I set them into the clay. They look incredibly delicate, but with that toothpick in the center they have a very strong support and I'll be able to handle them without too much worry. Stay tuned to see the final results of my pretty polymer clay flower garden! Thanks for visiting!
-Michelle of CreativeCritters
The tulips have been sculpted around pre-baked centers and are ready to go into the oven.
And here you can see them "planted" in the garden with the addition of their leaves. You'll also notice that the bunny is now hidden. You can still see him, you just have to look a little harder, which is the way I want it. This garden is meant to draw you in and make you want to stay a while.
I studied hyacinths very closely and eventually figured out how to create them on this very small scale. I just love hyacinths- they smell divine! Gramma loved their fragrance too, and I made sure to plant plenty of them right next to the front door. She liked to stand there in the door and just enjoy their perfume. For my miniature versions I used a toothpick as a support. I cut out tiny flower shapes, refined them by hand, and carefully attached them to the stem. I kept the toothpick long enough to hold with a clamp, which made it much easier to work with and avoid distorting any of the tiny flowers.
I used a ball tipped stylus to shape the flowers. I covered the toothpick in green clay, giving the flowers something to hold on to. And here you can see the blue, pink, and white hyacinths ready to be baked. It took an hour to make just two hyacinths, but they look just perfect! I will take the time to create just the look I want. The end result is totally worth the effort! I baked most of the flowers for this piece before adding them to the garden. It's much easier to avoid damaging the delicate petals if they're baked before I handle them. Of course it still requires a light touch!
The leaves were added to these before baking. This way I can push them into the unbaked clay of the base and they'll have a more solid base of support. I'll cut the toothpicks near the base before I set them into the clay. They look incredibly delicate, but with that toothpick in the center they have a very strong support and I'll be able to handle them without too much worry. Stay tuned to see the final results of my pretty polymer clay flower garden! Thanks for visiting!
-Michelle of CreativeCritters


No comments:
Post a Comment